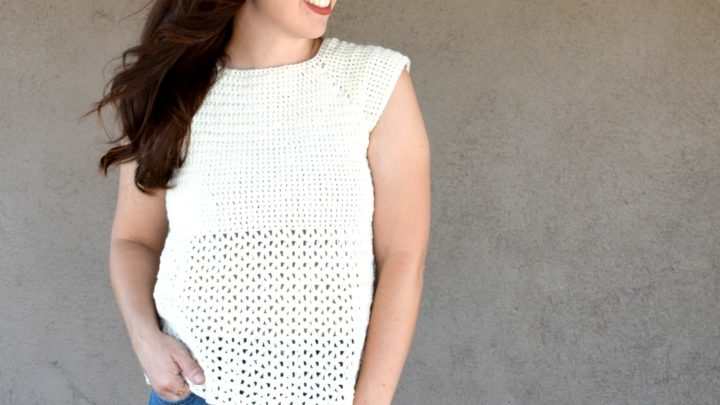
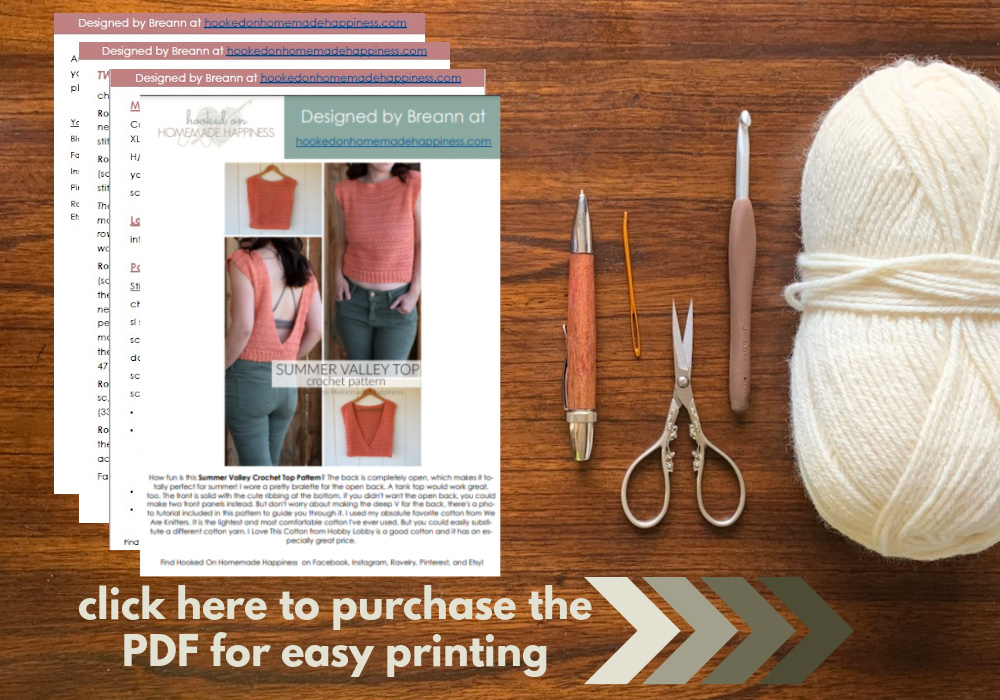
Summer Valley Crochet Top Pattern
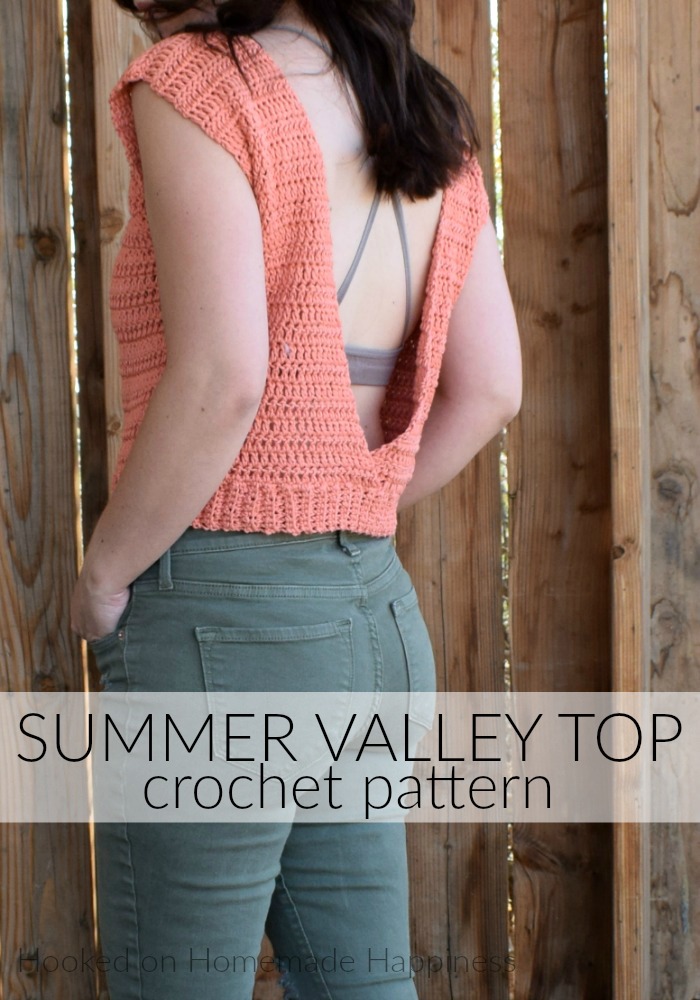
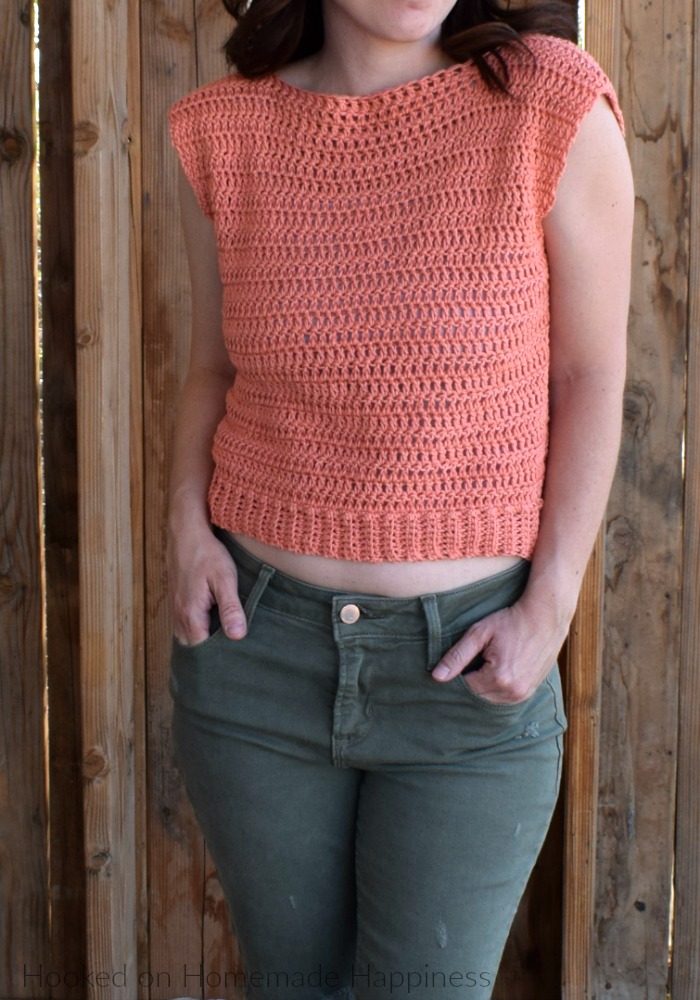
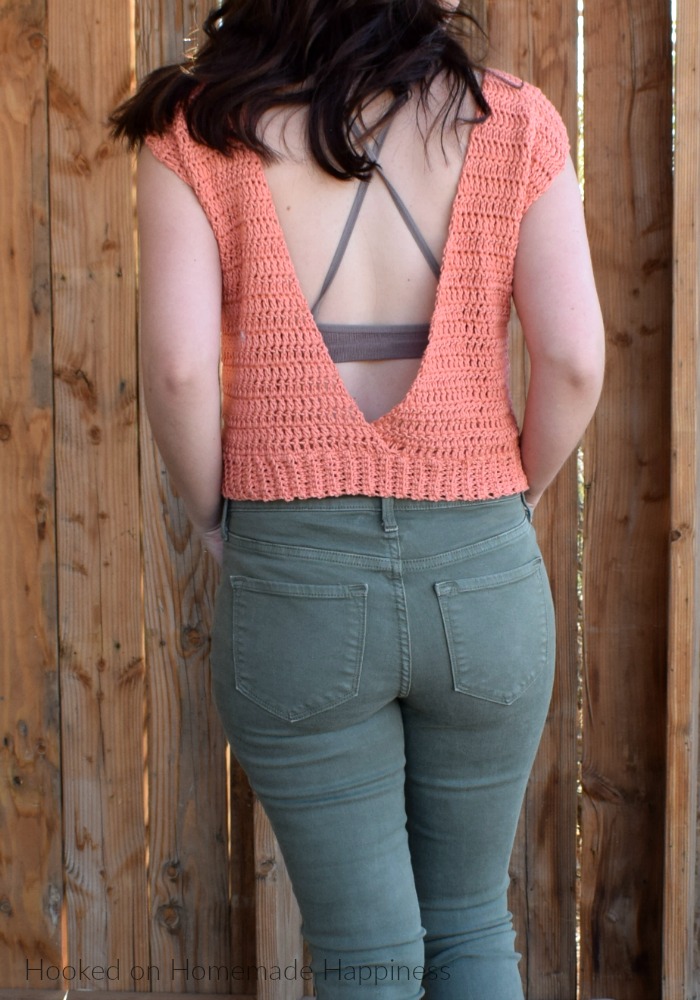
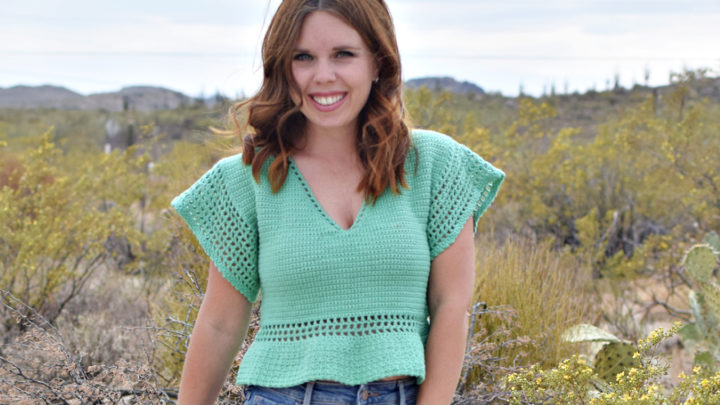
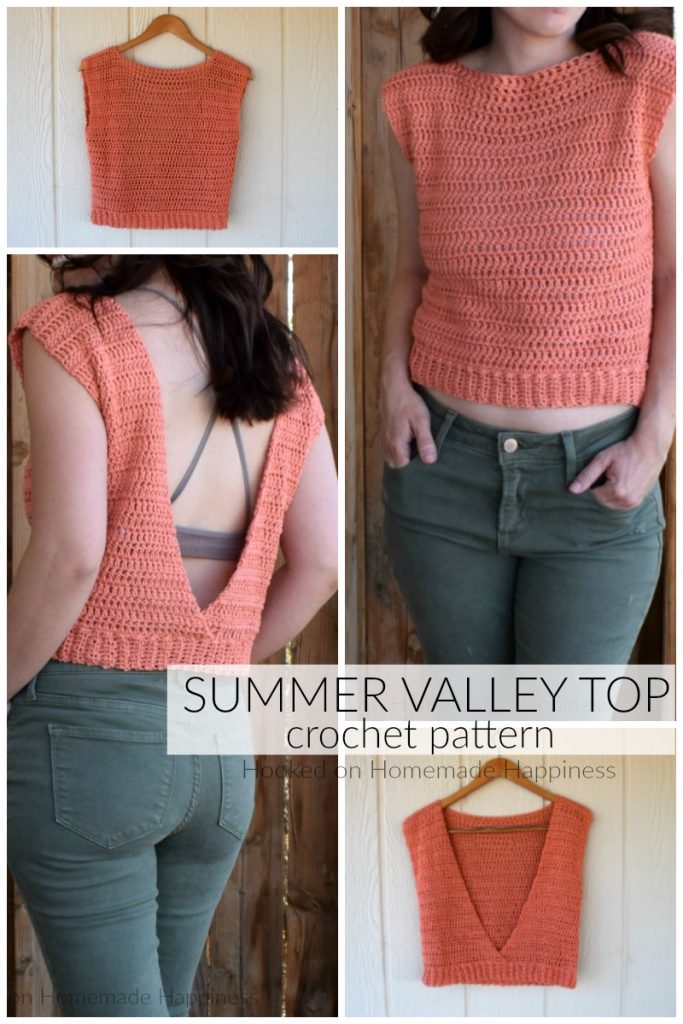
Get ready to crochet your new favorite summer staple—the Summer Valley Crochet Top! This lightweight and breezy design is perfect for warm weather, with an easy fit and effortless style. The standout feature of this top is the deep V back, adding a modern, flattering twist to a simple silhouette. Whether you wear it over a swimsuit or pair it with your favorite shorts, this pattern is perfect for sunny days and laid-back vibes.
Choosing Your Yarn
I used my absolute favorite cotton from We Are Knitters. It is the lightest and most comfortable cotton I’ve ever used. We Are Knitters Pima Cotton is a smooth, soft, and breathable yarn that’s perfect for warm-weather projects. Made from 100% Peruvian Pima cotton, it has a beautiful drape and a slight sheen that gives garments a polished look. It’s gentle on the skin and works up beautifully for summer tops, accessories, and lightweight layers. But you could easily substitute a different cotton yarn. I Love This Cotton from Hobby Lobby is another lightweight, comfortable cotton that has an especially great price.
Making the Top
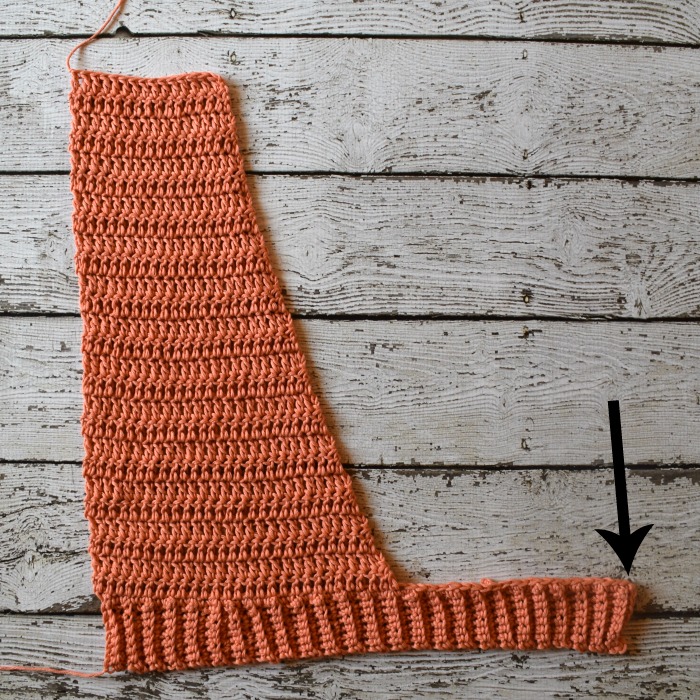
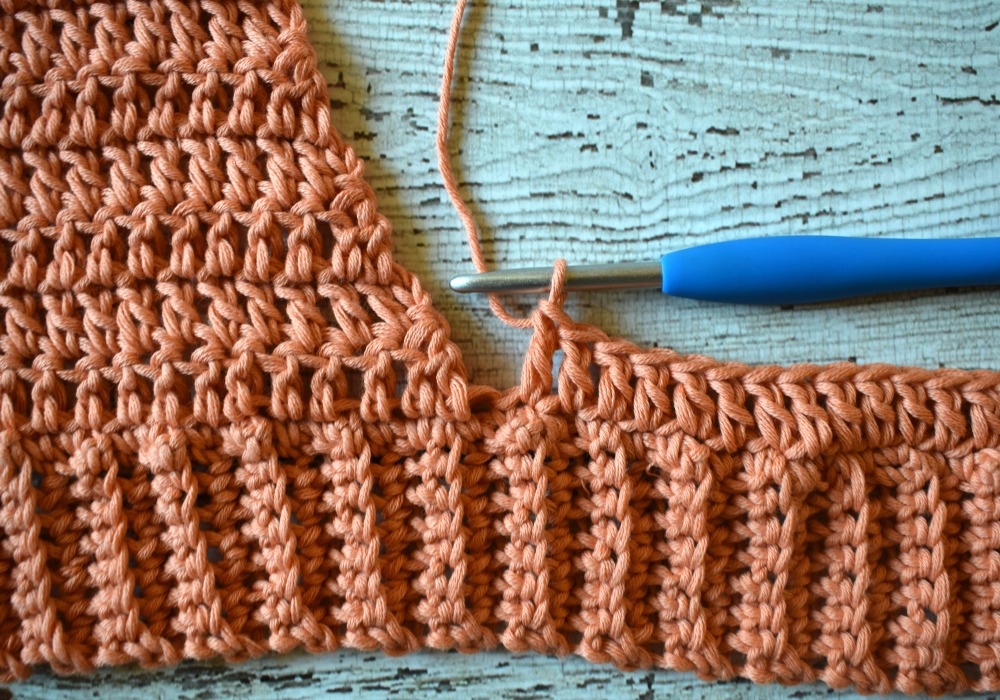
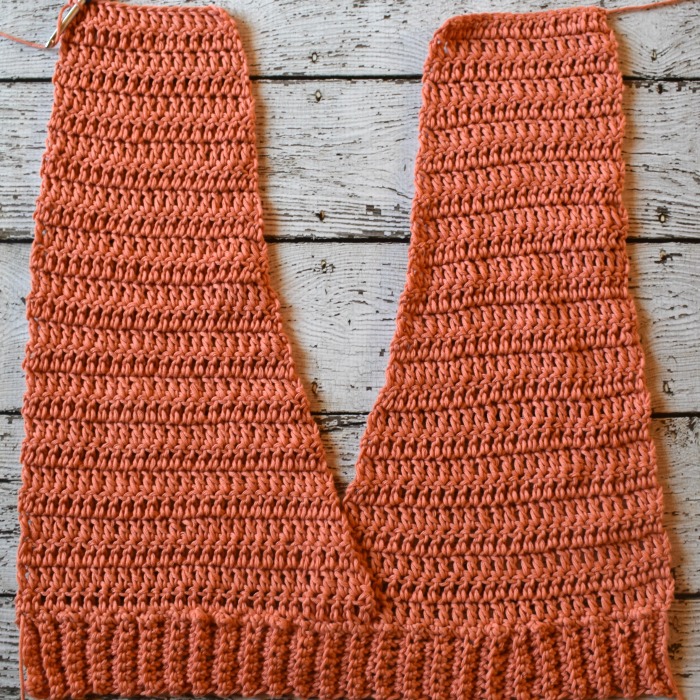
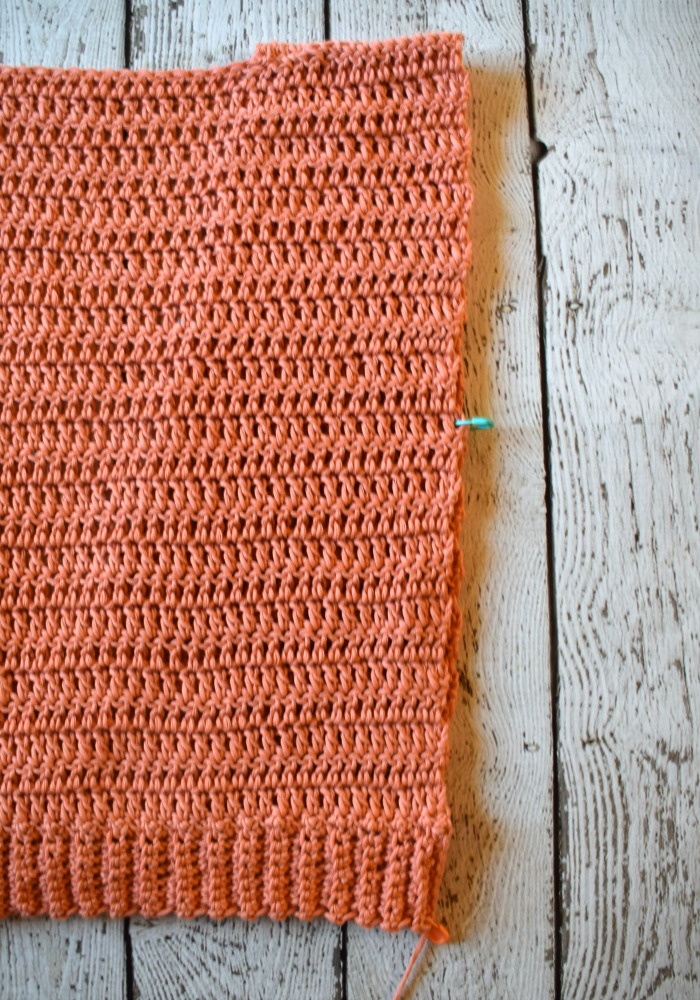
The construction of the Summer Valley Top is simple and beginner-friendly, with a stylish twist. Both the front and back panels begin with a foundation of ribbing worked along the bottom edge for a comfortable, stretchy fit. The front panel is a solid rectangle made entirely with double crochet stitches, keeping things classic and easy to follow. The back panel features a striking deep V design, creating an open-back look that’s perfect for summer. A step-by-step photo tutorial is included in the pattern to guide you through shaping the V, making it approachable even if you’re new to garment shaping.

click here to pin for later >>>
Summer Valley Top Crochet Pattern
Get the full pattern below or purchase the ad-free, printable PDF in my Ravelry Shop!
PIN for later HERE
Add to your Ravelry Queue HERE
Materials
200g cotton worsted weight yarn (I used 2 balls of We Are Knitters Pima Cotton in Salmon Pink)
5.0 mm hook
Scissors
Yarn needle
Level
Easy -you must be very familiar with basic crochet stitches
Pattern notes & stitches to know
Ch – chain
Sc – single crochet
Sc blo – single crochet back loop only
Dc – double crochet
Dc2tog – double crochet 2 together
Approximate Finished Size:
Width: S (32”) M (36”) L (40”) XL (44”)
Length: S (17”) M (19”) L (21”) XL (23”)
Gauge:
12 dc x 7 rows = 4” x 4″
SUMMER VALLEY TOP CROCHET PATTERN
FRONT
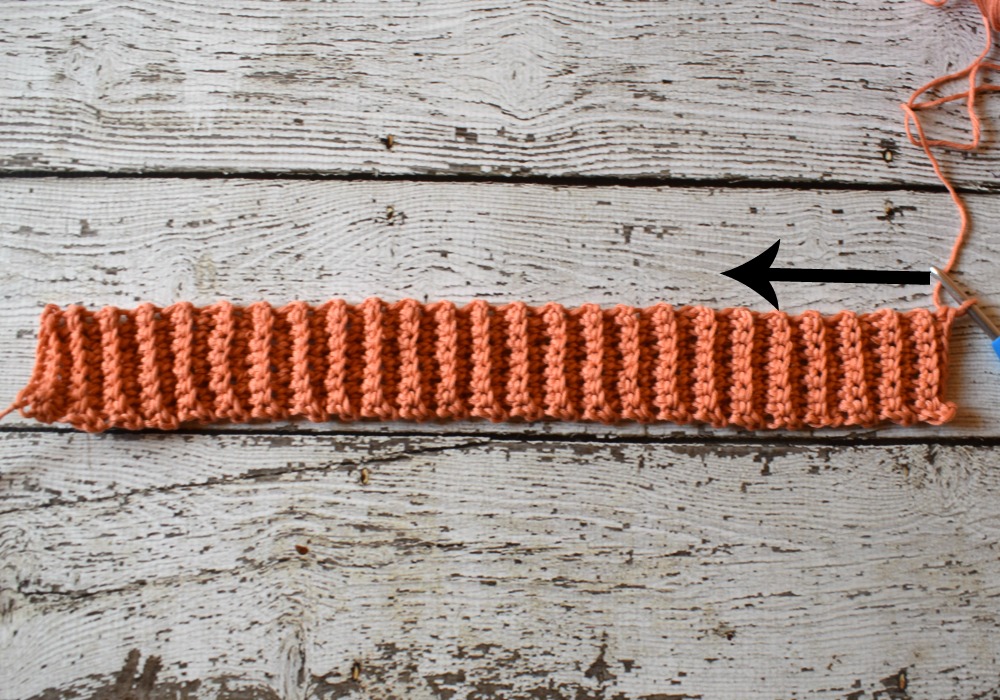
The top starts with the ribbed band along the bottom
Pattern written in S, M noted in ( ), L noted in [ ], XL noted in { }
Ch 9 (leave a long beginning tail for sewing)
Row 1: sc in 2nd ch from the hook and in each ch across (8 sc)
Row 2: ch 1, turn, sc blo in each stitch across (8 sc blo)
Repeat row 2 to row 50, (56), [62], {68}
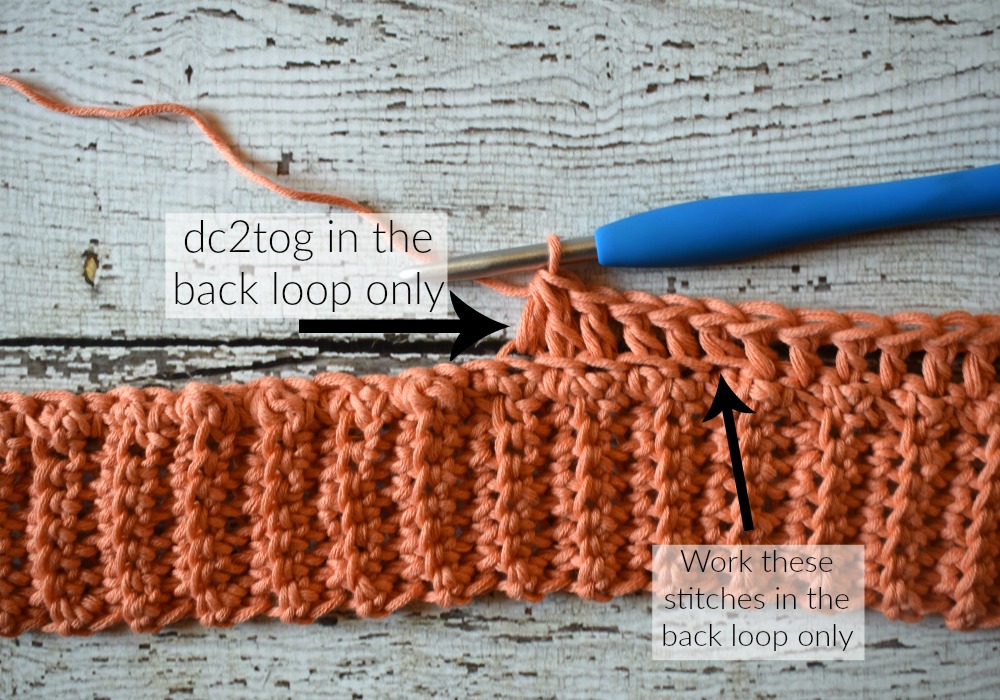
Now you will turn and work across the edge of the ribbed band
Row 1: ch 1, turn, sc evenly across working one sc in the end of each row (50 sc, (56 sc), [62 sc] {68 sc})
Row 2: ch 2, turn, dc in each stitch across (50 dc, (56 dc), [62 dc] {68 dc})
Repeat row 2 to row 27, (30), [33], {36}
Fasten off, leave the ends for sewing
BACK
Ch 9 (leave a long beginning tail for sewing)
Row 1: sc in 2nd ch from the hook and in each ch across (8 sc)
Row 2: ch 1, turn, sc blo in each stitch across (8 dc blo)
Repeat row 2 to row 50, (56), [62], {68}
Now you will turn and work across the edge of the ribbed band
Row 1: ch 1, turn, sc evenly across working one sc in the end of each row (50 sc, (56 sc), [62 sc] {68 sc})
In the next row you will start the “v” shape and only go a little over halfway across. The last stitch of the row is the dc2tog blo (you only do this stitch once).
Row 2: ch 2, turn, dc in next 22 (25) [28] {31} stitches, dc blo in next 4 stitches, dc2tog blo (27 dc, (30 dc), [33 dc], {36 dc}
Row 3: ch 2, turn, dc in each stitch across (27 dc, (30 dc), [33 dc], {36 dc}
Row 4: ch 2, turn, dc in each stitch to the last 2, dc2tog (26 dc, (29 dc), [32 dc], {35 dc}
Repeat rows 3 & 4 to row 22, (24), [28], {30}
Row 23 (25) [29] {31}: ch 2, turn, dc in each stitch across (17 dc, (19 dc), [20 dc], {22 dc})
Repeat previous row to row 27, (30), [32], {36}
Fasten off, leave a long tail for sewing
Join yarn on the opposite corner of row 1
Row 2: ch 2, dc in next 22 (25) [28] {31} stitches, dc blo in next 4 stitches, dc2tog blo (27 dc, (30 dc), [33 dc], {36 dc}

Row 3: ch 2, turn, dc in each stitch across (27 dc, (30 dc), [33 dc], {36 dc}
Row 4: ch 2, turn, dc in each stitch to the last 2, dc2tog (26 dc, (29 dc), [32 dc], {35 dc}
Repeat rows 3 & 4 to row 22, (24), [28], {30}
Row 23 (25) [29] {31}: ch 2, turn, dc in each stitch across (17 dc, (19 dc), [20 dc], {22 dc})
Repeat previous row to row 27, (30), [32], {36}
Fasten off, leave a long tail for sewing
Lay both pieces on top of each other. Using the long tail, sew the shoulders closed with a whip stitch.
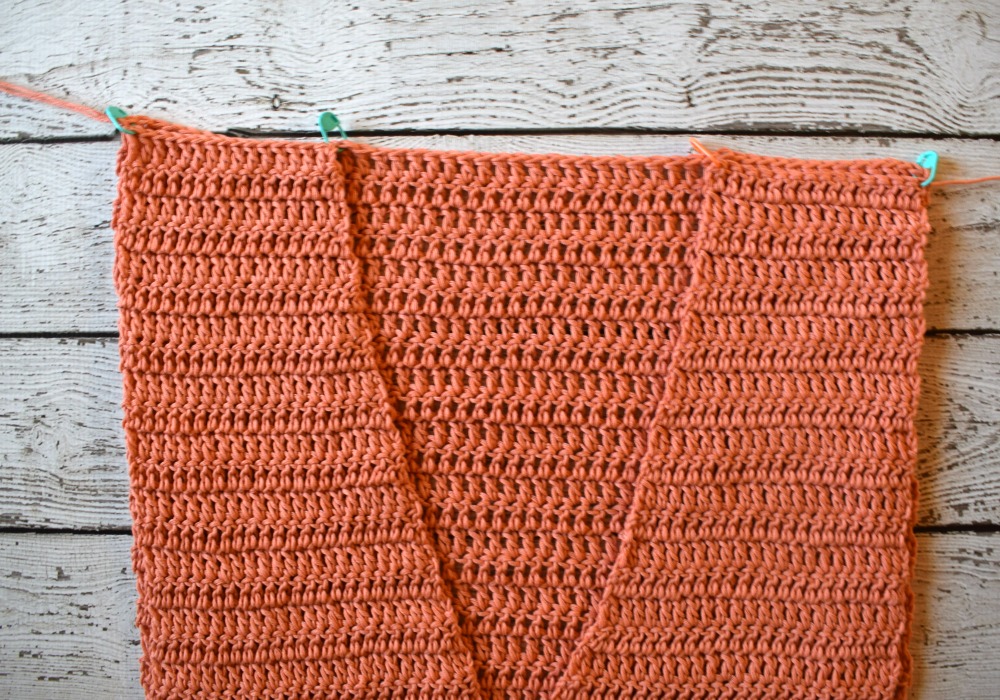
Then mark where you want the armholes to be and sew the sides closed with a whip stitch. Weave in all your ends and turn right side out
And you’re done! I hope you love this top!
Looking for more patterns? Follow me on Facebook, Instagram, and Pinterest! Please share a pic of your finished product with me. I’d love to see it!


Hi Breann! 🙂 Awesome pattern. I can also imagine wearing it the other way around 🙂 This is definitely on my to-do-list. Thanks
Hermoso patrón , me encantó espero poder sacarlo porque Sony principiante y me cuesta leer patrones. Saludos y bendiciones.
Hi Breann!
I love this top and started working on this pattern on Large. Already finished the front but having a problem with the back. So Row 3 is 33 dc and Row 4 is 32 dc (with the dc2tog). Then repeat 3 & 4 up to row 28, my 1st question in here is would it be an alternate row of 33 and 32 dc up to row 28? Next question is row 29 to 33, how many dc? is it 20 dc. I keep frogging coz I don’t see the shape going like the picture. HELP!
Hi ? every other row should have a dc2tog which will make the stitch count decrease by 1 every other row. Hope this helps!
On the start of the Back this part isnt coming out correctly at all …….
Row 2: ch 2, turn, dc in next 22 (25) [28] {31} stitches, dc blo in next 4 stitches, dc2tog blo (27 dc, (30 dc), [33 dc], {36 dc}
I’m working the medium size and going from 56dc to 30dc isn’t happening. I’ve frogged it multiple times.
Hi! How many stitches are you getting? You shouldn’t be going across the entire row, but turning a little over halfway.
i think it was 43…. I went to the end of the row because it doesn’t say to do otherwise.
omg i just realized i was glossing over the pattern when i read it , it makes sense now.
Ok, good 🙂
Hi! Love the top!
you mention using the prima cotton from WAK, on their website it is stated as sport or DK weight when you mention worsted, which is heavier. Can you please clarify if this was completed in DK or if it can be done using DK yarn? I have 2 skeins ok DK that I would love to use for this 🙂 thanks!!
Hi! Huh. When I ordered it was worsted weight and Ravelry lists it as worsted weight also. Maybe they changed the size? It was a very light worsted, so DK will probably work for you 🙂
Hi,
Quick question about this:
Repeat rows 3 & 4 to row 22, (24), [28], {30}
Row 23 (26) [29] {32}: ch 2, turn, dc in each stitch across (17 dc, (19 dc), [20 dc], {22 dc})
I am doing XL so I repeat rows 3 &4 to row 30 . Then it says row 32. What happened to row 31/
Thanks,
april
Oops! Typo! I just fixed it, sorry about that!
No worries. This is a nice pattern.
April
Love this. Thank you.
I’m making sleeves on mine to 😊
Hi my name is Latricia can you tell me how to make this top in a 2x and 3x please?
Breane, this pattern is the easy as you stipulate, although I do like a stitch chart.
I do not understand the difficulty some are having, I am a novice, there was some wording issue’s I had, such as (repeat row 2 to 50) 50 what, rows, inches after a few mins I worked it out by counting the ridges on the ribbing in the photo.
I have chosen a blush colour with a sparkle blush fleck it is looking beautiful so far just about to start on the back, hope I have not got to big for my boots, proud of what I have done so far will get back to youxxxxx
Hi! The ribbing is to row 50 🙂
I got it!!!!! working with the pattern doing the small size, the ribbing 25 ridges two rows to each ridge equals 50, then 50 sc stitches into the ribbing to grow the back piece also going into the first stitch being the one closest to the chain , in which slightly widens the garment as one works up towards the chest. For all of you novices like me, great project for this time of year, this project is like a good book I cannot put it down finished the back in a few hrs let you know how I am getting on, doing this for my daughters holiday to Mexico next month…..xxxBreane
Awesome!!
I love this top!
Do you think it could be made into a dress if I crochet a skirt to the bottom of the rib?
I think that’s a neat idea!
I am confused about the band…row 2 ssys sbo all 8 then it says (8dc blo) so is that double or single crochet,??
Sorry, typo! It’s all single crochet 🙂
I accidentally made this too big and realized too late. I haven’t finished the front and haven’t started the back… so do you think I could possibly remedy this by making the back shorter? Or should I just start over
Hi! Is it too wide or too short? And by how much? When we sew the pieces it will take out some length, too.
I’m still confused on row 2 on the back. I’ve made 62 sc across the ribbing and now working on row 2. Row 2: ch 2, dc in next 22 (25) [28] {31} stitches, dc blo in next 4 stitches, dc2tog blo (27 dc, (30 dc), [33 dc], {36 dc}. After the DC’s and the 4 DC blo, do we chain 2 then do the dc2tog as another row? Bc 33dc+33dc does not equal 62…I’m just a bit confused still or do we go all the way across on row 2?
You turn and move to row 3. The “v” part of the top will overlap on the bottom. If you scroll down there’s a photo of where you will start the other side that should help ?
So do we do the ch 2, the 28 dc (for lg), the 4 db blo, then turn to do another row for the dc2tog and start row 3?
After row 2 (you have 33 dc), ch 2, turn, dc in each stitch across. You are only making one half of the back at a time. The other half of the back is worked separately. Finish one half of the back, then you’ll rejoin your yarn and make the other half.
Where does the dc2tog come into play then? Do we do for row 2, ch 2, DC 28, 4 DC blo, then stop for row 2? Or do we continue with dc2tog? Or do we ended with the dc2tog? I can see the 33 DC, but then why does it say dc2tog blo for 33? Thanks Im an amateur… Sorry…
That’s ok ? for row 2: 28 dc + 4 dc blo + 1 dc2tog = 33 dc. That’s the end of the row. Just 1 dc2tog. This is what’s going to create the v shape. There’s a photo to show what it should look like.
Then turn and do row 3.
Breanna,
I don’t want the back of my top open I want it enclosed I don’t like my tops to have the back open I want my back closed up. Can you please help,there is no picture like you said that shows this??
Thank you
Antonette Jayne
Hi! You could just make 2 of the front panels 🙂
Okay I think that makes much more sense! Thank you!!!
You’re welcome!
Hello Breann
I love this top!! I’m making it in the Large [62], although I’m having a feeling I could have gotten away with the Medium.
Anyhow, I am starting the front ch2, 62 sc, so I should have a total of 62 stitches PLUS the chain 2 when it comes to the second row? I hope so. I’m on the 4th row.
I am still new to crochet, Ive seen some people say that the chain counts as a stitch, or that it doesn’t. Just wondering.
Hi! The ch 2 does not count as a stitch ?
Hi Breann! I’m doing this in a medium size & as I was working on the back, ROW 2, after I do the 4 dc blo and proceed to do the dc2tog, I do not end up with 30 dc… I’m so confused, help!
Hi! On row 2 you have 25 dc + 4 dc blo + 1 dc2tog blo = 30 ? this is the end of the row. Now you turn and do row 3.
I love this pattern and also love the We Are Knitters cotton skeins :-). What is the specific brand you like from Hobby Lobby? I’d like to find something that is of similar quality to WAK with a smaller price.
Thank you!
It’s called I Love This Cotton! Yarn 🙂
Hi hi.
I’m trying to decide between the small and Medium size to make. What size are you wearing in the picture?
I’m wearing a small. I’m 5’0″ with a 34″ bust. Hope this helps!
Wow! I love this pattern. I must try it!
Thank you!
Hi made the top came out so well.easy to understand instructions.its the first time I’ve tried making an outfit.thk u
Awesome! Thank you!!
Hi. I made this top but I am not getting the neck line proper. I made it with 4 mm hook and length 34 rows and breadth 60 rows.
It is coming above the neck
The neckline should be straight across.
Is the length of front and back same.
Yes
Hello I am unable to locate the salmon pink cotton yarn from the 2 sites you recommended. Can you site another yarn website? thank you Joanne
Hi! You can use any worsted weight yarn 😉 Paintbox has some worsted cotton
I still have a hard time following a pattern. I wish this was in a video. It would totally help me.
Hi! Sorry, I don’t have a video right now. What are you having trouble with?
Hi for some reason on the back panels my decreases are every two rows and it’s getting too small as I go up. I don’t know what I missing
Hi! What row are you on and how many are in each row?
Hi! I am loving this pattern so far. But I am confused about something. I am making the small. On the front, it says:
Row 2: ch 2, turn, dc in each stitch across (50 dc, (56 dc), [62 dc] {68 dc})
Repeat row 2 to row 27, (30), [33], {36}
If I am repeating row 2 all the way across by double crocheting in each stitch, wouldn’t the totals stitches I end up with be 50 dcs, not 30?
I am a beginner, so sorry if the answer to this seems obvious. 😀
That is the row number not the stitch count 🙂
Oh, ok. So I should have 30 total rows of double crochet, but 50 stitches in each row. Is that right? Thank you so much for replying so quickly! I am just so excited to make this.
Yes 🙂
Hello Breann!
I have a simple question for you.
Foor the front, after the ribbed band, you said row 2 DC int each stitch (DC 50) and then repeat row 2 to 27. You mean that we have to do DC in each stitch again to increase (so row 3 may be DC 100) or just do SC to keep the DC50 until the row 27?
Sorry for my poor English, but I really try to finish your top, it’s sooo amazing! ☺️
Hi! It’s 1 dc in each stitch across. There is no increasing 🙂
Hello,
Started working on your pattern. For the ribbed band should it measure 16 inches when the 50 rows are completed? My is only measuring 14 inches.
Hi! The ribbing should be approx the width of the top, yes 🙂 You might crochet tighter than me.
hola me encanto tenes el diagrama gracias
Hi
Thx a lot for the description, I found it really easy to follow.
Thing is: I chose S for width and XL (!) for length and it turned out a crop top that just so reaches my belly button. And I am a short person (160cm).
I used Lana Grossa Cottone and a 4.5 hook. Shouldn´t make so much of a difference?
Anyway it was a first try and I might give it a go again as I enjoy crocheting.
I actually used a different color for the ribbon (dark grey, rest is light grey), looks nice 🙂
Awesome!!
Hi my name is Latricia, can you tell me how to make this top for a 2x and 3x please?
Love this pattern! I want to make a longer version of it. How do I do the back? By adding one more row without the decrease would that work?
Hi! Yes, you can just continue the decreases but you also don’t want to make it too narrow at the top. You could do a few full rows before starting the decreases 🙂
I would like to make this slightly longer so it falls below my belly button. How can I adjust the size small pattern to do that?
Hi Breann
I love this top and I have finished the front and the back, without any problems. However, when I started to put the two pieces together, I noticed the rows are not matching up at the side seams? Should they match up? I couldn’t tell from the pictures if they should line up all the way around the sweater. I keep looking over my work and made sure that I did the back pieces the same pattern as the front. Thought I would check with you before I start ripping the back out to do over again,
Thanks for the feedback!
Tracy
Hi! Are they not matching up height wise or the rows aren’t lining up with each other all the way down the side? I don’t worry about matching each row exactly. I just sew it up as evenly as I can 🙂
HI Breann,
Height wise the front and back match, as well as the number of rows. It is just that the rows are not matching,
Hi! Just finished the top, it was very easy to read your instructions. Thanks a lot!
Anyway, as I try the top I can clearly see that one of the back “straps” kind of opens out and the other goes in… it feels a bit weird and have no idea how to fix it. Any idea?
Hi! Hmm… I wonder if you could add a single crochet border along the inside to help?
Hi! If I wanted to use sport weight (2) with a size 4mm hook, do you know how I would modify the pattern for a size M?
Hi! I would start with a gauge swatch & see how far it is from the pattern