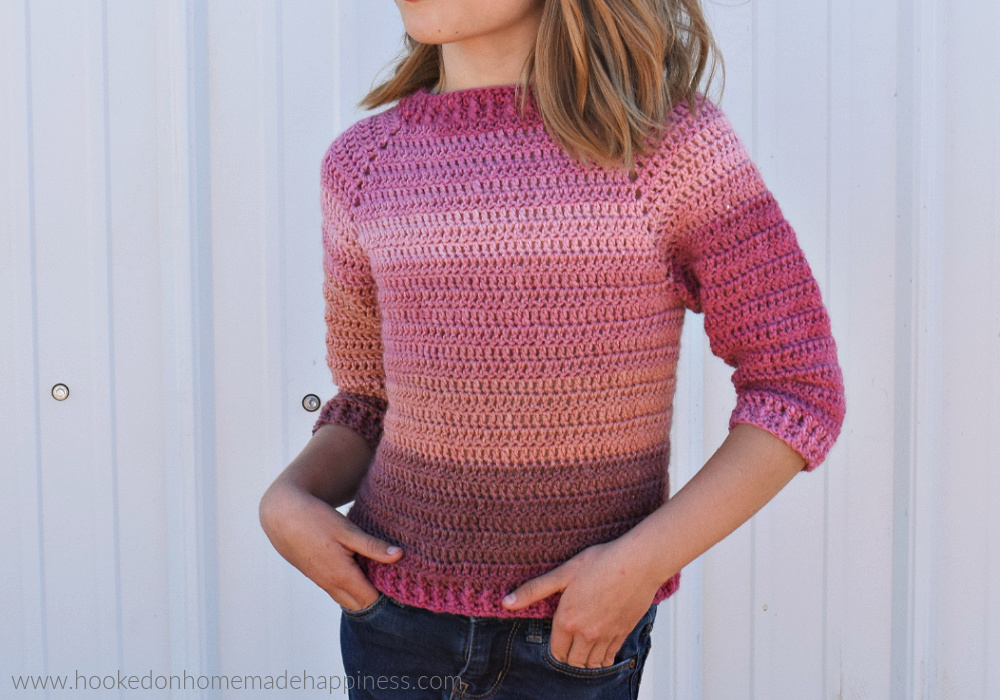
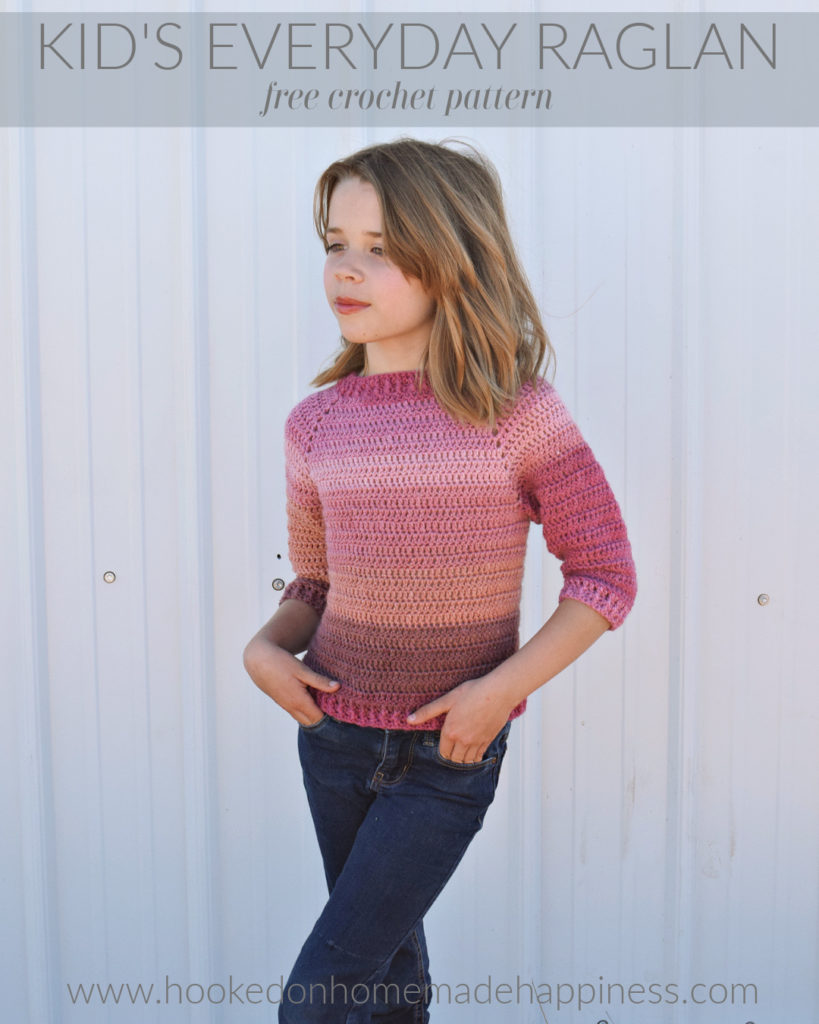
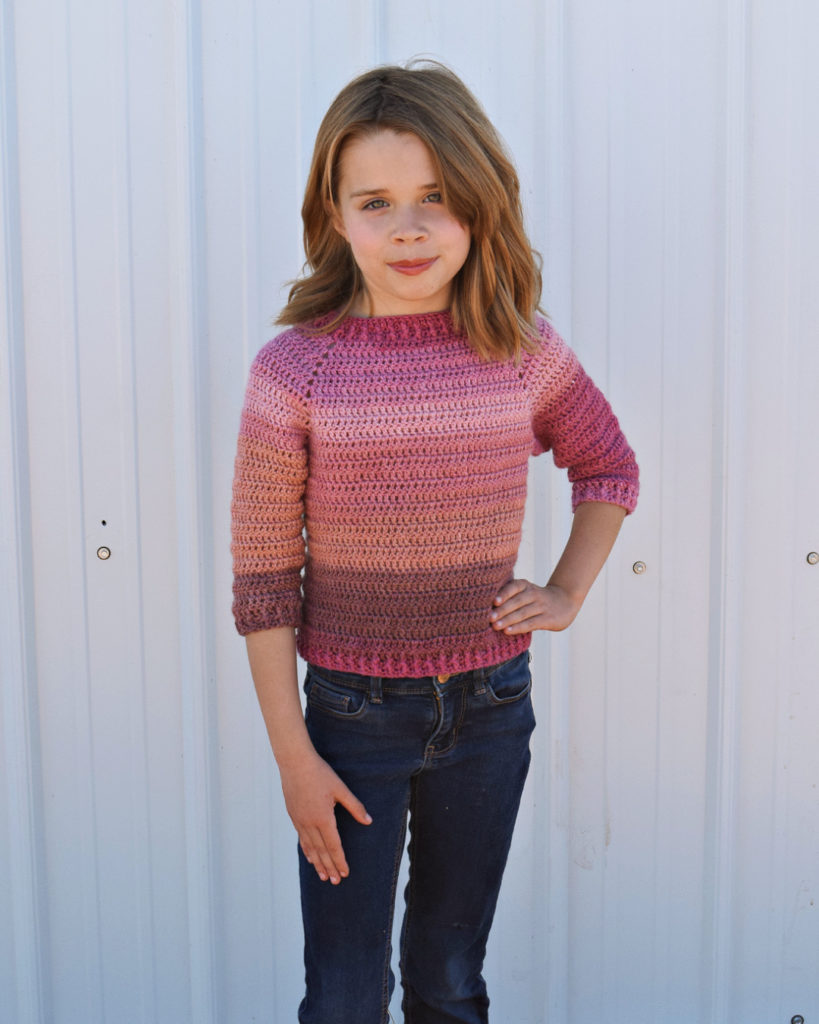
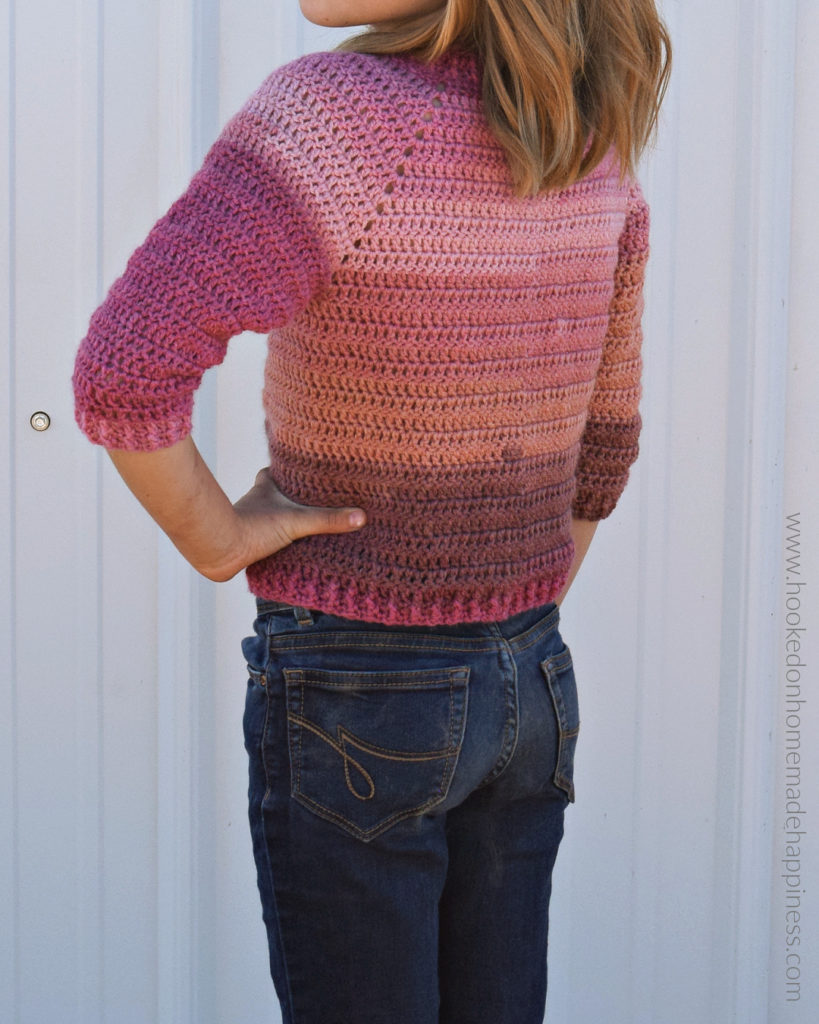
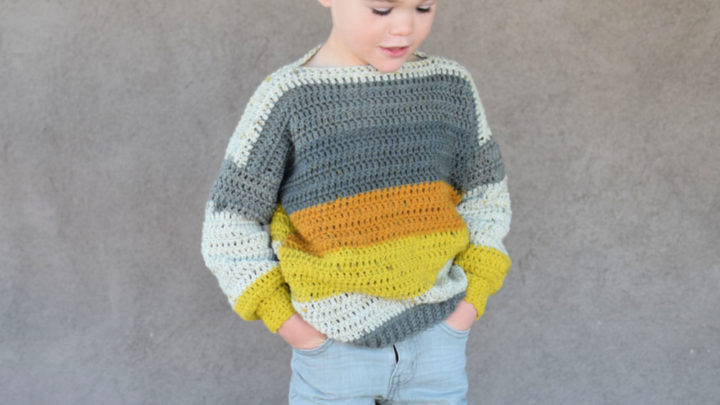
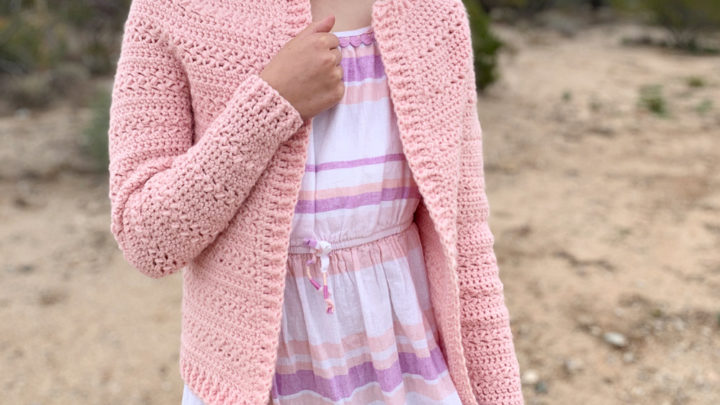
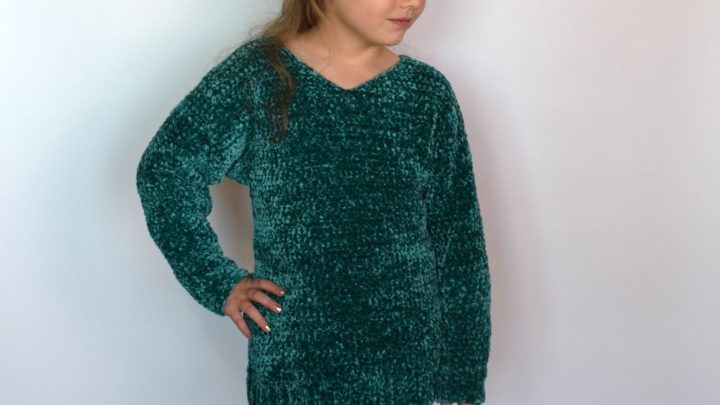
The Kid’s Everyday Raglan Crochet Pattern is an easy, beginner level, top-down sweater! This is easily customizable and could be made for boys and girls. In this article, you will discover a step-by-step guide to creating a trendy and unique crochet sweater without any sewing required. From choosing the right lightweight yarn to mastering the basic stitches, we will take you through the process of making your very own no sew crochet sweater.
Choosing the right lightweight yarn
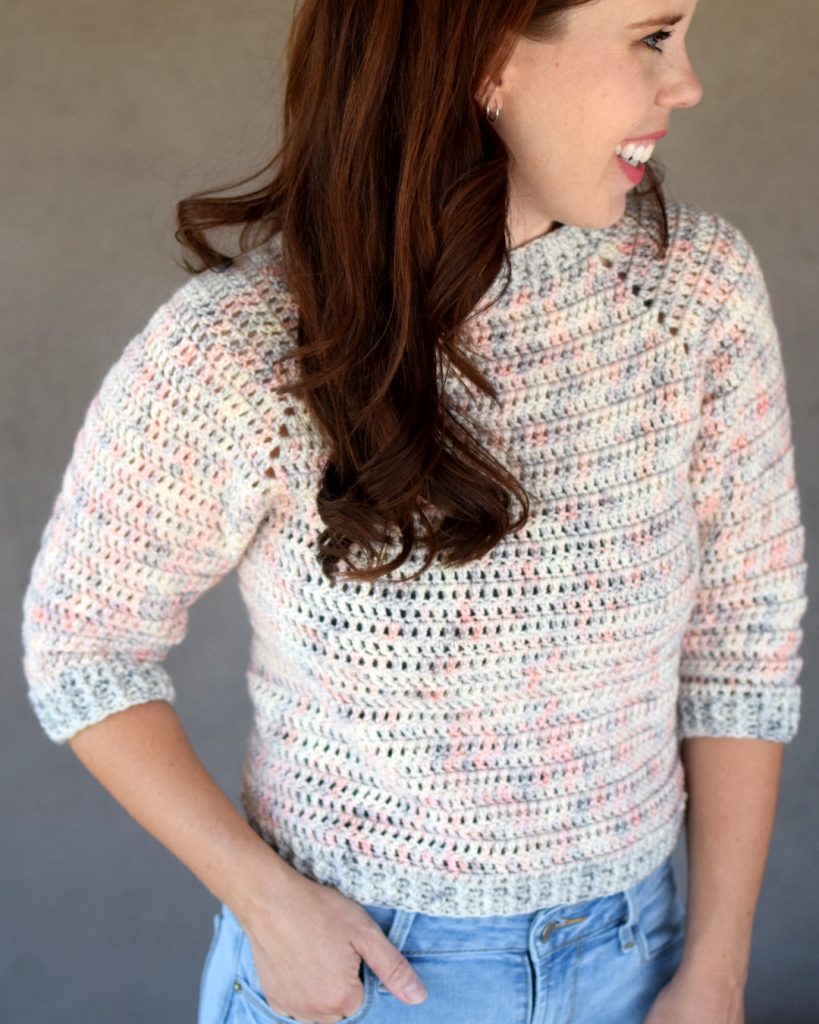
I used 2 Lion Brand Wool-Ease DK Cakes in the color Forever Young. I love the subtle color changes of this yarn. Even when the color changed in the middle of a row, it’s not super noticeable. Any DK weight yarn, wool, acrylic, or cotton, would work for this project.
Mastering the basic stitches
To create a beautiful and functional no sew crochet sweater, you will only need to know basic crochet stitches. The foundation chain, single crochet, double crochet, and slip stitch are some of the fundamental stitches that you’ll need to know to bring your sweater to life.
Finishing touches and customization
This sweater is highly customizable and it’s easy to make it your own! You can easily add some finishing touches and customize your sweater to make it truly unique. If you’d like a longer sweater, simply continue the round repeat until it’s the desired length. Same with the sleeves! I made a 3/4 length sleeve, but it can be either short sleeve or long sleeve. You can also experiment with different colors or even incorporate different stitch patterns for a one-of-a-kind look. Don’t be afraid to let your creativity shine through in this final stage of the process.
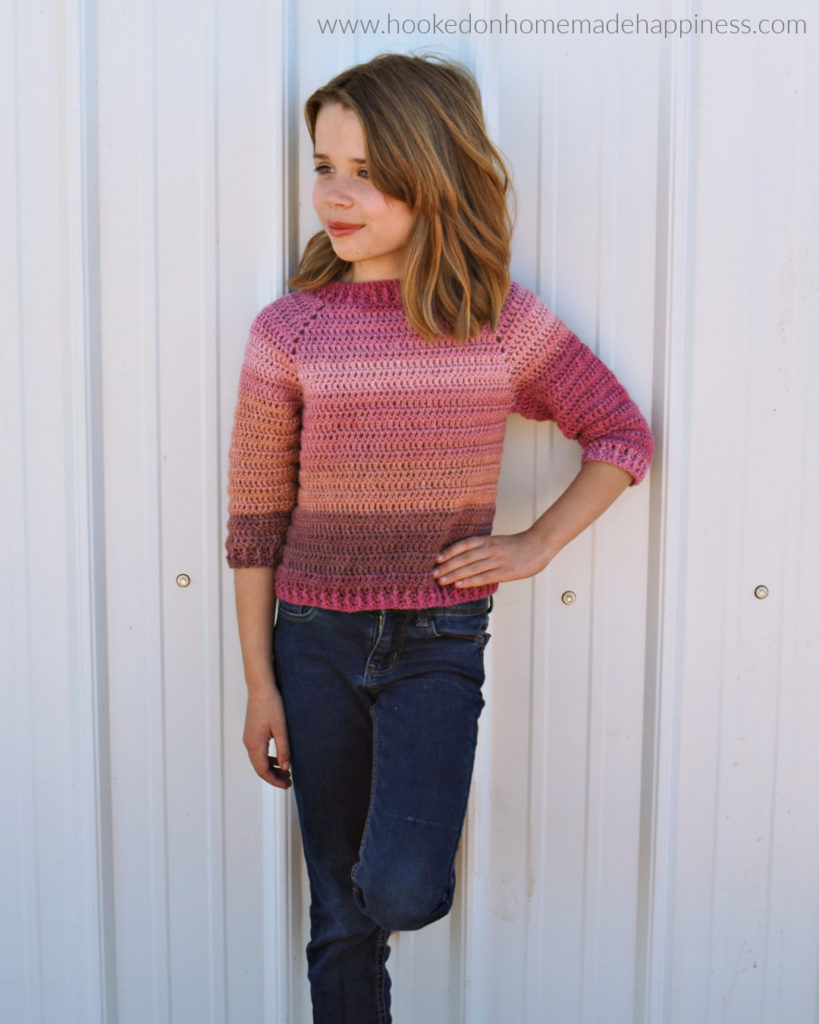
This easy pattern is also available in adult sizes S – 3X!
Check out the Everyday Raglan Crochet Pattern!
More Homemade Happiness
click here to pin this pattern for later >>>
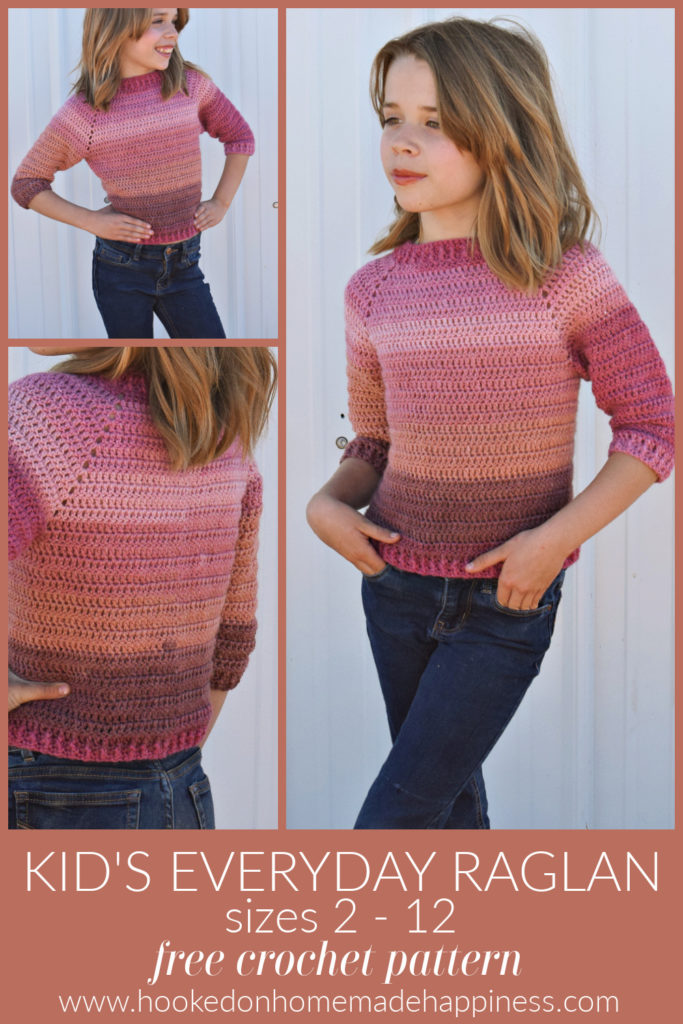
Kid’s Everyday Raglan Crochet Pattern
– Get the free pattern below or purchase the ad-free, printable PDF in my Ravelry Shop
– PIN for later HERE
– Add to your Ravelry Queue HERE
Materials
Lion Brand Wool-Ease DK Cake in Forever Young (1 skein for size 2/4, 2 for size 6/8, 3 for size 10/12)
4.5 mm hook
yarn needle
scissors
stitch markers
Level
easy+
Pattern notes & stitches to know
ch – chain
foundation dc (alternatively you can make a ch and dc into the ch)
sl st – slip stitch
sc – single crochet
dc – double crochet
fpdc – front post double crochet
bpdc – back post double crochet
dc2tog – double crochet 2 together (double crochet decrease)
· written in US terms
· ch 2 does not count as dc
· ch 1 does not count as sc
· This sweater is made from the top down, raglan style, with turned rounds. The sleeves are added at the end in turned rounds with decreases.
· Gauge: 14 dc x 9 rows = 4” x 4”
Sizes:
2, 4, 6, 8, 10, 12 – The pattern is written in these sizes consecutively. Example, when the pattern gives the end of row amount (42, 50, 58, 66, 74, 82 dc) the 42 is size 2, 50 is size 4, 58 is size 6, 66 is size 8, 74 is size 10, 82 is size 12
This sweater is a classic fit with some positive ease
Approx Finished Size:
Chest: 2 (22.5”) 4 (24.75”) 6 (27”) 8 (29.25”) 10 (31.5”) 12 (33.75”)
Length: 2 (12”) 4 (13”) 6 (14”) 8 (15”) 10 (16”) 12 (17”)
Armhole Width: 2 (4.5”) 4 (5”) 6 (5.5”) 8 (6”) 10 (6.5”) 12 (7”)
Sleeve Length (from the neckline): 2 (13”) 4 (14”) 6 (15”) 8 (16”) 10 (17”) 12 (18”)
KID’S EVERYDAY RAGLAN CROCHET PATTERN
ch 3
Row 1: Starting in the 3rd ch from the hook, foundation dc 54, 60, 66, 72, 78, 84, join to first dc with sl st (54, 60, 66, 72, 78, 84 dc) – or – ch 56, 62, 68, 74, 80, 86 dc in 2nd ch from hook and across
The remainder of the sweater is worked in turned rounds
Round 2: ch 1, turn, *sc, fpdc in next* repeat from * to * around, join to first sc with sl st (54, 60, 66, 72, 78, 84)
Round 3: ch 2, turn, *bpdc, sc in next* repeat from * to * around, join to first bpdc with sl st (54, 60, 66, 72, 78, 84)
Round 4: ch 1, turn, *sc, fpdc in next* repeat from * to * around, join to first sc with sl st (54, 60, 66, 72, 78, 84)
Round 5: ch 2, turn, dc in 7, 8, 9, 10, 11, 12 stitches, 2 dc in next, ch 2, 2 dc in next, dc in 8, 9, 10, 11, 12, 13 stitches, 2 dc in next, ch 2, 2 dc in next, dc in 15, 17, 19, 21, 23, 25 stitches, 2 dc in next, ch 2, 2 dc in next, dc in 8, 9, 10, 11, 12, 13 stitches, 2 dc in next, ch 2, 2 dc in next, dc in remaining stitches, join to first dc with sl st (62, 68, 74, 80, 86, 92 dc)
Round 6: ch 2, turn, *dc in each stitch to the ch 2 space, (dc, ch 2, dc) in ch 2 space*, repeat from * to * around, dc in remaining stitches, join to first dc with sl st (70, 76, 82, 88, 94, 100 dc)
Repeat round 6 (each round will increase by 8 stitches) to Round 14, 15, 16, 17, 18, 19 (134, 148, 162, 176, 190, 204 dc)
The sleeves are created in the next round.
Round 15, 16, 17, 18, 19, 20: ch 2, turn, dc in each stitch to the ch 2 space, dc in the ch 2 space, ch 3, dc in the next ch 2 space (skipping an entire section, this will be the first sleeve), dc in each stitch to the next ch 2 space, dc in ch 2 space, ch 3, dc in next ch 2 space (skipping an entire section, this will be the second sleeve), dc in remaining stitches, join to first dc with sl st (74, 82, 90, 98, 106, 114 dc)
Round 16, 17, 18, 19, 20, 21: ch 2, turn, dc in each stitch and ch around, join to first dc with sl st (80, 88, 96, 104, 112, 120 dc)
Round 17, 18, 19, 20, 21, 22: ch 2, turn, dc in each stitch around, join to first dc with sl st (80, 88, 96, 104, 112, 120 dc)
Repeat previous round to Round 30, 32, 34, 36, 38, 40 (80, 88, 96, 104, 112, 120 dc) (or until top is approx. 1” shorter than desired length)
Round 31, 33, 35, 37, 39, 41: ch 2, turn, dc in each stitch around, join to first dc with sl st (80, 88, 96, 104, 112, 120)
Round 32, 34, 36, 38, 40, 42: ch 1, turn, *sc, fpdc in next* repeat from * to * around, join to first sc with sl st (80, 88, 96, 104, 112, 120)
Round 33, 35, 37, 39, 41, 43: ch 2, turn, *bpdc, sc in next* repeat from * to * around, join to first bpdc with sl st (80, 88, 96, 104, 112, 120)
Round 34, 36, 38, 40, 42, 44: ch 1, turn, *sc, fpdc in next* repeat from * to * around, join to first sc with sl st (80, 88, 96, 104, 112, 120)
Fasten off. Weave in the ends.
SLEEVES
Join yarn to the bottom of an armhole. Work stitches evenly around the armhole. The sleeves are made in turned rounds. Place a stitch maker in the first stitch to help identify round 1.
Round 1: ch 2, dc evenly around, join to first dc with sl st
Round 2: ch 2, turn, dc in each stitch around, join to first dc with sl st
The next rounds include a dc2tog. Each round will decrease by 1 stitch. Decreasing is optional and you can stop any time the sleeve is tight enough.
Round 3: ch 2, turn, dc2tog, dc in remaining stitches around, join to first dc2tog with sl st
Repeat previous round to Round 14, 16, 18, 20, 22, 24 (or until sleeve is approx. 1” shorter than desired length)
Round 15, 17, 19, 21, 23, 25: ch 1, turn, *sc, fpdc in next* repeat from * to * around, join to first sc with sl st
Round 16, 18, 20, 22, 24, 26: ch 2, turn, *bpdc, sc in next* repeat from * to * around, join to first bpdc with sl st
Round 17, 19, 21, 23, 25, 27: ch 1, turn, *sc, fpdc in next* repeat from * to * around, join to first sc with sl st
Fasten off. Weave in the ends.
Repeat for other sleeve.
Looking for more patterns? Follow me on Facebook, Instagram, and Pinterest! Please share a pic of your finished product with me. I’d love to see it!


This sweater is adorable! In the body section, the “repeat previous round to round 30, 32…” line lists dc count different from count before or after. Is there a decrease?
That’s a typo 🙂 it’s fixed!
H, am i reading pattern wrong??? As if you do 2dc,2 chain and 2dc, to me that makes an extra 16 stitches per round but stich count only equals 8, as is said after row 6. Should it only be 1dc,2ch, 1dc as that makes sense to me.
Hopeyou can help.
Hi! The ch 2 isn’t included in the end of round count. You’re adding 2 stitches to each of the 4 corners around 🙂
On the first row/round, if I chain instead of fdc, do I join the chain and then do the DC around, join and turn for row 2? Thank you. I hope not a stupid question.
I figured it out. Did the chain and first row of dc then joined, worked out fine. Will fix the little gap when I weave the ends.
Hi.
I can’t understand round 5.
dc in 7, 8, 9, 10, 11, 12 stitches, 2 dc in next, ch 2, 2 dc in next, dc in 8, 9, 10, 11, 12, 13 stitches
What do I do for 1-6 stitches. Skip them?
Or how to count this?
Hi! Depending on the size you’re making (each number is for a different size), you’ll dc in that number of stitches for that size, then 2 dc in next, ch 2, and 2 dc in the next. You’ll have a solid round of dc with 2 corners after this round.
Hello, I love the pattern, I am making the size 4 currently. I am having problems with stitch counts though when making the sleeve holes. My count is correct on row 15 at 148, but then after finishing row 16 I am at 86 somehow instead of 82, and no not counting the ch stitches… I have undone and redone this 4 times and I cannot figure out what I am doing wrong to end up with 4 extra stitches. I Dc up to the ch 2 and then put 1 dc in the ch 2 sp and then ch 3 and sk to next ch 2 space and Dc and so forth. Very confused, hopefully you can help me unravel this confusion. Thanks 🙂
Hi! Did you have the correct number of stitches in the previous round?
Yes I did, I had 148 on row 15 but on 16 and forward it’s 86 instead of 82. I went and redid it 4 times, same results every time.
I too have 86 DC at the end of round 16 for the size 4. I believe the pattern is incorrect.
I came up with 4 extra stitches on round 17 working a size 4, too. I’m just going to roll with it. I’m starting round 20 with 92 stitches and since stitch count has been stable last three rounds I’m going to carry on and see what happens.
Hi, in Round 15, 16, 17, 18, 19, 20, where It says: skipping an entire section, this will be the first sleeve, It may be dumb, but whats do you mean with section? Is a stitch? A line? Could you explain It please?
Hi! You’ll skip and entire side of the rectangle 🙂
So, should I attach another ball of yarn?
No, it’s going to fold over and create the sleeve. Work into the corner, ch 3, then work into the next corner (skipping and entire side of stitches). It will fold and make a hole for the sleeve. Hope this helps!
Hi, if I want to make the sleeves full length for size 2, is it just a matter of adding more rows to the sleeves? And how many rows should I add?
Hi! Yes, just repeat the sleeve rounds until it’s the desired length 🙂
Hi.
I can’t understand round 5.
dc in 7, 8, 9, 10, 11, 12 stitches, 2 dc in next, ch 2, 2 dc in next, dc in 8, 9, 10, 11, 12, 13 stitches
What do I do for 1-6 stitches. Skip them?
Or how to count this?
Hi, I am making a size 8 and have an extra 4 stitches in row 18 (102 instead of 98). I have the correct number of stitches in row 17 (176). Any advice on where I might be going wrong? Many Thanks.
Hi! I am looking at the numbers and I think I might have missed the 4 extra stitches in the final count. So I think your count is correct & I will be updating the pattern 🙂
Thank you for clarifying! I am really enjoying the pattern. Thank you for sharing it☺️
I’m so confused. If I’m placing 2 double crochets, chain two and 2 double crochets in each chain two corner, I have four stitches in each corner. Multiply the four corners by four stitches equals 16 stitch increase in each round. Am I misunderstanding? HELP!
Disregard my previous comment. I went back and re-read the pattern. I should be placing one double crochet, chain two and one double crochet into each corner. Frogging now.
Thank you for the great pattern!
Ok awesome 🙂
Hi,
We love this pattern and are quite new to crochet, but we are struggling with row 6…..
What do we do *double crochet in each stitch to the chain 2 space, (dc, ch2,dc) in ch2 space*.
Struggling to know what to do !
Can you help please?
Thank you
Hi! In the previous round there are 4 ch-2 spaces. These will be corners and continue to be corners for the next few rounds and you will make a rectangle. Dc in each dc across the side to the ch-2 space. In the ch-2 space make (1 dc, ch 2, 1 dc) in the ch-2 space. Then continue this around the rectangle. Hope this helps!