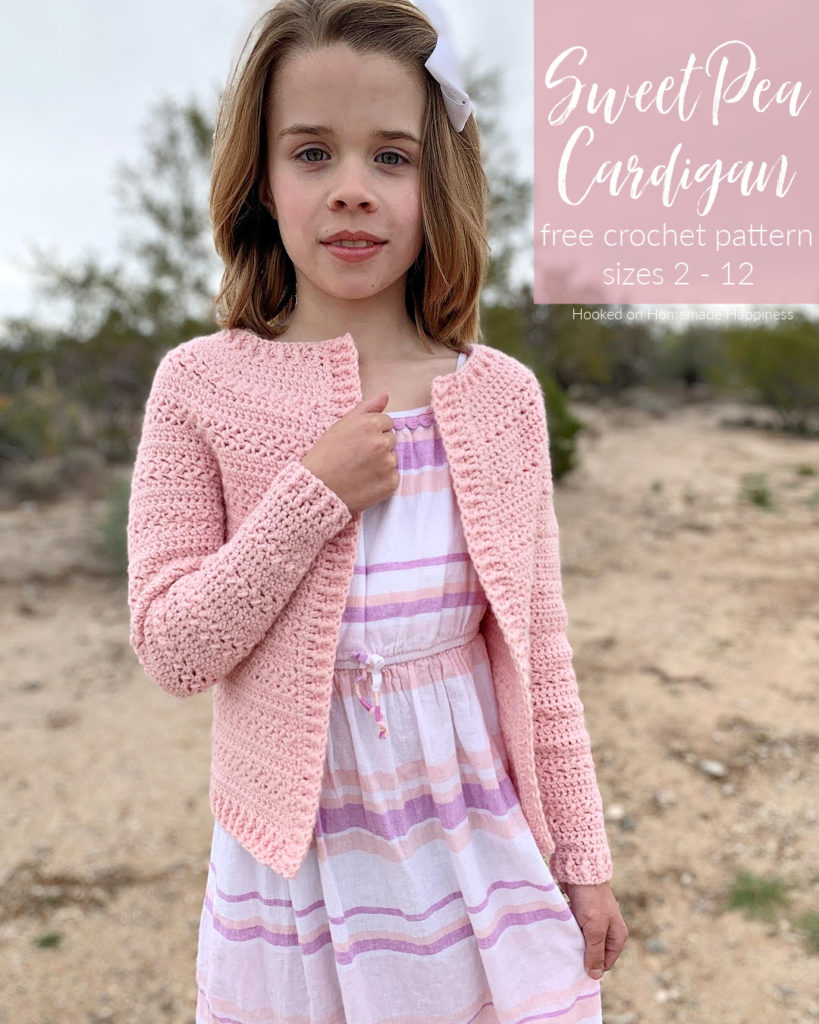
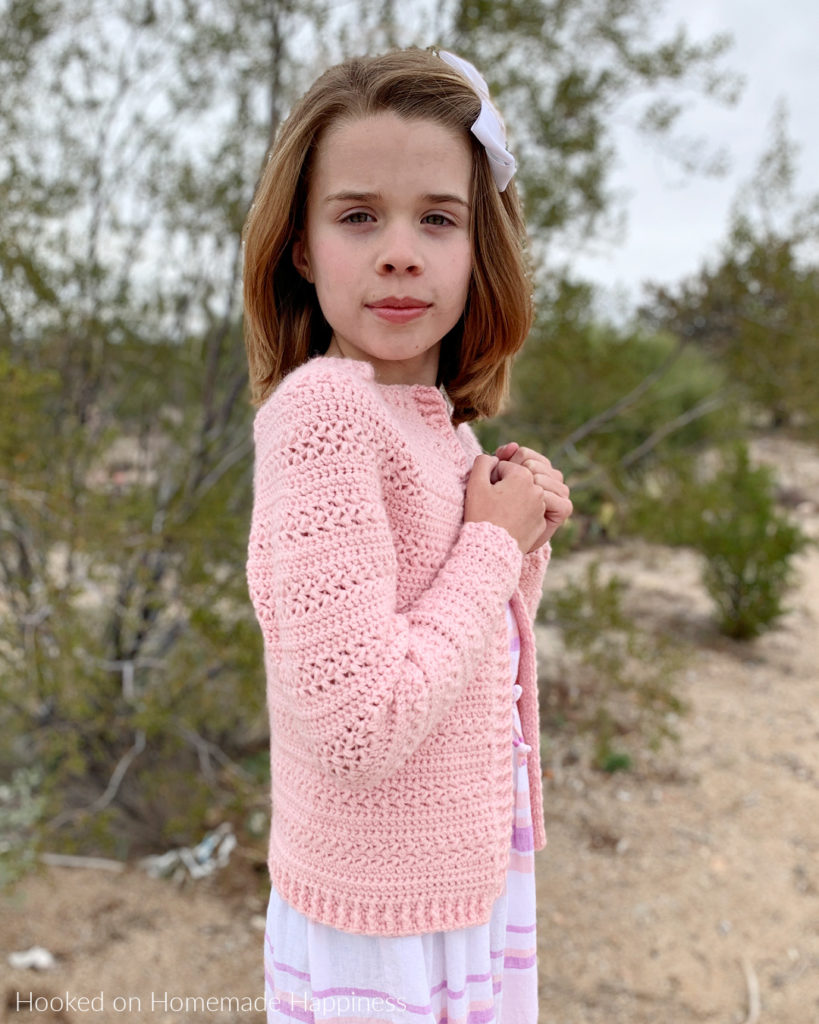
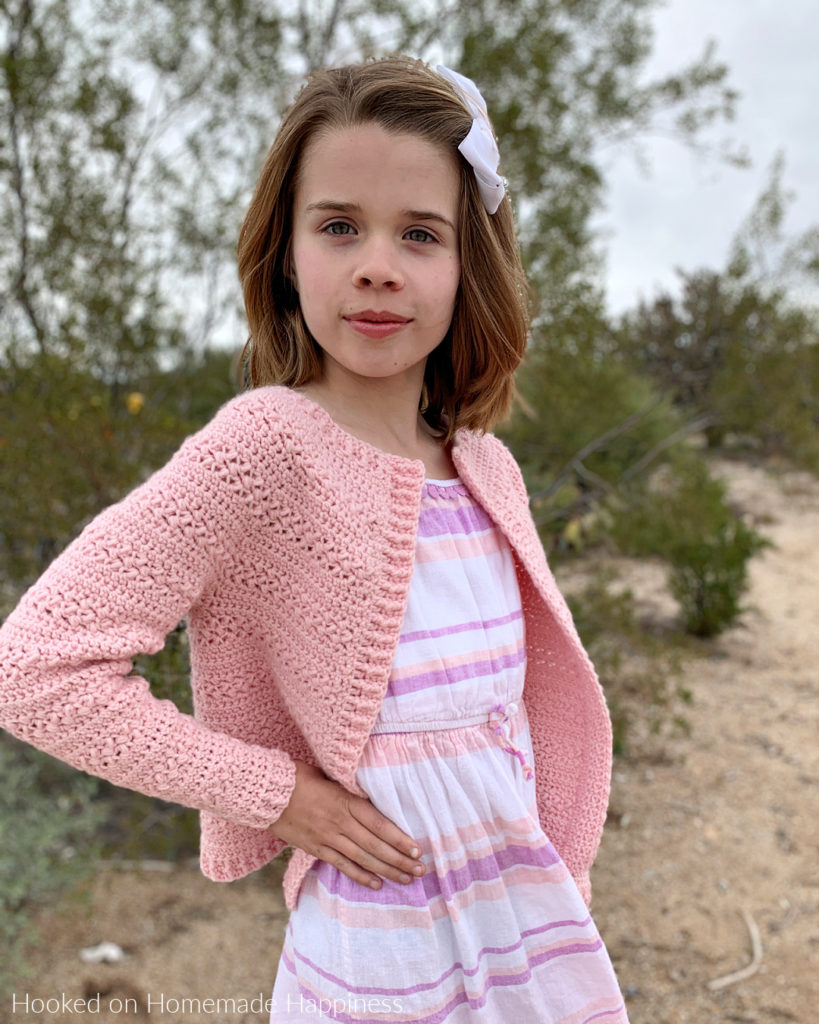
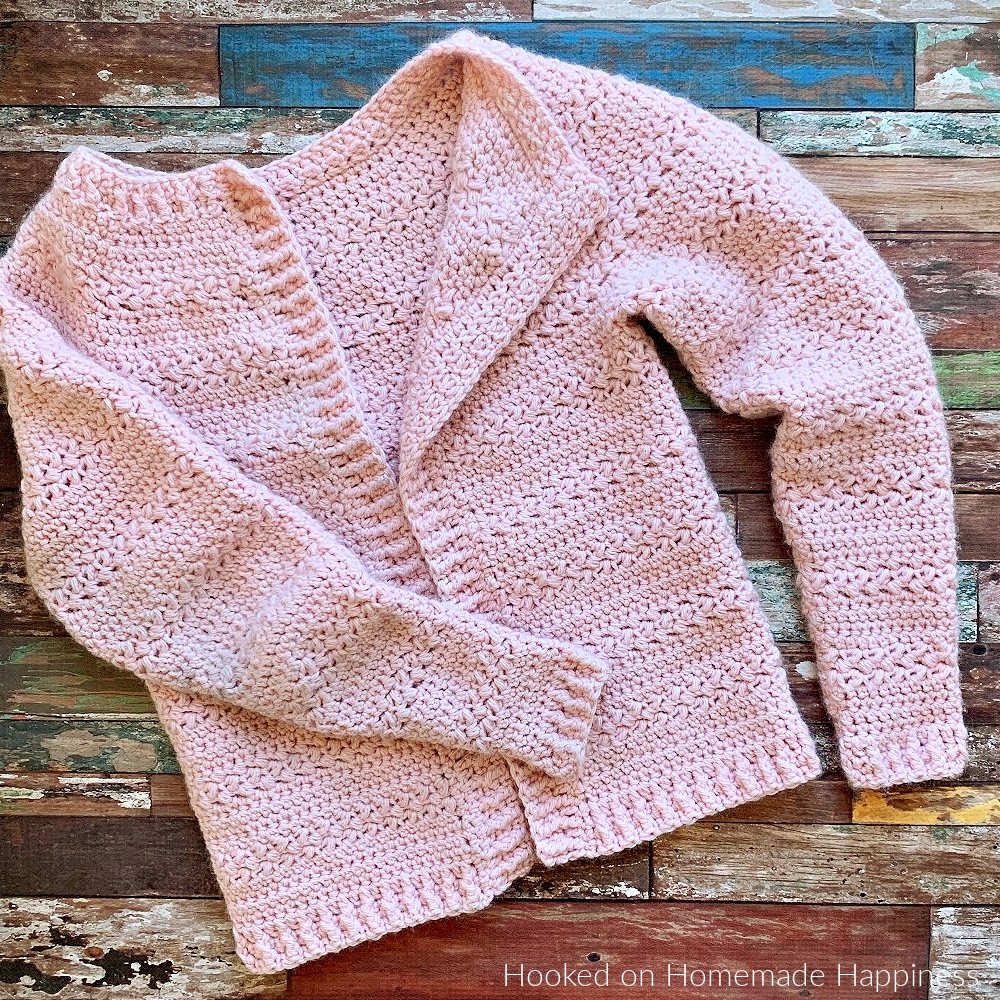
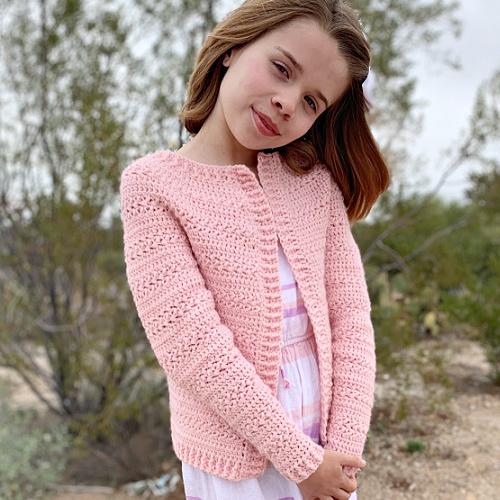
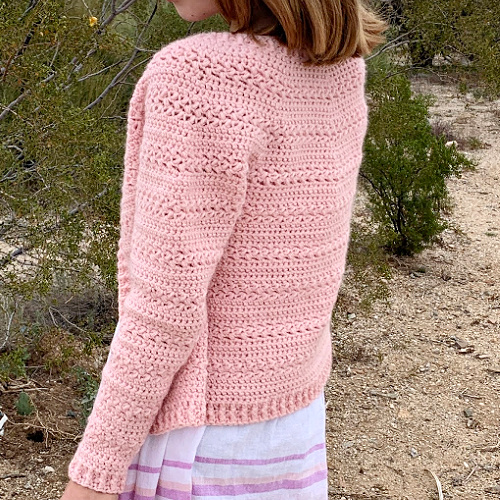
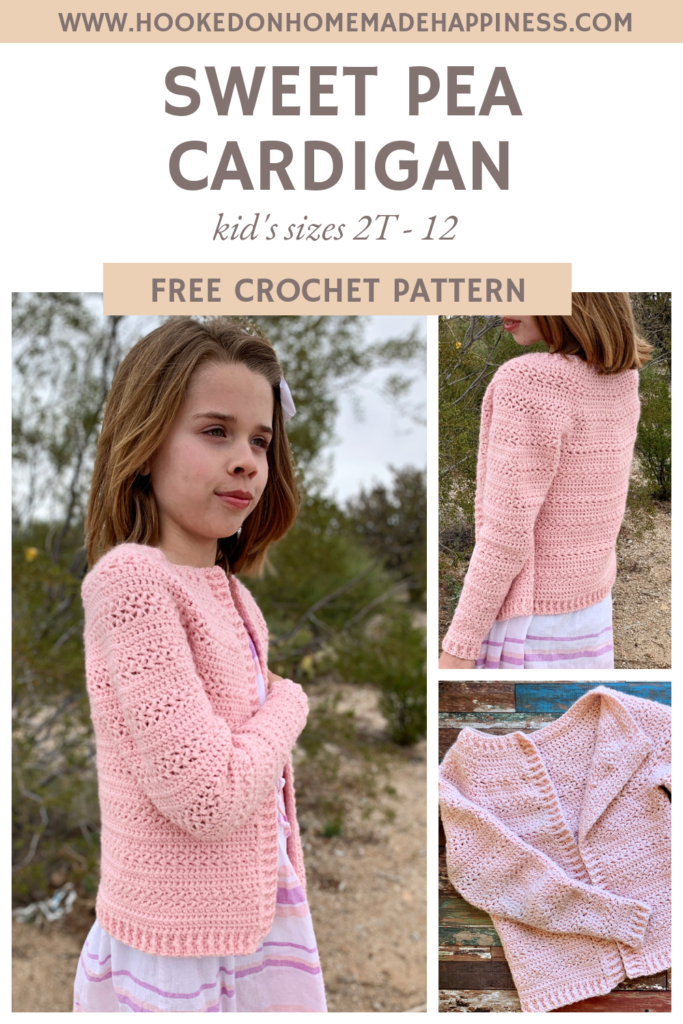
Sweet Pea Cardigan Crochet Pattern (Kids Sizes 2–12)
If you’re looking for a sweet, timeless layering piece for little ones, the Sweet Pea Cardigan Crochet Pattern is just the project. This top-down crochet cardigan features a beautiful circular yoke, soft texture, and classic ribbed details that give it a polished, handmade look. Perfect for school days, family outings, or cozy layering, this cardigan is as practical as it is adorable.
Whether you’re making it for your own child or as a gift, this is a pattern you’ll come back to again and again.
Purchase the ad-free, printable PDF for easy printing.
Why You’ll Love This Pattern
- Top-down construction – Try on as you go for the perfect fit
- No seaming – Minimal finishing required
- Classic circular yoke – Clean, modern look with great drape
- Subtle texture – A mix of extended single crochet and mini bean stitches
- Ribbed details – Collar, cuffs, hem, and front edges for a cozy finish
- Full video tutorial included – Great for visual learners
Pattern Details
- Sizes: Kids 2, 4, 6, 8, 10, 12
- Skill Level: intermediate
- Construction: Top-down with a circular yoke
- Yarn: DK weight yarn
- Sample: WeCrochet Capra DK
- Video: WeCrochet Gloss DK
- Hook: 4.5 mm
- Stitches Used:
- Extended Single Crochet (esc)
- Mini Bean Stitch
- Ribbing (front/back post stitches)
Yarn Substitutions
You can use any DK weight yarn for this pattern. Here are a few great alternatives:
- WeCrochet CotLin
- Lion Brand Cottino
- Paintbox Yarns Cotton DK
- Stylecraft Special DK
Look for a yarn with good drape and softness—especially important for kids’ garments!
Tips for Success
- Check your gauge before starting to ensure proper fit
- Use stitch markers to keep track of your yoke increases
- Take advantage of the top-down design to try it on as you go
- Block lightly for the best drape and stitch definition
FAQ
Ready to Crochet?
The Sweet Pea Cardigan is the perfect mix of cozy, classic, and customizable. With its seamless construction, soft texture, and detailed tutorial, it’s a fun and rewarding project you’ll love making.
Grab your favorite DK yarn, your hook, and get started on a cardigan that’s sure to become a favorite ❤️
Making the Sweet Pea Cardigan Crochet Pattern
Get the full free pattern below or purchase the ad-free, printable PDF
Materials
Capra Dk from WeCrochet in Blush or any DK weight yarn (5 skeins (615 yds) for 2, 6 skeins (738 yds) for 4, 7 skeins (861 yds) for 6, 8 skeins (984 yds) for 8, 9 skeins (1,107 yds) for 10, 10 skeins (1,230 yds) for 12)
4.5 mm hook
yarn needle
scissors
Level
intermediate
Pattern notes & stitches to know
ch – chain
sl st – slip stitch
fdc – foundation double crochet
sc – single crochet
dc – double crochet
fpdc – front post double crochet
bpdc – back post double crochet
esc – extended single crochet (insert hook into stitch, yarn over, pull up a loop, yarn over, pull through one loop, yarn over, pull through 2 loops)
MB – mini bean -insert hook into stitch, pull up a loop, yarn over, insert hook into same stitch, yarn over, pull up a loop, yarn over, pull through all 4 loops on hook, ch 1
esc2tog – extended single crochet 2 together (insert hook into stitch, yarn over, pull up a loop, yarn over, pull through one loop, insert hook into next stitch, yarn over, pull up a loop, yarn over, pull through one loop, yarn over, pull through three loops)
rs – right side
ws – wrong side
· Established pattern repeat: 4 rows of esc, 3 rows of MB (aka Elizabeth stitch)
· written in US terms
· ch 1 does not count as MB
· ch 1 does not count as sc
· ch 2 does not count as dc
· Gauge: 4 esc x 4 rows = 1” x 1”
Sizes:
(2, 4, 6) (8, 10, 12) – The pattern is written in these sizes consecutively. Example, when the pattern gives the end of row count ((56, 56, 64) (64, 72, 72) dc) the 56 is for 2, 56 is 4, 64 is 6, 64 is 8, 72 is 10, 72 is 12.
This sweater is a close fit with little to no positive ease.
Approx Finished Size:
Chest: 2 (20.25”) 4 (21.25”) 6 (24.5”) 8 (26”) 10 (29.5”) 12 (30.75”)
Length: 2 (15”) 4 (15.5”) 6 (16”) 8 (16.5”) 10 (17”) 12 (17.5”)
Armhole Width: 2 (4”) 4 (4.5”) 6 (5”) 8 (5.5”) 10 (6”) 12 (6.5”)
Sleeve Length (from underarm): 2 (10.5”) 4 (12.5”) 6 (13.5”) 8 (14.5”) 10 (15.5”) 12 (16.5”)
Size 8 pictured.
Watch the Tutorial
See how it’s done! This easy-to-follow video tutorial will walk you through each step of the pattern.
Pattern Support
Looking for pattern support or want to share your progress? Join our Crochet Community Facebook Group! It’s the perfect place to ask questions, get help, and connect with fellow makers.
CROCHET PATTERN WRITTEN INSTRUCTIONS
ch 3
Row 1 (ws): starting in the 3rd ch from the hook, fdc (56, 56, 64) (64, 72, 72) ((56, 56, 64) (64, 72, 72) dc)
-OR– ch (58, 58, 66) (66, 74, 74) dc in 3rd ch from the hook and across
Row 2 (rs): ch 1, turn, fpdc in first stitch, sc in next, *fpdc, sc* repeat from * to * across ((56, 56, 64) (64, 72, 72))
Row 3 (ws): ch 1, turn, sc in first stitch, bpdc in next, *sc, bpdc* repeat from * to * across ((56, 56, 64) (64, 72, 72))
Row 4 (rs): ch 1, turn, *esc in 7 stitches, 2 in next* repeat from * to * across ((63, 63, 72) (72, 81, 81) esc)
Row 5 (ws): ch 1, turn, *esc in 8 stitches, 2 in next* repeat from * to * across ((70, 70, 80) (80, 90, 90) esc)
Row 6 (rs): ch 1, turn, *esc in 9 stitches, 2 in next* repeat from * to * across ((77, 77, 88) (88, 99, 99) esc)
Row 7 (ws): ch 1, turn, *esc in 10 stitches, 2 in next* repeat from * to * across to the last stitch, 3 esc in last stitch ((85, 85, 97) (97, 109, 109) esc)
Row 8 (rs): ch 1, turn, MB in first stitch, *skip 1 stitch, MB in next stitch* repeat from * to * across ((43, 43, 49) (49, 55, 55) MB)
Row 9 (ws) – 10 (rs): ch 1, turn, work a MB in each MB from previous round across (you’ll see a gap along the side of the MB, insert hook here and work the stitch) ((43, 43, 49) (49, 55, 55) MB)
Row 11 (ws): (working in each MB & ch-1 space) ch 1, turn, *esc in 11 stitches, 2 in next* repeat from * to * across to last 2 stitches, 1 esc in last 2 stitches ((91, 91, 104) (104, 117, 117) esc)
Row 12 (rs): ch 1, turn, *esc in 12 stitches, 2 in next* repeat from * to * across ((98, 98, 112) (112, 126, 126) esc)
Row 13 (ws): ch 1, turn, *esc in 13 stitches, 2 in next* repeat from * to * across ((105, 105, 120) (120, 135, 135) esc)
Row 14 (rs): ch 1, turn, *esc in 14 stitches, 2 in next* repeat from * to * across to last stitch, 3 esc in last stitch ((113, 113, 129) (129, 145, 145)esc)
Row 15 (ws) – 17 (ws) : repeat rows 8 – 10 ((57, 57, 65) (65, 73, 73) MB)
Row 18 (rs): (working in each MB & ch-1 space) ch 1, turn, *esc in 15 stitches, 2 in next* repeat from * to * across to last 2 stitches, 1 esc in last 2 stitches ((119, 119, 136) (136, 153, 153) esc)
Row 19 (ws): ch 1, turn, *esc in 16 stitches, 2 in next* repeat from * to * across ((126, 126, 144) (144, 162, 162) esc)
Row 20 (rs): ch 1, turn, *esc in 17 stitches, 2 in next* repeat from * to * across ((133, 133, 152) (152, 171, 171) esc)
Row 21 (ws): ch 1, turn, *esc in 18 stitches, 2 in next* repeat from* to * across to last stitch, 3 esc in last stitch ((141, 141, 161) (161, 181, 181) esc)
Row 22 (rs) – 24 (rs): repeat rows 8 – 10 ((71, 71, 81) (81, 91, 91) MB)
Size 2, skip to SLEEVES
Row 25 (ws): (working in each MB & ch-1 space) ch 1, turn, *esc in 19 stitches, 2 in next* repeat from * to * across to last 2 stitches, 1 esc in last 2 stitches (starting with size 4: (147, 168) (168, 189, 189) esc)
Sizes 4 & 6, skip to SLEEVES
Row 26 (rs): ch 1, turn, *esc in 20 stitches, 2 in next* repeat from * to * across (starting with size 8: (176, 198, 198 esc)
Size 8 & 10, skip to SLEEVES
Row 27 (ws): ch 1, turn, *esc in 21 stitches, 2 in next* repeat from * to * across (size 12: 207 esc)
SLEEVES
Continue in the next round for all sizes
Split for sleeves in next row
Row 25, 26, 26, 27, 27, 28: ch 1, turn, esc in (16, 17, 21) (22, 26, 27) stitches, ch 5, skip (36, 37, 41) (42, 46, 48), esc in (37, 39, 44) (48, 54, 57) stitches, ch 5, skip (36, 37, 41) (42, 46, 48) stitches, esc in (16, 18, 20) (22, 26, 27) stitches ((69, 73, 86) (92, 106, 111) esc)
BODY
For sizes 2 – 10
Row 26, 27, 27, 28, 28: ch 1, turn, esc in each stitch and ch-1 across, ~NOTE: 2 esc in last stitch for sizes 6, 8, 10 only~ ((79, 83, 97) (103, 117) esc)
For size 12
Row 29: (working in each esc and ch-1 across) ch 1, turn, MB in first stitch, *skip 1 stitch, MB in next stitch* repeat from * to * across
Continue working the established pattern repeat for the remainder of the body to Row (57, 59, 61) (63, 65, 67) ws
Row (58, 60, 62) (64, 66, 68) rs: ch 2, turn, dc in each stitch across ((79, 83, 97) (103, 117, 121) dc)
Row (59, 61, 63) (65, 67, 69) ws: ch 1, turn, sc in first stitch, *bpdc, sc* repeat from * to * across ((79, 83, 97) (103, 117, 121))
Row (60, 62, 64) (66, 68, 70) rs: ch 1, turn, sc in first stitch, *fpdc, sc* repeat from * to * across ((79, 83, 97) (103, 117, 121))
Row (61, 63, 65) (67, 69, 71) ws: ch 1, turn, sc in first stitch, *bpdc, sc* repeat from * to * across ((79, 83, 97) (103, 117, 121))
Do not fasten off.
COLLAR
Turn to work along the inside edge of the sweater up towards the collar
Row 1 (ws): ch 1, sc evenly across to row 1, working 1 sc in the end of each row ((61, 63, 65) (67, 69, 71) sc)
Row 2 (rs) : ch 2, turn, dc in each stitch across ((61, 63, 65) (67, 69, 71) dc)
Row 3 (ws): ch 1, turn, sc in first stitch, *bpdc, sc* repeat from * to * across ((61, 63, 65) (67, 69, 71))
Row 4 (rs): ch 1, turn, sc in first stitch, *fpdc, sc* repeat from * to * across ((61, 63, 65) (67, 69, 71))
Row 5 (ws): ch 1, turn, sc in first stitch, *bpdc, sc* repeat from * to * across ((61, 63, 65) (67, 69, 71))
Row 6 (rs): ch 1, turn, sc in first stitch, *fpdc, sc* repeat from * to * across ((61, 63, 65) (67, 69, 71))
Fasten off.
Join to the top on the ws of the opposite side and repeat collar
SLEEVES
Join to the bottom of an armhole
Round 1 (rs): ch 1, esc in each stitch and ch around, join to first esc with sl st, make sure to have an even number of stitches (approx. (40, 42, 46) (48, 50, 52) esc)
Round 2 (ws): ch 1, turn, esc in each stitch around, join to first esc with sl st
Round 3 (rs): ch 1, turn, MB in first stitch, skip 1 stitch, *MB in next stitch, skip 1 stitch* repeat from * to * around, join to first MB with sl st
Round 4 (ws) – 5 (rs): ch 1, turn, work a MB in each MB from previous round around (you’ll see a gap along the side of the MB, insert hook here and work the stitch), join to first MB with sl st
Round 6 (ws): ch 1, turn, (working in each MB & ch-1 space) esc2tog, esc in each stitch and ch-1 around, join to first esc with sl st
Round 7 (rs) – 9 (rs): ch 1, turn, esc2tog, esc in each stitch around, join to first esc with sl st
Round 10 – (35, 43, 47) (51, 55, 59) rs: repeat rounds 3 – 9
Round (36, 44, 48) (52, 56, 60) ws: ch 2, turn, dc in each stitch around, join to first dc with sl st
Round (37, 45, 49) (53, 57, 61) rs: ch 1, turn, *sc, fpdc* repeat from * to * around, join to first stitch with sl st
Round (38, 46, 50) (54, 58, 62) ws: ch 1, turn, *sc, bpdc* repeat from * to * around, join to first stitch with sl st
Round (39, 47, 51) (55, 59, 63) rs: ch 1, turn, *sc, fpdc* repeat from * to * around, join to first stitch with sl st
Fasten off. Weave in the ends.
Join to other armhole and repeat sleeve pattern.
Looking for more patterns? Follow me on Facebook, Instagram, and Pinterest! Please share a pic of your finished product with me. I’d love to see it!


Love this sweater! I don’t usually like the circle yoke (no reason–just preference), but I like the way it works with these stitches. Any plans to expand the pattern to adult sizes?
Hi! Thank you! Not at the moment. The math made me go crossed eyed a bit with this one, lol!
Hi Breann, I just discovered you and really love the sweet pea cardigan. There’s something I don’t understand… *esc in 8 stitches, 2 in next.* What does this mean for the 2 in next? I get that it’s esc in eight stitches…I know how to do that but what happens for 2 in next? Does that mean that I do two esc in the next stitch?
Thanks, Patricia
Yes
In Sweet Pea Cardigan Crochet Pattern, in row 7 – I counted thrice as it is 96 esc but the instruction stated 97 esc. (One in ten stitches, 2 esc in one stitches = 96 in total) How do you get 97 esc? Can or will you please help me out? The next row that I tried to get 49 MB but for 96 is not getting 49.
Hi! For row 7 you’ll work 3 esc in the last stitch 🙂 (the MB stitch requires an odd # in rows)
Hi there! Beautiful pattern.
Please advise how many stitches we should have at the end of the sleeves. Thank you.
Hello, the sleeve stitches are approx at the beginning of the sleeve. Then they’ll decrease by 4 stitches every 7 rounds. What size are you making?
Thank you. I am making the size 12.
Hello, I am on row6 on the first sleeve and I can’t figure out how to do both the esc2tog,esc stitch in this row. Could you explain it in a different way so I can understand how to execute it properly? Thank you!
Hello, I love this sweater pattern. I am on row 6 on the first sleeve but I’m having trouble understanding the instructions written. Could you please explain it a different way so that I can finish this beautiful sweater? Than you!!
Hi! You will have 1 decrease in this row. So start with the esc2tog, then esc in each stitch and ch-1 space around 🙂
Thank you explaining it differently. I understand what to do now!! Thank you so much!!!!
Hi Breann! Can I just say… I chanced upon this no-sew pattern of yours and even though I’m a beginner, I daringly took a leap to try it out after reading through it (and all the comments and replies) MANY MANY times – I promised my daughter I’d crochet her a cardigan to give her a vested interest in my new hobby so I had no choice! 😂 And after 2 months of late night crocheting after work and putting the kids to bed, it’s finally complete and it looks LOVELY!! ❤️
Thank you so so so so much for this lovely lovely pattern and I DO so hope you’ll one day bless us with Adult sizes 😉🙏🏼
A blessed Christmas & New Year to you and your family!
Yay!! Thank you so much!! I have plans for a video tutorial and adult sizes for this sweater in 2025!
Breann, if I did this right, row 57 is 1 row of MB for a size 2? Then start the row of DC for the bottom edge?
The pattern doesn’t include completed lengths for the individual sizes. How long are the sleeves? There’s only 4 rows difference between size 2 and size 12 for the sleeves? I’m making size 2 and my sleeves look extremely long and thin
Breann
What do you mean when you say split for sleeves in next row. Do you mean to do half the number listed for each sleeve? Also after I chain 5 do I turn and go back the other way. I’m sorry for being a pain.
Hi! After this round you will have 2 spaces where you skipped stitches. Each of these will be the sleeves. Ch 5, skip the number of stitches for the size you’re making and continue around. Hope this helps 😊
after which row #24? I don’t see where it says there will be 2 skipped stitches. I’m kind of new at crocheting clothing like this sweater. So I need simple instructions. I understand the instructions so far but its the sleeves and the body I’m having a problem understanding. Is the body the side fronts or the back. Sorry like I said for being a pain.
What size are you making? If you’re making the smallest size, you’ll look at the first number in each series of numbers.
Example for the smallest size: Row 25: ch 1, turn, esc in (16) stitches, ch 5, skip (36) stitches (<- these skipped stitches are your first sleeve), continue after the skipped stitches and esc in (37) stitches, ch 5, skip (36) stitches (this is your second sleeve), continue after the skipped stitches and esc in (16) stitches After doing this round the sweater will fold and look like a cardigan shape. The opening down the center front with two spaces (one on each side) for the sleeves. You’re not being a pain, no worries 😊❤️
I’m making size 8. I understand about about the number of the stitches that represent each size. What do I do with the chain 5? I connect it to the other side in the back correct?
After you chain 5, skip the correct number of stitches for the size you’re making and keep going around. Don’t join, just keep crocheting after the skipped stitches
what do I do with the chain 5? Do I tie that off. skip the stitches then start crocheting again.
Don’t tie it off, don’t do anything with it 😊 just keep going. It will leave a ch-5 space. This is the bottom of the armhole.
so at the Sleeves section for size 8 I ch, 1 turn esc in 26 stitches, ch 5, then skip 46 stitches. esc in 54 stitches, ch 5 skip 46 stitches, then esc in 26 stitches. That adds up to a lot more stitches than I have. what is the ((69,73,86,) (92,106,111) esc) what do I do with the chain 5’s that I have made?
sorry
i’m just not picturing what I’m suppose to do. Do you have a drawing or diagram?
If you’re making a size 8 it will be:
ch 1, turn, esc in (22) stitches, ch 5, skip (42) esc in (48) stitches, ch 5, skip (42) stitches, esc in (22) stitches (92 esc)
22 + 48 + 22 will give you 92
You’ll ch 5 and after skipping 42 stitches, just esc in the next. It will make a fold in the fabric.
I have a video for a similar pattern. It’s a different cardigan but the sleeves are made in the same kind of way https://m.youtube.com/watch?v=VsW7C6SgM50
Thank you I will check that out.
Hello, my name is Rachel. I commented on this sweater yesterday and I was wondering if you could resend the email you sent me about the sleeve directions. I’m not understanding it the way it’s written. Row 6 is what I am having trouble with!! The pattern is for the Sweet Pea Cardigan! Thank you so much!!
Hi,
I’m making a size 6 and as per instructions it is:
ch 1, turn, esc in (21) stitches, ch 5, skip (41) esc in (44) stitches, ch 5, skip (41) stitches, esc in (20) stitches (86 esc).
But 21 + 44 + 20 = 85 not 86. I also have one last stitch left so should it be 21 + 44 +21 instead?
HI! Yes, I think the last section should be 21 🙂
I am making size six – I was trying to find row 28 but noticed no instructions about which rows to repeat (stated “Continue working the established pattern repeat for the remainder of the body to Row 61” (size 6)). Can you help me out? Thank you.
· Established pattern repeat: 4 rows of esc, 3 rows of MB (aka Elizabeth stitch)
I noticed that there are listed 2 row 27’s, 2 row 28’s what does that mean? I did check out the video—great video. I guess I’m a visual learner rather than just reading the instructions. I finally figured it out other than the numbers being listed twice. Thanks for your help! Appreciated your patience with me also. Beryl
Some sizes start the sleeves in the same row number 🙂
How many esc and MB after Row 61, please?
49
Absolutely gorgeous. Looks beautiful on your daughter.
Thank you!
I have frogged this pattern three times as I cannot seem to get the double stitch count at row 11, and I have read and re-read the instructions but I am not able to figure out how the stitches are more than doubled going from 43 to 91 in row 11. What am I not understanding with these directions?
Hi! In the previous row you have a alternating MB stitches and ch stitches. The end of row count is the number of MB stitches. For row 11 you will esc in each MB and ch-1 space. This will double the number of stitches in the end of row count because you are also working into the ch spaces 🙂
thank you, I will have to give that a go and see if I can figure it out. Appreciate your response!
Hi Breann,
I am making the sweet pea cardigan in size 6. You say to have an even number at the armhole so I had 46 like you suggest so why does row 10 say there are 47 stitches and then for cuff the stitches increase even more.
Victoria Morceau
That’s the row number to repeat to 🙂
Is the starting length of the foundation chain the end circumference of the chest or does more width get added during the process? I’m making a size 6 and right now my project is measuring 19″ wide. I checked my Guage before starting and I was right on target. I’m not sure what to do to get it to measure 24.5″ as listed in the pattern. I’m new to making clothing so this might just be a beginner’s error.
Hi! The sweater is worked from the top down and will increase as you go 🙂 It will not be the finished width yet.
Is there an error in the Size 10 row 27. My count is 117 stitches. 26, 5, 54, 5. And 26 plus 1. I don’t think I’ve misread your pattern.
I think you mean row 28? 117 is correct when you count the chains
What does this mean “esc in 7 stitches, 2 in next”?
Hi! esc in 7 stitches, then place 2 esc in the next stitch
Hi, I love this pattern! I’m making it for my god daughter who is a small 8 year old. Do I follow the instructions for 8T? I’m unsure on what the T stands for. Thanks 🙂
Hi! The T is toddler sizes 🙂
Hi I’m working size six, however the ESC row is 97 stitches but I can’t get the MB row to add up to 61/as pattern suggests. I keep getting about 48 MB stitches. I am doing 1 mb then skip ch 1 stitch.
Are the numbers correct and if so how do I get the correct amount of mb stitches? Thanks. Donna.
Hello! That is is row number for the pattern repeat, NOT the total number of stitches 🙂
Hi! I would like to get brave and crochet this Sweet Pea cardigan for my Great Goddaughter in UK. She wears clothes for a 7 year old in UK sizes. What size would that be on your pattern since it is in US sizing. Can I assume that all the stitches are US stitches so I would have to translate them to the UK equivalent – but hopefully they will end up as same stitches and this should not affect the sizing?
Sorry to be a nuisance.
Thanks 🙂
Hi Breann. Trying a size 4 in sweet pea cardigan. Row 9 and 10 only have a ch 1 at the beginning of the row , the rest are MB. How do you get 43 sts up to 91 in row 11?.
Hi! Each MB ends with a ch 1
I’m working on Sweet Pea Cardigan in size 6. Row 11 I have done twice and end up with 106 instead of 104.
48 MB x 2 = 96 + 8 increases + 1 esc in last 2 stitches (49th MB) = 106 stitches.
Any help would be greatly appreciated.
Hi! You will repeat from * to * to the last 2 stitches and then 1 esc in the last 2 stitches. That means the last repeat won’t have an increase.
Thanks for your quick response! Got it straight in my head now.
Hi
Iam making size 8 after the staring of the sleeves with the chain 5 row. For row 27 what do you mean witch esc in each stich and ch 1. ? Idont have any ch 1, what have i done wrong….. The stiches doesent add upp. Thanks
Hi! There should be a ch 1 in between each MB stitch 🙂
Your stitch count on the sleeves goes up instead of down on size 12. Row 6 says 2 tog, then by row 10 we have more than the original 52,,,,,?? instead of less. Is this a typo? I don’t know how to proceed…. I am at row 5 with the original 52 st. Why is rnd 10 at 59 if we are decreasing??? I have so much invested up til now…I can’t lose it on the sleeves. Please explain.
Hi! That’s the round number. Round 10-59: repeat rounds 3-9
Thank you so much for your quick reply!! That answers my question….of course, d’uh on me.
Hi i’m lost like everyone in row 11 from the Cardigan. I’m working size 10, and in the stitch count it’s 117 but every time i count i end up with 119… What i do wrong ? I finished last MB with chain one, after that chain one again and turn , did that change the count ? And If I divide 117 by 13 (11 esc + 2 in next) that makes 9 so the last 2 at the end are excess stitches , no?
Hi! You will repeat from * to * to the last 2 stitches and then 1 esc in the last 2 stitches. That means the last repeat won’t have an increase.
Im having the same issue and I dont understand. *to* is inclusive of “2 in next” so where is it that there is no increase? Wouldn’t we need no increase twice to get this down to correct number of stitches?
Just place 1 esc in the last 2
I’m making a size 6, and I’m confused by row 11. I don’t understand how I’m supposed go from 49 stitches (row 10) to 104 stitches (row 11) if I’m only increasing 1 after every 11 stitches. I feel like I’m leaving something out. Row 11 also starts by saying work in each MB and ch-1 space, which is what I’m assuming I’m messing up on. What ch-1 space? Please help. (I may have bitten off more than I could handle, but I really want to finish this for my little girl.)
Hi! The MB stitch ends with a ch 1. There should be a chain 1 in between each MB stitch
Thank you.
I have done and undone this at least 3 times, i have no idea what i am doing wrong but i get to the sleeves and there are no shoulders. It looks like a skirt for a very skinnydoll.
What an adorable cardigan pattern! My partner is really into crochet and I always share patterns I find online. The stitch detail on the sleeves is beautiful. Saved this to my online clipboard to forward later!