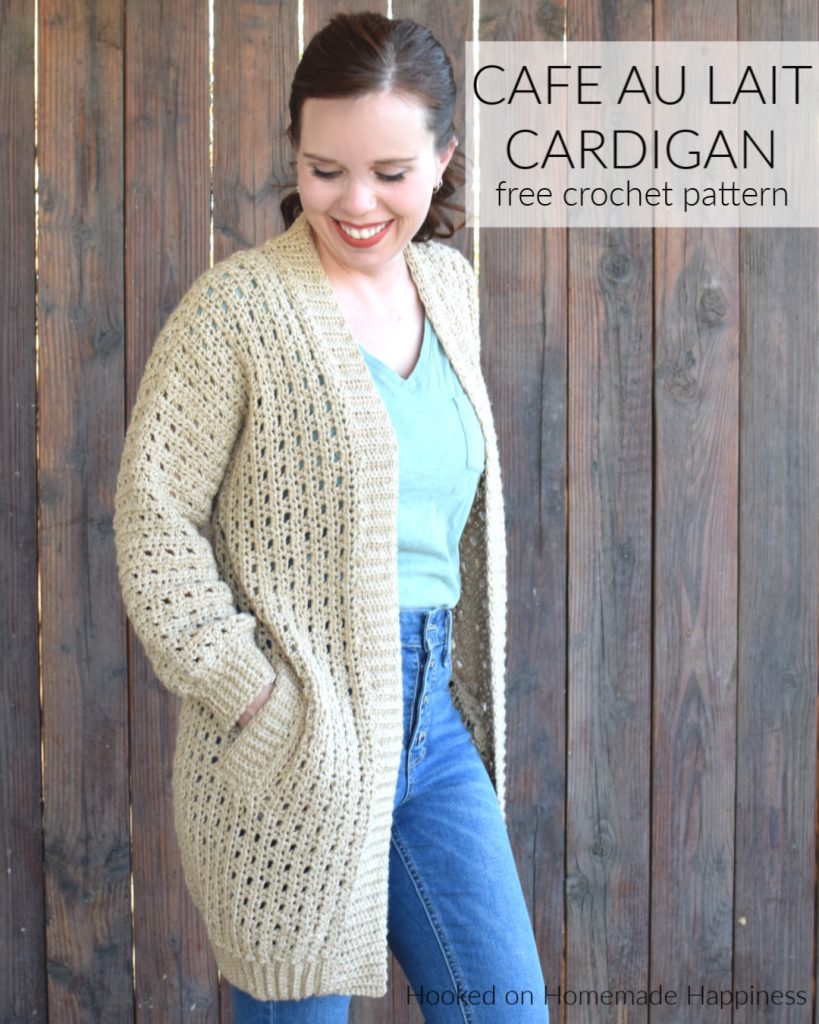
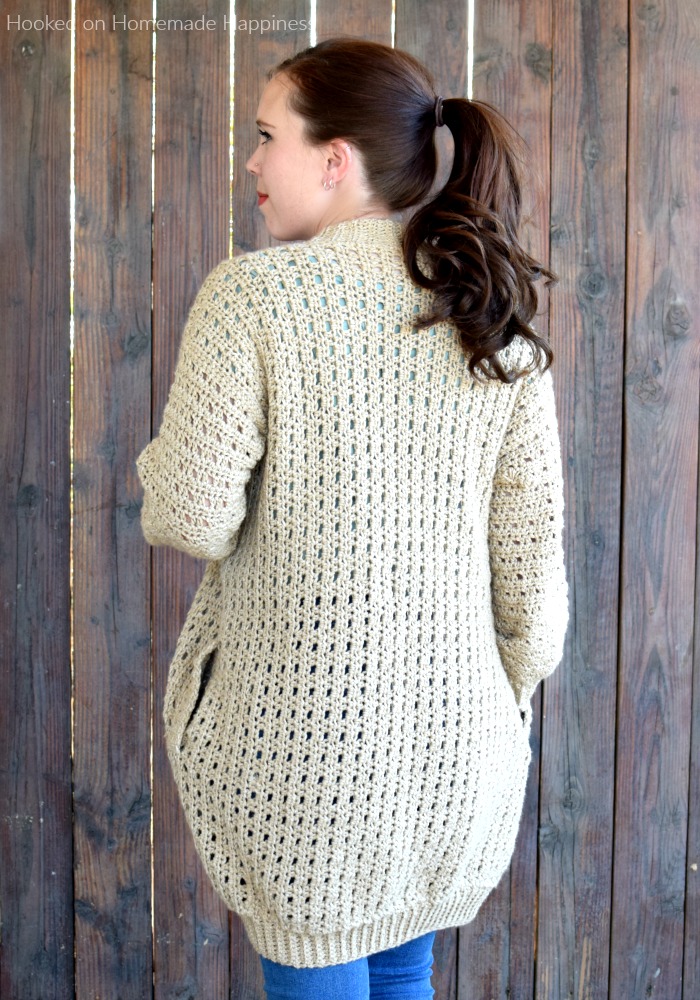
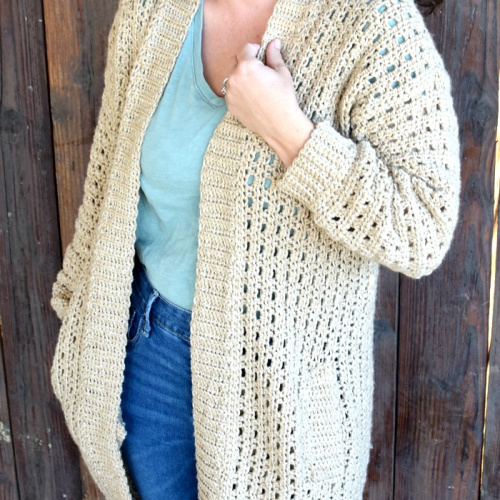
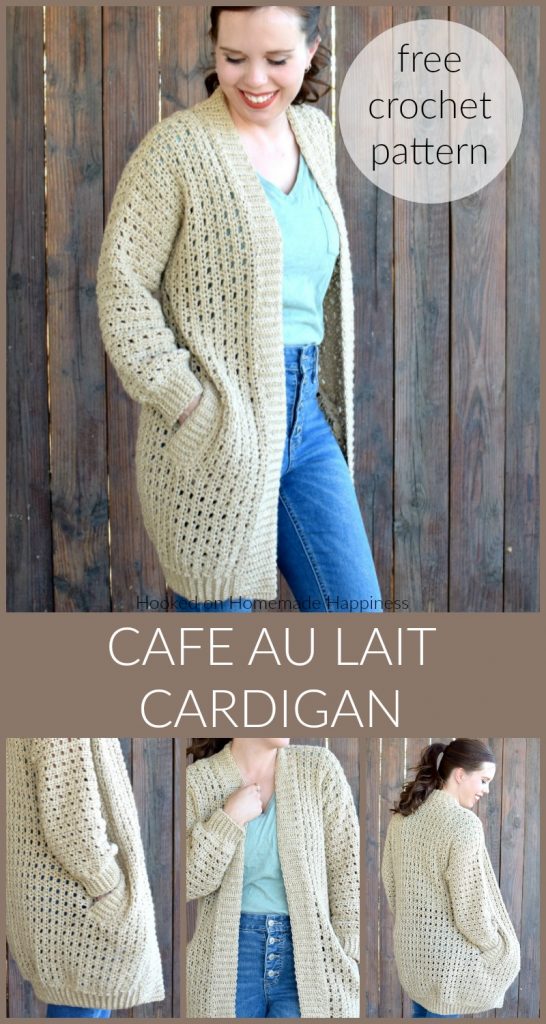
Cafe au Lait Cardigan Crochet Pattern
There is so much to love about the Cafe au Lait Cardigan Crochet Pattern. The seamless construction, the ribbing, the simple stitch, the POCKETS!
Purchase the ad-free, printable PDF for easy printing.
This cardigan has a pretty simple construction. It’s one rectangle (with spaces for sleeves) that’s folded, sewn (just a little bit of sewing) and then the sleeves are added. There are a lot of cute details in this pattern, especially the ribbing and the pockets.
Let’s talk yarn! I used Lion Brand Jean’s Yarn in Khaki. This is a worsted weight (4) acrylic yarn and it’s one of my favorites! It is the softest acrylic yarn I’ve ever used and that makes it perfect for this cardigan! Of course, any worsted weight acrylic (or cotton or wool) would be great for this pattern.

Making the Cafe au Lait Cardigan Crochet Pattern
Get the full free pattern below or purchase the ad-free, printable PDF
Materials
Lion Brand Jean’s Yarn in Khaki – approx 6 skeins for S, 7 for M/L, 8 for XL/2X, 9 for 3X
I/5.5 mm hook
yarn needle
scissors
stitch markers
Level
intermediate
Pattern notes & stitches to know
ch – chain
sl st – slip stitch
hdc – half double crochet
hdc4tog – half double crochet 4 together
sc – single crochet
sc2tog – single crochet 2 together
sc blo – single crochet back loop only
foundation hdc VIDEO TUTORIAL
· written in US terms
· ch 1 does not count as stitch
· This pattern is written as one rectangle (there is a photo within the pattern) and then a little bit of sewing to close the shoulders. Then the sleeves are added. Last add the ribbing and pockets.
· NOTE ABOUT THE POCKETS: The pockets do add a little bit of bulk around the hips. The pockets are optional and can easily be left out of the pattern.
– Gauge: 14 hdc x 11 rows = 4” x 4”
Sizes:
S, M, L, XL, 2X, 3X – The pattern is written in these sizes consecutively. Example, when the pattern gives the end of the row count (95, 101, 107, 113, 119, 125) The 95 is for the size S, 101 is M, 107 is L, 113 is XL, 119 is 2X, 125 is 3X.
Approx Finished Size:
Bust: S (38”) M (41”) L (44”) XL (47”) 2X (50”) 3X (53”)
Length: S (31.5”) M (33.25”) L (35”) XL (36.75) 2X (38.5) 3X (40.25)
Armhole: S (8”) M (9”) L (10”) XL (11”) 2X (12”) 3X (13”)
Sleeve Length: S (16”) M (16.75”) L (17.5”) XL (18.25”) 2X (19”) 3X (19.75”)
Size Small pictured on 5’0” model with 34” bust
CROCHET PATTERN WRITTEN INSTRUCTIONS
ch 3
Row 1: starting in the 3rd ch from the hook, foundation hdc 95, 101, 107, 113, 119, 125 (95, 101, 107, 113, 119, 125 hdc)
Row 2: ch 1, turn, hdc in 2 stitches, *ch 1, skip 1 stitch, hdc in next 2 stitches* repeat from * to * across (64, 68, 72, 76, 80, 84 hdc)
Row 3: ch 1, turn, hdc in each stitch and ch across (95, 101, 107, 113, 119, 125 hdc)
Repeat rows 2 & 3 to Row 13
A pocket hole is made in the next row (optional—if you’re not adding pockets continue repeating rows 2 & 3)
The height of the pocket hole is adjustable. Make the chain stitches wherever the pocket feels comfortable for you.
Row 14: ch 1, turn, hdc in 2 stitches, *ch 1, skip 1 stitches, hdc in next 2 stitches* repeat from * to * 6, 7, 8, 9, 10, 11 more times, ch 19, skip 19 stitches, hdc in next 2 stitches, repeat from * to * across
Row 15: ch 1, turn, hdc in each stitch and ch across (95, 101, 107, 113, 119, 125 hdc)
Repeat rows 2 & 3 to Row 19, 21, 23, 25, 27, 29 (95, 101, 107, 113, 119, 125 hdc)
A arm hole is made in the next row—the depth of the arm hole is adjustable. Add or take out as many chains as you need for the arm hole depth you need.
Row 20, 22, 24, 26, 28, 30: ch 1, turn, hdc in 2 stitches, *ch 1, skip 1 stitches, hdc in next 2 stitches* repeat from * to * 21, 22, 23, 24, 25, 26 more times, ch 27, 30, 33, 36, 39, 42
Row 21, 23, 25, 27, 29, 31: ch 1, turn, hdc in 2nd ch from the hook and in each ch and stitch across (95, 101, 107, 113, 119, 125 hdc)
Repeat rows 2 & 3 to Row 69, 75, 81, 87, 93, 99
The second arm hole is made in the next row.
Row 70, 76, 82, 88, 94, 100: ch 1, turn, hdc in 2 stitches, *ch 1, skip 1 stitches, hdc in next 2 stitches* repeat from * to * 21, 22, 23, 24, 25, 26 more times, ch 27, 30, 33, 36, 39, 42
Row 71, 77, 83, 89, 95, 101: ch 1, turn, hdc in 2nd ch from the hook and in each ch and stitch across (95, 101, 107, 113, 119, 125 hdc)
Repeat rows 2 & 3 to Row 75, 83, 91, 99, 107, 115
The second pocket is made in the next row.
Row 76, 84, 92, 100, 108, 116: ch 1, turn, hdc in 2 stitches, *ch 1, skip 1 stitches, hdc in next 2 stitches* repeat from * to * 6, 7, 8, 9, 10, 11 more times, ch 19, skip 19 stitches, hdc in next 2 stitches, repeat from * to * across
Row 77, 85, 93, 101, 109, 117: ch 1, turn, hdc in each stitch and ch across (95, 101, 107, 113, 119, 125 hdc)
Repeat rows 2 & 3 to Row 89, 97, 105, 113, 121, 129 (96 hdc)
Fasten off. Weave in the ends.
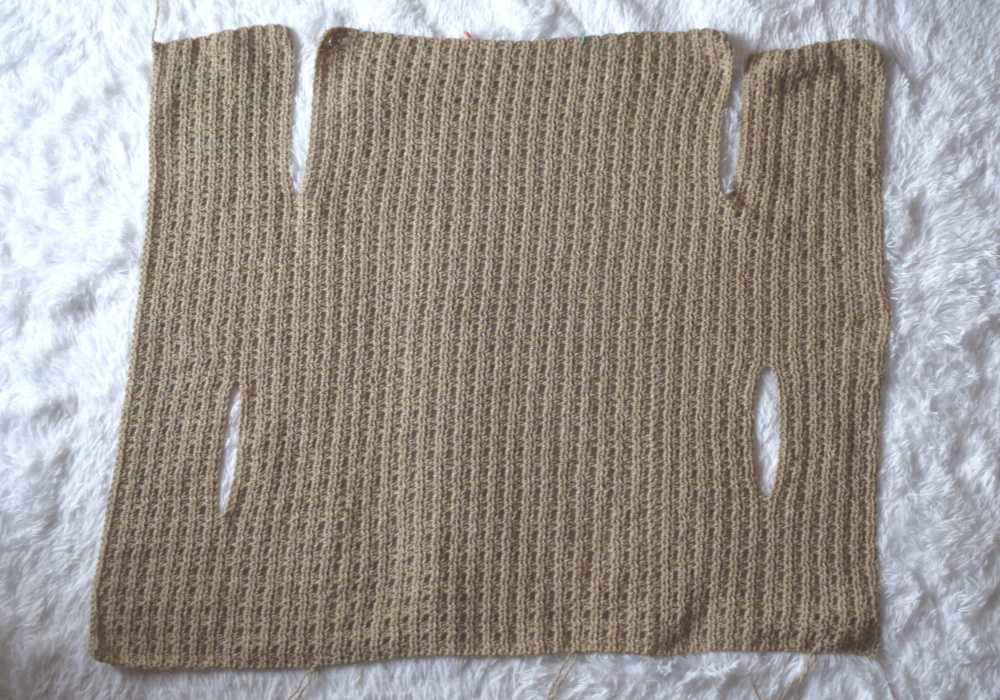
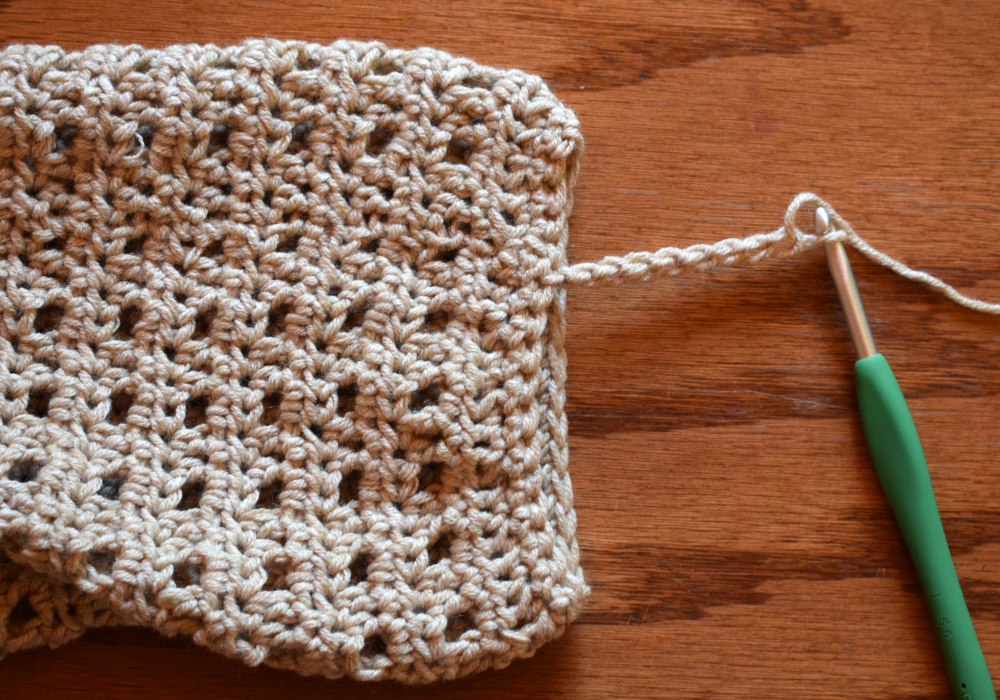
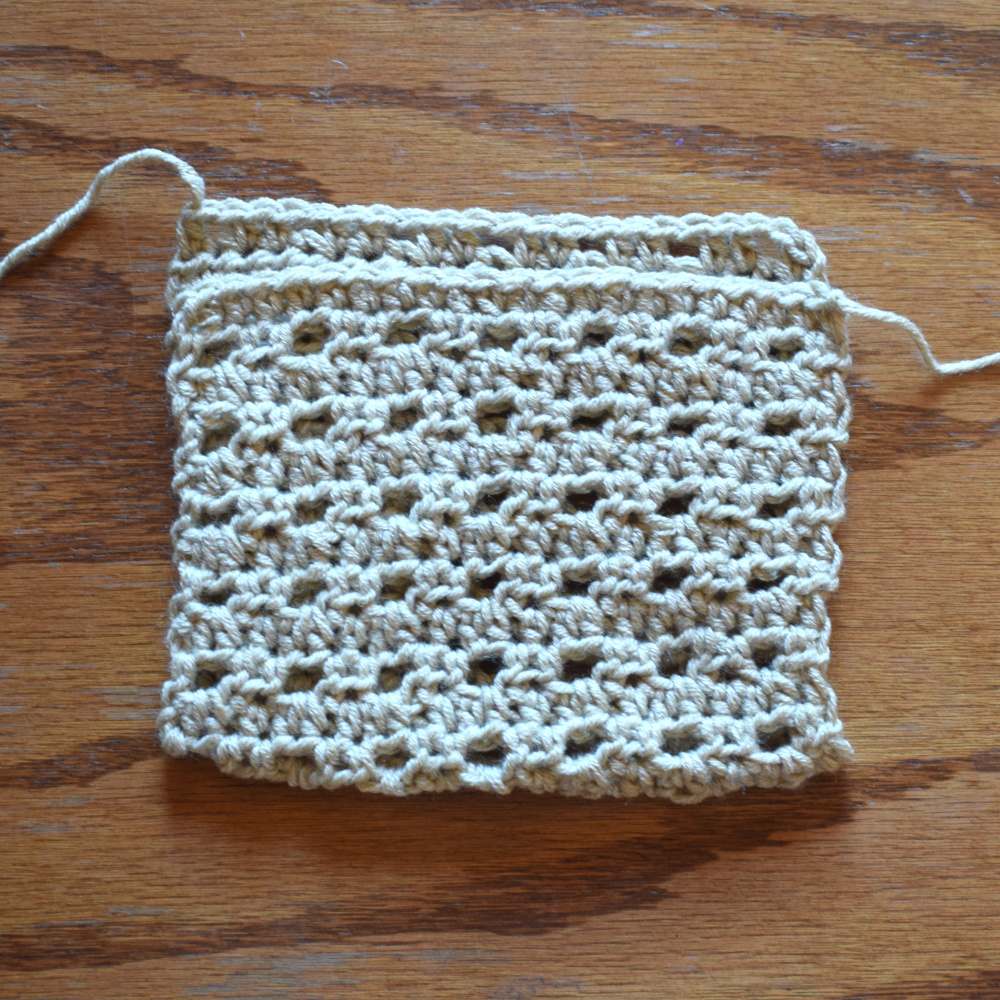
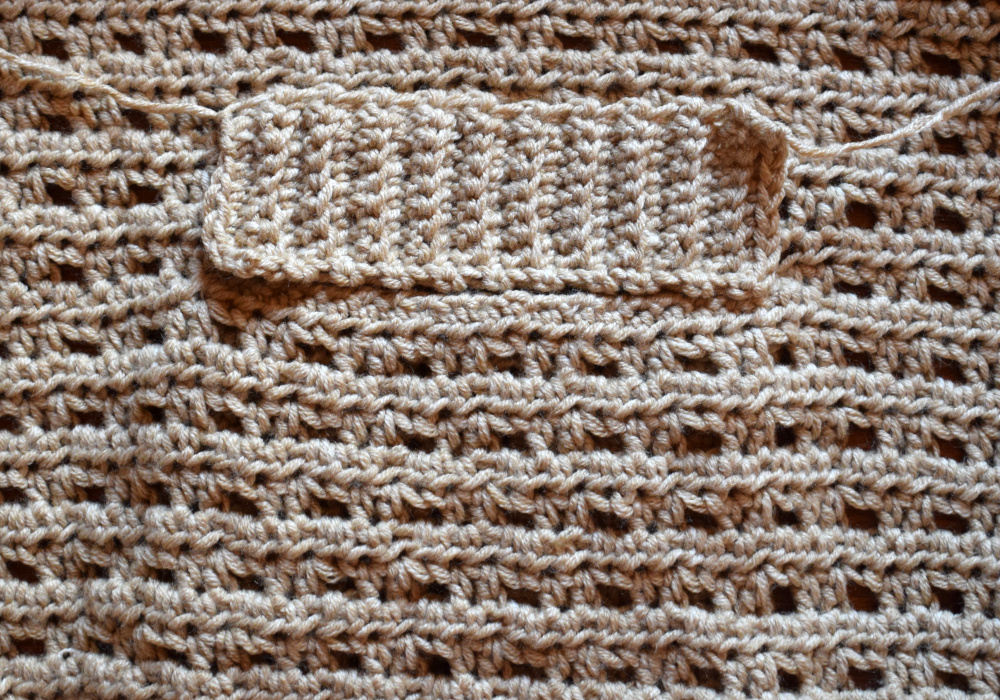
What the piece should look like so far is pictured below. There are 2 pocket holes near the bottom and 2 spaces for arm holes at the top.
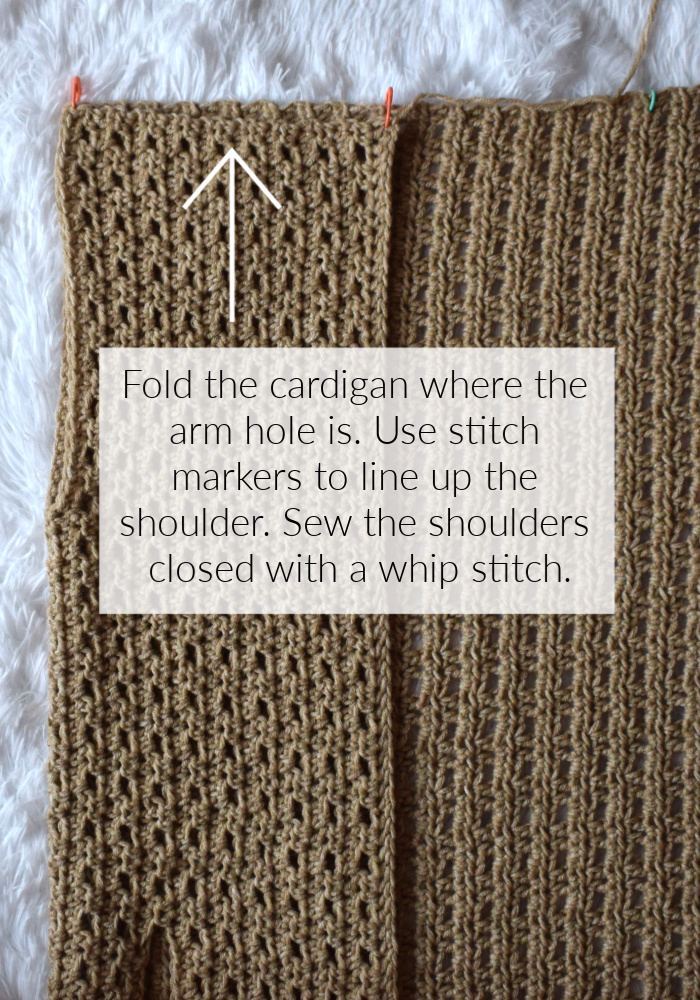
SEWING
Fold where the arm hole is. Sew the shoulders closed with a whip stitch.
Fasten off.
Weave in the ends.
Repeat on opposite side.
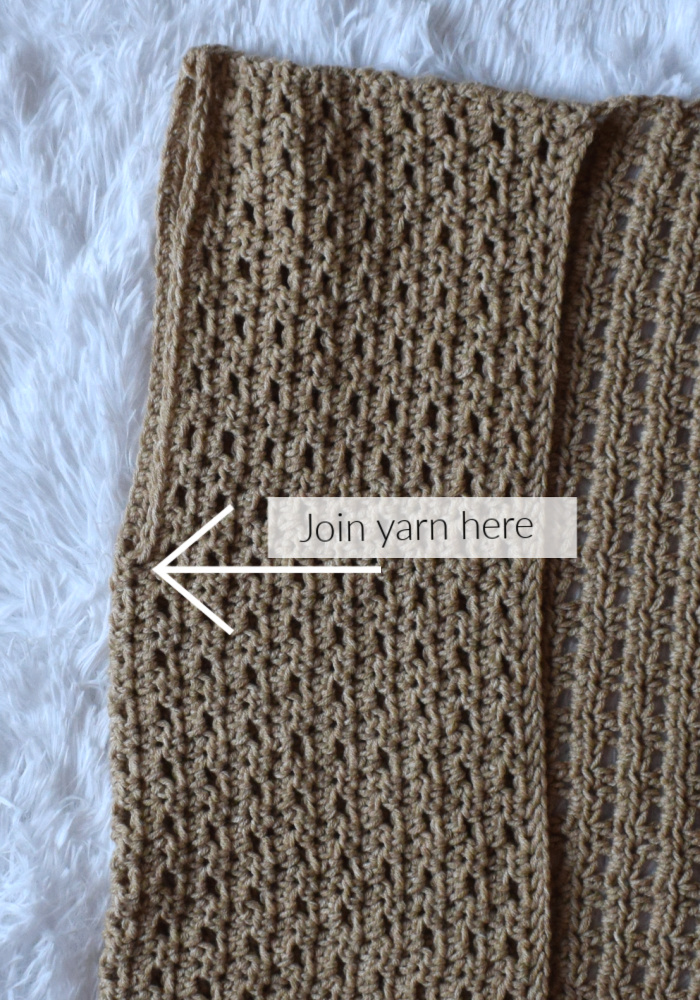
SLEEVES
Join yarn to the bottom of an arm hole.
Round 1: ch 1, sc in each stitch around (make sure the number of stitches is a multiple of 3), join to first sc with sl st
Round 2: ch 1, turn, *hdc in 2 stitches, ch 1, skip 1 stitch* repeat from * to * around, join to last hdc with sl st
Round 3: ch 1, turn, hdc in each stitch and ch around to last 4 stitches, hdc4tog across last 4 stitches, join to first hdc with sl st
Repeat rounds 2 & 3 to Round 8
Round 9: ch 1, turn, hdc in each stitch and ch around, join to first hdc with sl st
Round 10: repeat round 2
Repeat rounds 9 & 10 to Round 33, 35, 37, 39, 41, 43
(Or until 2.5” short of desired length)
Round 34, 36, 38, 40, 42, 44: ch 1, turn, *sc, sc2tog* repeat from * to * around, join to first sc with sl st
Round 35, 37, 39, 41, 43, 45: ch 1, turn, sc in each stitch around, join to first sc with sl st
Do no fasten off.
CUFF
HOW TO CROCHET APPLIED RIBBING >>>VIDEO TUTORIAL<<<
ch 9
Row 1: sc in 2nd ch from the hook and in each ch across, join to the last round of the sleeve with sl st (8 sc)
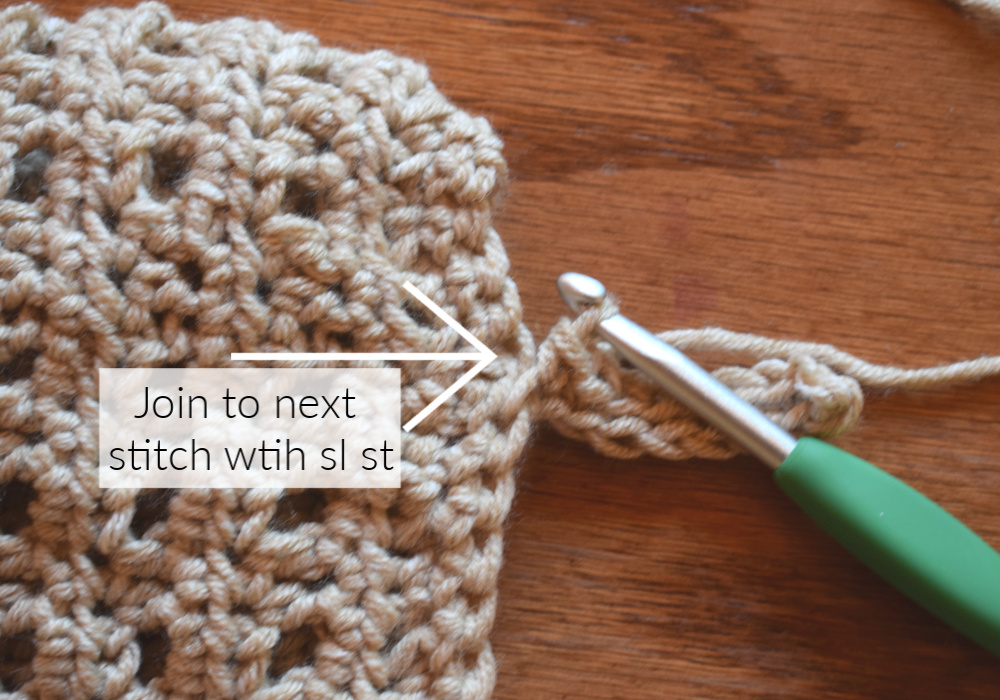
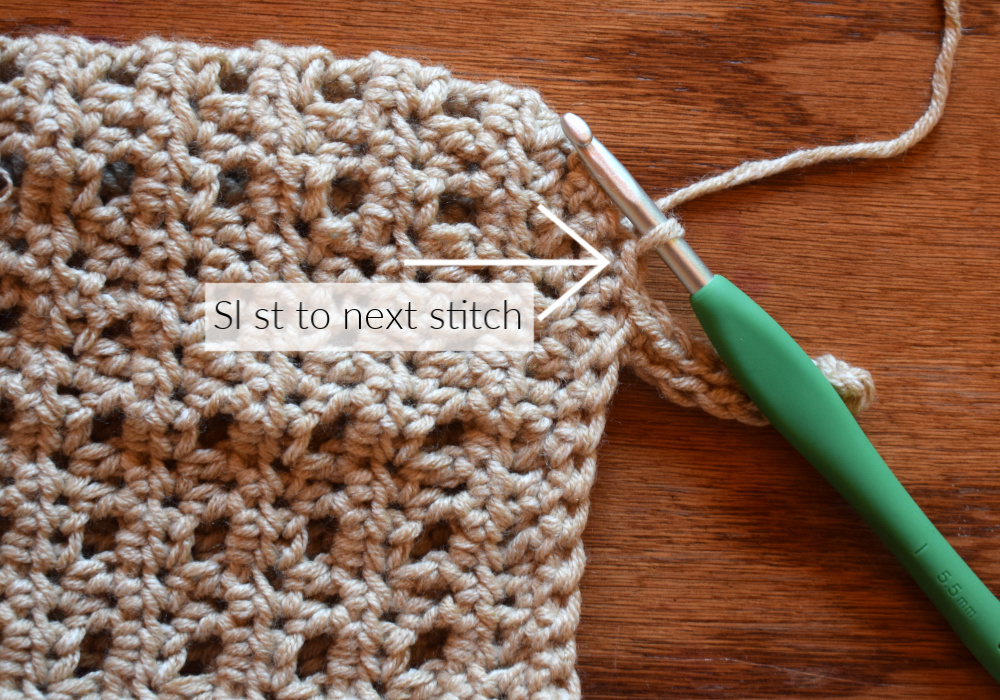
Row 2: sl st to next stitch in the last round of the sleeve, turn, sc in first stitch, sc blo in next 6, sc in last stitch (8 sc)
Row 3: ch 1, turn, sc in the first stitch, sc blo in next 6, sc in the last stitch, sl st to the last round of the sleeve (8 sc)
Repeat rows 2 & 3 until you work all the way around the sleeve. Sew the cuff closed with a whip stitch
Fasten off. Weave in the ends.
Repeat for other sleeve.
RIBBING & COLLAR
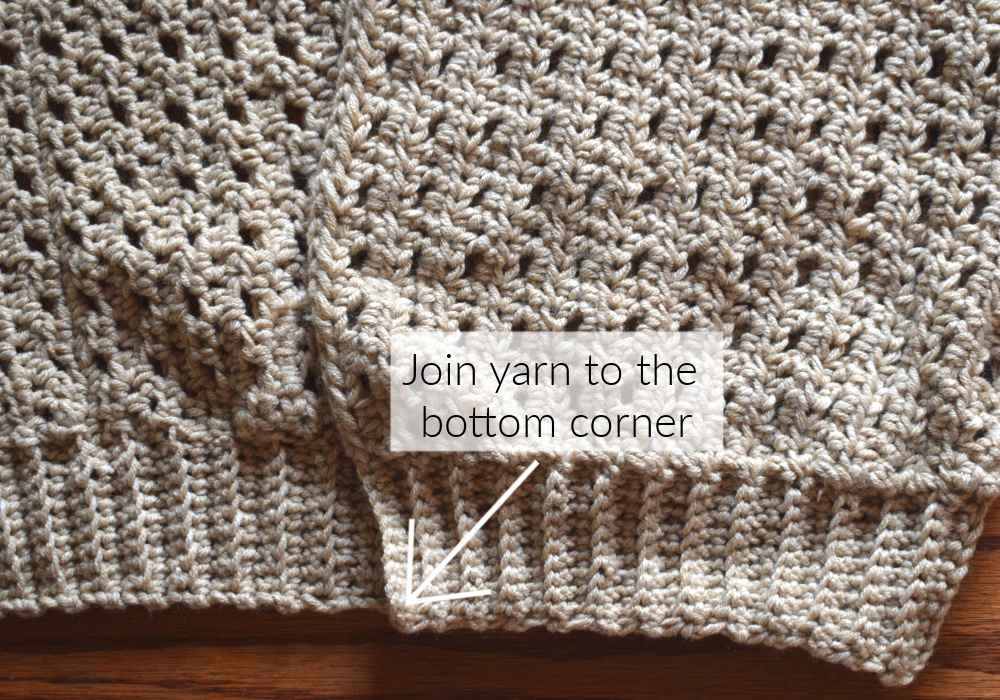
Join yarn to the bottom corner of the cardigan
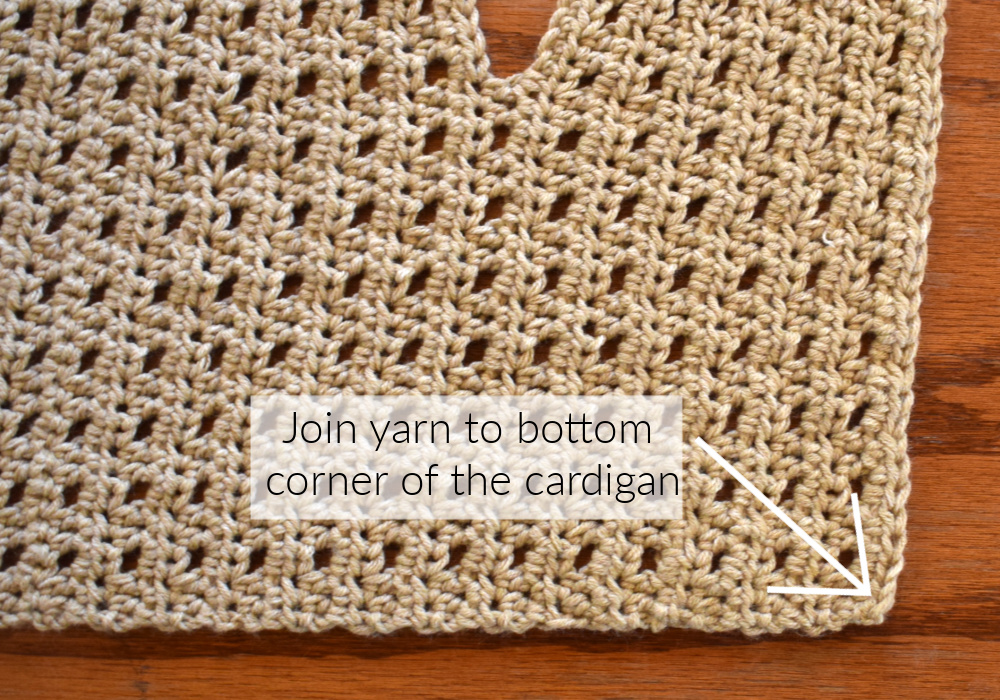
The ribbing is worked the same as the cuff of the sleeve. Work ribbing across the bottom of the cardigan
ch 9
Row 1: sc in 2nd ch from the hook and in each ch across, join to the last stitch of the cardigan with sl st (8 sc)
Row 2: sl st to next stitch of the bottom of the cardigan, turn, sc in first stitch, sc blo in next 6, sc in last stitch (8 sc)
Row 3: ch 1, turn, sc in the first stitch, sc blo in next 6, sc in the last stitch, sl st to the bottom of the cardigan (8 sc)
Repeat rows 2 & 3 all the way across the bottom of the cardigan to the opposite corner
Fasten off. Weave in the ends.
COLLAR
The ribbing is worked the same as the cuff of the sleeve. Work ribbing around the collar of the cardigan
Join yarn to the bottom corner.
ch 9
Row 1: sc in 2nd ch from the hook and in each ch across, join to the last stitch of the cardigan with sl st (8 sc)
Row 2: sl st to next stitch of the collar of the cardigan, turn, sc in first stitch, sc blo in next 6, sc in last stitch (8 sc)
Row 3: ch 1, turn, sc in the first stitch, sc blo in next 6, sc in the last stitch, sl st to the collar of the cardigan (8 sc)
Repeat rows 2 & 3 all the way around the collar of the cardigan to the opposite corner
Fasten off. Weave in the ends.
POCKETS (make 2)
ch 2, leave a long end for sewing
Row 1: starting in the 2nd ch from the hook foundation hdc 23 (23 hdc)
Row 2: ch 1, turn, hdc in 2 stitches, *ch 1, skip 1 stitch, hdc in next 2 stitches* repeat from * to * across (16 hdc)
Row 3: ch 1, turn, hdc in each stitch and ch across (23 hdc)
Repeat rows 2 & 3 to Row 26 (23 hdc)
Fasten off. Leave a long end for sewing
Fold the rectangle in half with one side taller than the other.
Use the long ends to sew the sides of the pocket closed.
Lay the cardigan with the wrong side facing out. The pocket should be horizontal with the ribbing below it.
Line up the pocket with the pocket hole on the inside of the sweater with the longer side facing out.
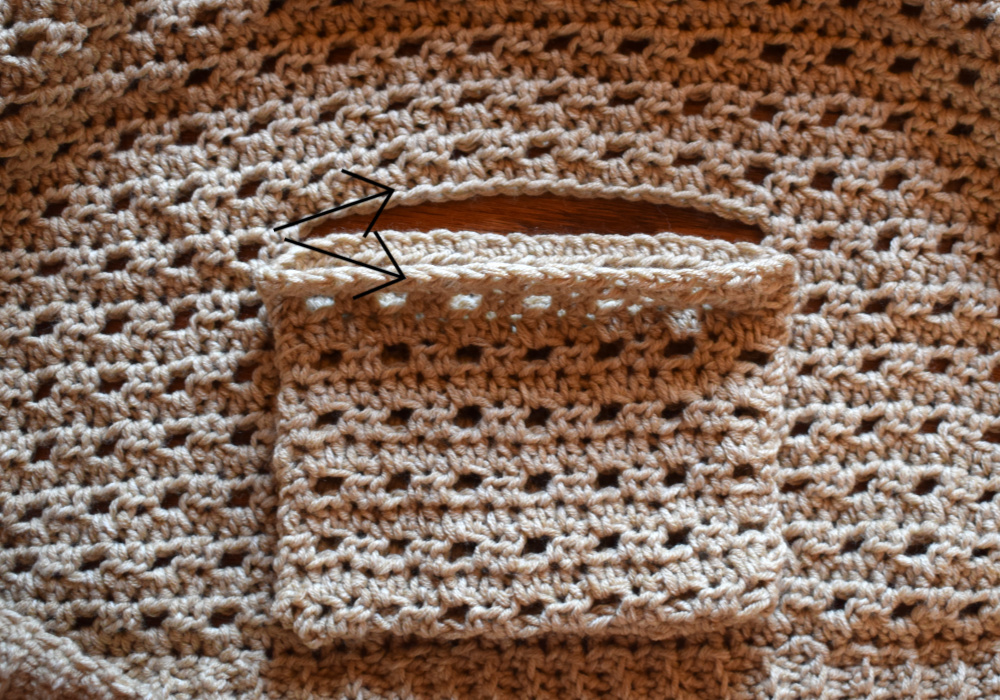
Sew the pocket to the pocket hole with a whip stitch. Sew the shorter side to the bottom edge of the pocket hole and the longer side to the top edge of the pocket hole.
Fasten off. Weave in the ends.
Turn sweater right side out.
POCKET RIBBING (make 2)
ch 9, leave a long end for sewing
Row 1: sc in 2nd ch from the hook and in each ch across (8 sc)
Row 2: ch 1, turn, sc in first stitch, sc blo in next 6, sc in last stitch (8 sc)
Repeat row 2 to Row 21
Fasten off. Leave a long end for sewing.
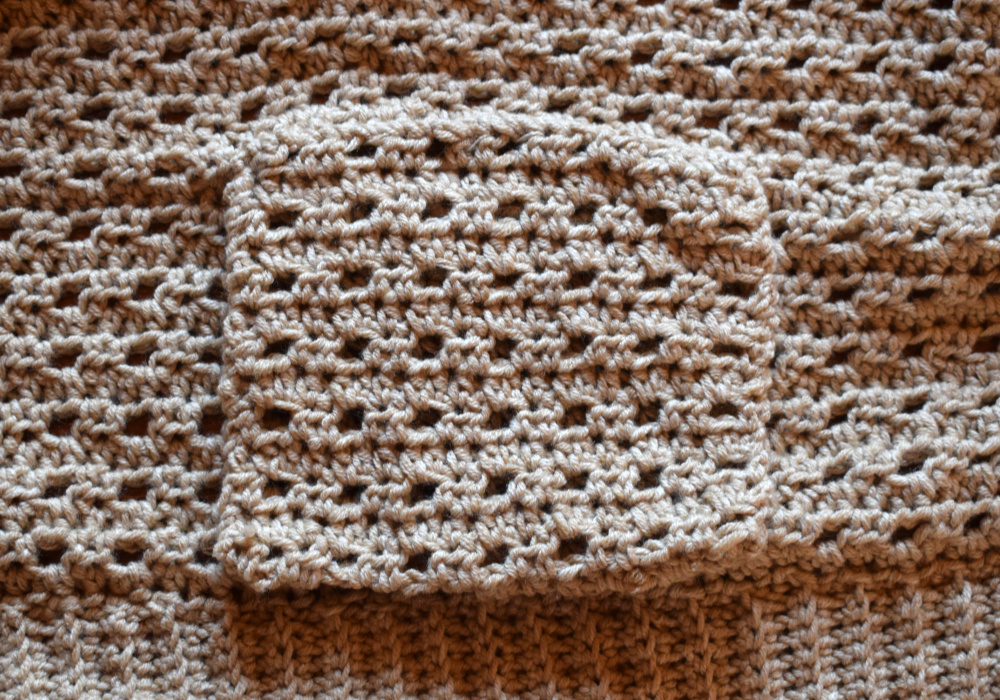
On the front of the sweater, line up the ribbing with the pocket hole. Use the long ends to sew the ribbing to the pocket hole and on the sides.
Fasten off. Weave in the ends.
Congratulations!! You finished this amazing sweater! I hope you love it!!
Looking for more patterns? Follow me on Facebook, Instagram, and Pinterest! Please share a pic of your finished product with me. I’d love to see it!

Hi Breann! How are you? This is a beautiful cardigan! I can’t wait to get started on it. I do have a request. Could you do a video tutorial on the pocket section? It would be greatly appreciated
Looks amazing could you do a YouTube video? It would be much easier❤
WOW cant wait to start this, thankyou
Thank you so much!
Hi beautiful cardigan in row 3 u write hdc in each stitch and chain 1 space would this mean around the ch 1 space or in the chain stitch?
Hi! Either way. I just worked into the ch-1 space.
Hi I’m a little stuck on rows 20 21 etc I’m making cafe au lait cardigan on row 20 I start with row 2 then make the chain if 30. Do I then go due the chain and finish off with row 2? And then the next row do I go up the chain I made then down to the other side? I’m so confused I hope you understand what I’m trying to say! Thank you
Hi! Yes, work your stitches in the chain to finish the row. Then you will turn and work down the stitches just made (not the other side of the chain). Hope this helps!
Why is my stitch count off this way? I m missing 7 stitches somewhere
Omg I’m in love. Can’t wait to pick my yarn and get started this weekend. Thank u
Thank you!
Hi! I love this cardigan, but I’m super short (4’11”) I was just wondering how tall you are so I can gauge where this would fall on me. Thanks!
I’m 5’0″
Love that pattern and want to try.
Thank you!
Thank you for this gorgeous fall freebie!!!
Just lovely! I am planning to make this but just have one question. How many skeins for XL? I don’t see it in the notes. Thank you !
Thanks! And whoops!! Approx 8 🙂
Thank you so much! I was guesstimating that, lol. Now I can get started on this. I’m super excited. Can’t thank you enough! This will be a first sweater I’ll make for me!
Yay! Let me know if you have any questions 🙂
I just fell un love with cour cardigan!
Thank you!
How many chain stitches in the foundation?
If you’re using a starting ch instead of foundation hdc, ch the amount of hdc you need for your size + 1. Then start in the 2nd ch from the hook
Lovely cardigan thank you for sharing. I’m planning on making this but now to decide on what colour I would like it to be.
Hi Breann
I have a question on row 20
It says to chain 39 for xl but then what?
It goes to row 21…am I missing something ?? I love this pattern but it sure has me working!! ??keeping stitch counts!
Hi! On row 26 for XL that’s where the arm hole is made. You will ch 39 and that’s the end of the row 🙂 Then you will ch 1, turn, and half double crochet in each ch and stitch across. There will be a space. This will eventually be where the sleeve goes. I hope that helps!!
Thx you for the quick response!! Thank you!!! Love this pattern ❤️
Hi Breann, great pattern! Thank you!! I’m loving this cardigan so far, I’m up to the sleeves, but am a little confused by round 3 it says – Round 3: ch 1, turn, hdc in each stitch and ch around to last 4 stitches, hdc4tog across last 4 stitches, join to first hdc with sl st. I’m unsure as to when I do the chain 4 :/ can you possibly clarify this step for me please.
Hi! I’m not sure what you mean by ch 4?
I had the same question. It says “round3: ch 1, turn, hdc in each stitch and ch around to last 4 stitches, hdc4tog across last 4 stitches, join to first hdc with sl st”. The part where it “and ch around to last 4 stitches.” What does that mean? Am I supposed to ch 4?
Hi! You hdc in each stitch and ch. Do this until you reach the last 4 stitches of the round. Then hdc4tog in the last 4 stitches. I hope this helps!
Hi, in the measurements for the sleeve length, you have two different numbers for the medium size. 16.75 and 17.75. Which is most accurate? Thank you for a wonderful design.
I had the same question. It says “round3: ch 1, turn, hdc in each stitch and ch around to last 4 stitches, hdc4tog across last 4 stitches, join to first hdc with sl st”. The part where it “and ch around to last 4 stitches.” What does that mean? Am I supposed to ch 4?
Hi! You hdc in each stitch and ch. Do this until you reach the last 4 stitches of the round. Then hdc4tog in the last 4 stitches. I hope this helps!
So you ch 1 after every hdc?
The previous round has ch 1 spaces. So in this round you hdc in each hdc and ch space around
Hi:)
Can you please make a stiches tutorial for the Cafe au lait Cardigan;)
Love this cardi:)
Thanks
On the sleeve portion .. it says repeat rounds 2&3 to round 8. If you do that you end with a round 2 and then round 9 says repeat round 2 again?? That would not follow the pattern and you would have two rounds of row 2 back to back.
You’re right! Sorry about that!! I just updated it 🙂
No problem. I kept counting and counting and was driving myself crazy that I had missed something. Lol. I can’t wait to wear this btw!!! I can’t get it finished fast enough.
What is the correct way to do the sleeves. I don’t see any changes.
I’m going to give this cardigan a try. Love the stitches and hidden pocket. I’m going to do it in LB mandala tweed. I’ll start as soon as it comes.
That will be beautiful!! Let me know if you have any questions 🙂
Thank you Breann. My yarn came today and I have started it and so far no problems and I love the stitch pattern.
Thank you so much for the patterns you’ve shared with us. I Love your blog. As a happy ‘hooker’ for over 4 decades i think it’s one of the best around. Your instructions & pix are clear and I’ve shared it with some newer crocheters. Thank you. Have a wonderful holiday!!
Thank you so much 🙂
Hi! Loving the pattern. Do you have a suggested number of sc to start the sleeves with? I’m making a size small, and did on sc in each stitch around (57 I think) and just got to the part where you start the cuff and the sleeves seem quite large. I think I’ll frog the sleeve and start with less stitches but wanted to see if you have a suggestion. Thanks!
Hi! If it seems too large for the cuff, you can do a round of *sc, sc2otg* to see if that tightens it up enough for you 🙂
Love this pattern! My question is when you fold to make shoulder seams, do you fold right sides together, then turn right side out before starting sleeves?
Hi! At this point there really isn’t a “right side”. After you sew and weave in the ends, I would turn it so the ends and sewing are on the inside.
Hi, I found your pattern on ravelry and love it! My question is…I’m still new to making cardigans. This pattern is listed as intermediate level….can you tell me why? Just was wondering what I needed to know that makes it that vs. maybe a beginner level? Thanks!
Hi! I classified it as intermediate because of the construction 🙂 The stitches are all easy
If I want to make this a size 4X, how many starting chains do I need. I am sorry for the bother, I just love everything about this cardigan. Please try and help me.
Thanks
Joyce
Hi! Just a quick question. I’m wondering if the sleeves are worked from the inside or the outside of the cardigan? As well as is the ribbing worked on the inside or the outside?
Thanks!
Hi! I joined to the front (I think), but they are turned rounds so it shouldn’t really matter either way 🙂
Thank you!
Hi what size is 3 xl please
Hi! The 3X is the last number for the different sizes 🙂
Hi I meant like what size in numbers? Which xl would be British size 20 please
I’m just starting this pattern and have a question on row 2. Where it says “hdc in 2 stitches” , do you mean hdc2tog for a decrease or hdc in the next 2 stitches? Thank you!
Hi! hdc in the next 2 stitches.
I made this using your pattern and it came out beautifully. Thanks!
I’m making this and have a question. Does it make sense that the pockets are on row 14 for every size? Wouldn’t the front panel on say a 3xl be larger than a size s, so shouldn’t there be more rows before the pockets? Just trying to figure it out before I go any further. Thanks so much for the pattern, it’s just lovely!!!
Hi! That’s up to you 🙂 You can do the pockets a few rows back if that’s more comfortable for you
Hi On row 14 it says chain 19 for the pocket. I did that and all is well. On row 15 I’ve lost a stitch. I’ve done this row 5 times now and counted every stitch but still end up one stitch short! Not sure if it’s your pattern or my counting.
Hi again I’m stuck once again I had to rip out and start anew so. I’m on row 20 did the the 22 of row 2 chained 33 hdc down like you said and every stitch but am coming up short of the 107 I need ! I checked the row before and it’s 107 so what am I doing wrong?
Hi! If I’m reading correctly, you are making a size large? If so, the sleeve starts on Row 24 for large. You should have 74 hdc in row 24 before starting the ch 33. Hope this helps!
Hello,
I was wondering if you block this pattern at all? Thanks!
Hi! I did not block mine 🙂
Okay, thank you so much!
Please guide me round 3 part sleeves I don not underestand it how to crocheting.
Hi! hdc4tog is a half double crochet 4 together. It’s a hdc decrease across 4 stitches 🙂
I absolutely love this pattern. This is the first crochet sweater I have been able to find that actually fits right.
Yay! Thank you so much!!
Hello, sorry to bother you again but I was wondering if you could explain round 21 in more detail? What does the pattern mean by stitch across?
Hi Breann!
Im loving this pattern, but I’m really struggling with the sleeves. I’ve tried working them up with the body inside out and the right way and no matter what the sleeves are working up so hdc are under while the 2hdc/chain are over (instead of the hdc being raised). What am I don’t wrong?
Hi! I’m not sure. Why don’t you try keeping it right side out. Then when you do the first round of hdc they should both be facing the same direction.
Hi it’s me again! Am I doing something wrong? My cuffs look like they are flailing out ? Help!!!
I’m almost done with this sweater, and I love it, but I had no tweak it here and there
I know this is an old messages, but I had the same problem with the cuffs. I believe I slipped stored through two. It appears, at first, that it’s far from the end, but it worked perfectly. I did the same with the bottom ribbing and now the front ribbing.
I didn’t use as ma Chains for the arms as well, I just tried it on, and love it. Fits perfectly
I’m just finishing this cardigan and couldn’t be happier with how it’s turning out. I do tend to crochet tight so it doesn’t surprise me that the sizing is off, no big deal. I would normally fit a medium to large but thankfully I decided on the 2x and it fits perfectly. It’s actually the first crocheted item I’ve made that has fit right. I’ll be making more…thank you!!
Yay! That’s so awesome!! Thank you!
I’m to the ribbing and collar.
When joining to the bottom corner, are you have the outside or inside out?
Starting on bottom of left or right front??
A video tutorial would be helpful.
Thanks.
Hi! It doesn’t matter if you start on the inside or outside 🙂 I started on the bottom left.
Can you provide a close up pic of how the pocket flap is attached?
I can’t visualize it.
Thanks.
Hi! Sorry! I can’t take a picture. We’re moving and everything is packed away 🙁
Hi,
I just wanted to know if row 2 &3 is counted as 1 row – as repeat into row 13 – does that mean they the combination of (row 2&3) is one row?
Hi! Alternate the instructions for 2 & 3 🙂
Hello,
Do you know what the approx length of the first foundation chain should be? I’m working an XL size, and I seem to be a loose crocheter when it comes to making foundation chains. I’m just trying to figure out for gauge should I go down a hook size for the chain.
Thanks!
It should be approx the same as the length of the sweater 🙂
When joining for the ribbing what do I do with the chain 9? The way I read the pattern it will just be hanging out there and I know that can’t be right😂😃
You’ll sc across the chain 🙂
I have just started on the sleeve hole, row 20. Confusion on rows 22, 24, 26, 30. If I followed the steps as row 20 there would be arm holes across the back. would these not be just repeat rows 2 and 3??? Same with rows 23, 25, 27, 29, 31??
Hi! Are you referring to where it says Row 20, 22, 24, 26, 28, 30 followed by the directions? These different numbers correspond to the different sizes. What size are you making?
Large.
Ok, then for size large you will look for the third number down the line. You’ll start the arm holes in row 24. Small is row 20, Medium is row 22, Large is row 24, XLarge is row 26 and so on… 🙂 Hope that helps!!
If I want to make this a size 4X, how many starting chains do I need. I am sorry for the bother, I just love everything about this cardigan. Please try and help me.
Thanks
Joyce
Hi I’m confused with the beginning, it says ch 3, and then in third chain from hook, hdc foundation row 95. I don’t understand. Where do I make the foundation row?
Hi! You are making foundation half double crochet. This is when you make the starting chain and the first row of half double crochet at once. Here is a video tutorial 🙂
https://www.youtube.com/watch?v=SMxMYzOX5R0
Hi, im looking to make this in cotton or cotton combo yarn, probably a Schweppes yarn. Would this pattern make up well in this yarn? Its a lovely pattern and I want one to wear in summer.
Hi! Yes, I think that would work well 🙂
I’m approximately 6’2″ tall, is the pattern easy to lengthen, both the body and sleeves?
Hi! Yes, you can add to the starting chain length 🙂
Hey I am confused on the pocket part do you mind explaining it a bit
Hi! You’re creating a slit where the pocket will be. So you’ll have a hole along the side after this row. It will turn into a pocket later in the pattern 🙂
Hi, I’m about to start this beautiful cardigan. My bust is 41″, and am thinking of going up to the next size. The other measurements armhole etc aren’t going to match up. How many extra stitches do I add?
Hello, I am currently trying to crochet the sleeves on the medium size. Do you have a stitch count for the sleeve after the rows of hdc4tg?
Also is there a way to just make the sleeves and sew them into arm hole. I am struggling with keeping the stitches lined up. Thanks
Hi! You could make them flat. Just ch the amount of stitches needed for round 1. Then sew it on 🙂
Hi it me again finally got the way to do the row 20 etc. so I’m at row 69 what happens with 79 then 75 do I just do row 2&3 until I get to where I started second sleeve hole?
Thank you answering my question but I am still stuck with losing stitches! I went up to row 24 and then did the pattern 23 times but I only get 65 hdc not the 74 you said I should have! What do I keep doing wrong?
I’m sorry! When I said 74 hdc I meant 74 stitches (including the ch-spaces). Ugh… my bad!!! 🙁 🙁 So if you repeat that 23 times you have 46. Then plus the first 4 hdc and you should have 50 hdc.
Hi got another problem. Just tried half the sweater to my daughter and it looks like the shoulders are going to be small. She’s a medium but I’m making a large! Any suggestions would be helpful. Do you think when I get to the sleeves it will work out? Ugh!!!
Hi! Do you mean the back section (across the entire back) will be small? Or the part that folds and is sewn (directly on top of the shoulders) will be small? If it’s across the back, you can just continue repeating the pattern until it’s the width you want. If it’s across the shoulders where it’s going to be sewn, a collar will be added and this will add width there 🙂
I think the armhole is too small so I was trying to figure out if I could add on a few stitches at the shoulder to make that hole bigger
Oh ok, yeah you could add some rows to the top of the garment to add a bit of length there if needed. If you go that route, then I would finish it and then join the yarn along the top and add a couple rows there.
I’ve been working on the body for like 4 months (on & off lol) just finished it and am trying to finish it for spring. It looks awesome thank you for this pattern!!
Yay! Thank you!
I just started this pattern today for my wife, after making my daughter a Catalina Cardigan with your pattern – my first ever wearable that isn’t a hat. At this point, no questions – just a thank you for making patterns and tutorials that make crocheting a sweater far less intimidating.
Thank you so much!!
The ribbing on the sweater I need it clarified please! I understand all the way to where you slip stitch at the end of each row do you slip st into same row and then the next st or do you at the end slip st into the next st and repeat or do you slip stitch into the next and one more st (2 stitches on chain sl st) I see pictures but can’t get it!
You need to start on the wrong side to make the ribbing correctly. Is that correct sorry I need a bit of help
Hi! It doesn’t matter which side you start on 🙂 I have a video tutorial for applied ribbing here: https://youtu.be/M4bBhoj9oYk?si=e_PVURQ4MkOMaDka
Hi ,tks for the pattern , but on row 38 , I’m going the 2xl , says chain 39 …
Row 29 , ch 1 turn , total sts 119 hdc … this means the chains are not worked
do you leave it for later ,I don’t see where you would work it .
Or ,do you add the chains to the row to the end by slip st , and next row start the hdc all the stitches .
Hope this clear, sure want to finish this cardigan , thank you
Hi! On row 28 you will do the pattern repeat just 25 more times (so not all the way across). Then do the chain of 39. So the row should still be the same length as the previous row. In the next row you will still have the same number of stitches after working into the chains. Hope that helps!
Sorry , I just don’t understand what to do with the 39 chains ,
you say not all the way across .????? Is that mean at the end of chain you join
With hdc at beginning of next row and leave the chains, I don’t think that’s what you mean, I have to work those chain somewhere to continue for the front
Thank you , I’ll keep trying , tks for your reply , linda
For row 28 do the repeat 25 times. You will have stitches left in the row. Then chain 39. Do not join. In the next row you will turn and work across the chain and then to the stitches made in the previous row. This will create and opening that will be the sleeve after sewing. Right now it is a slit in the fabric.
Oh my , I have read this so many times ,my brain is gone lol ,
You repeat 25 more times , I did 25 more rows , Lord , so sorry to bother you , but also very grateful for you help .
I did was chain the 39 on the row ,the rest did hdc for a total of my sts = 119 , it does have a opening but the top is joined not slit ..
I think that will work, if not I’ll frog to the beginning of sleeve opening . Again , thank you
Hello! I am really struggling with the sleeves. What would cause me to have too many or too little stitches?
Hi! When you are turning, make sure you’re not working into the sl st 🙂
Thank you! That is exactly what I was doing wrong.
Hello im hoping you can help me with a question. I’m doing a size XL I just did Row 26 with 24 times of Hdc and I got 48 hdc in 2 stitches , in total with the Chain Space is 72 Stitches when for a size Xl is 76 Stitches. Also when I count all the stitches including the 36 Chains the total is 108 when the regular count is 113 Hdc. I’ll appreciate a lot the help. Thank you
Hi! For row 26 you *skip 1 stitch & hdc in the next 2* 24 MORE times (so 25 times total) = 75 stitches. + the first 2 hdc = 77 stitches. + 36 chains = 113
Hope this helps!
I love this cardigan pattern. Thank you for sharing. I have been crocheting 55 years, so I don’t have trouble with reading patterns and keeping my tension the same throughout a project. But my cardigan is literally diagonal. It is almost like I am dropping a stitch on one end and adding to the other end but I am not. I have been blocking it but not having any luck. Do you have any suggestions?
Hi! I really don’t know why it would do that. Are you using half double crochet for every row? Not alternating with another stitch?
Just half double crochet stitches. I will keep blocking it and hope it straightens up.
I’m finally finishing this up. My first crocheted cardigan, even though I’ve been crocheting for a long time! Thanks for the gorgeous work as inspiration, and for sharing your pattern! I had a lot of trouble with multiple aspects, but that’s mostly on me, I think – LOTS of learning! One thing that didn’t work out as expected is that the ribbing on my sleeves – and the collar area – turned out kind of ruffled. I asked in a facebook crochet group for advice & loads of people told me that I shouldn’t crochet in every row when making the ribbing. Your instructions don’t say anything about that… should I just know that, or is there some other trick I missed? I definitely did not add additional rows, only crocheted into what was already there.
Hi! It’s very easy to add too many sc ribbing rows. I recommend adding a stitch marker whenever you slip stitch to the garment so you don’t accidentally slip stitch into a sc twice (I do this all the time!)
Hi, I’m so excited to try and make this! Just wondering, I want to make the main portion of the cardigan in black and all the ribbing in green, could you advise as to approximately how many of each skein I’ll need? I’ll be making a medium/ large. Thank you so much!
Hi! Yes, you can do the ribbing a different color. I would guess you will only need 1 skein for the ribbing?
I am a pear shape figured kind girl, and I want to have my length like about 3 inches above my knees. My question is when I make my starting chain do I make it measuring around the roundest part of my body???
Hi! The starting chain runs vertically and is the length. You will want to add rows to add to the width of the sweater 🙂
Thank you
Would you add extra rows after the arm hole or before and after?
Would you add extra rows after the arm hole or before and after?
I would add before and after