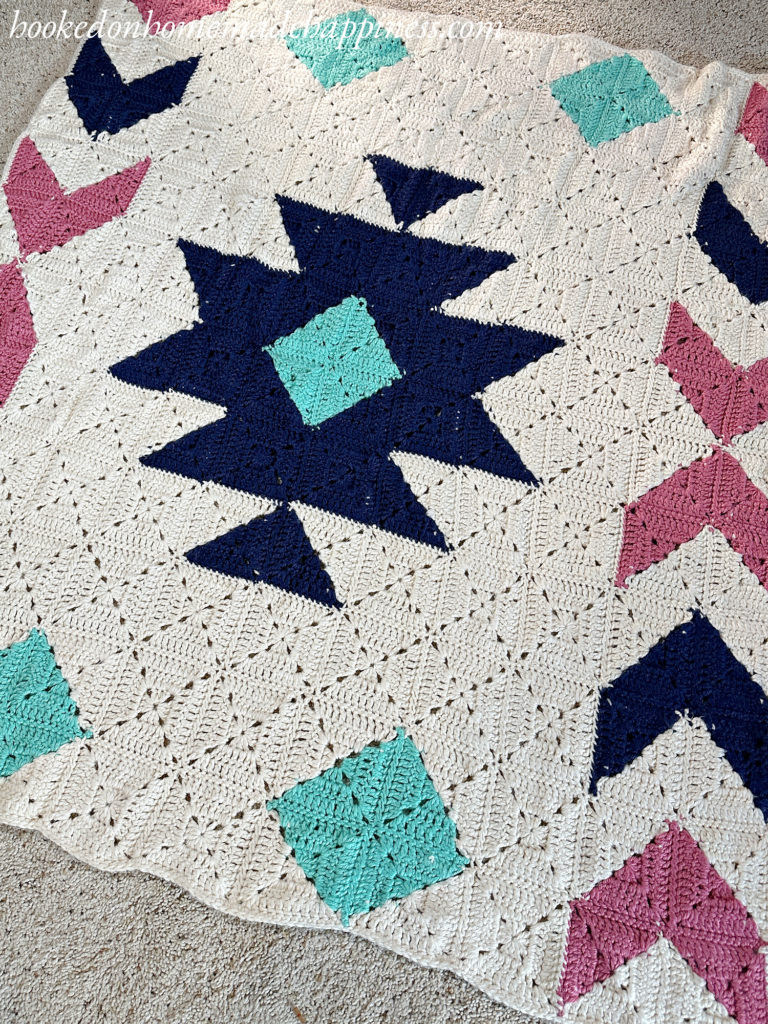
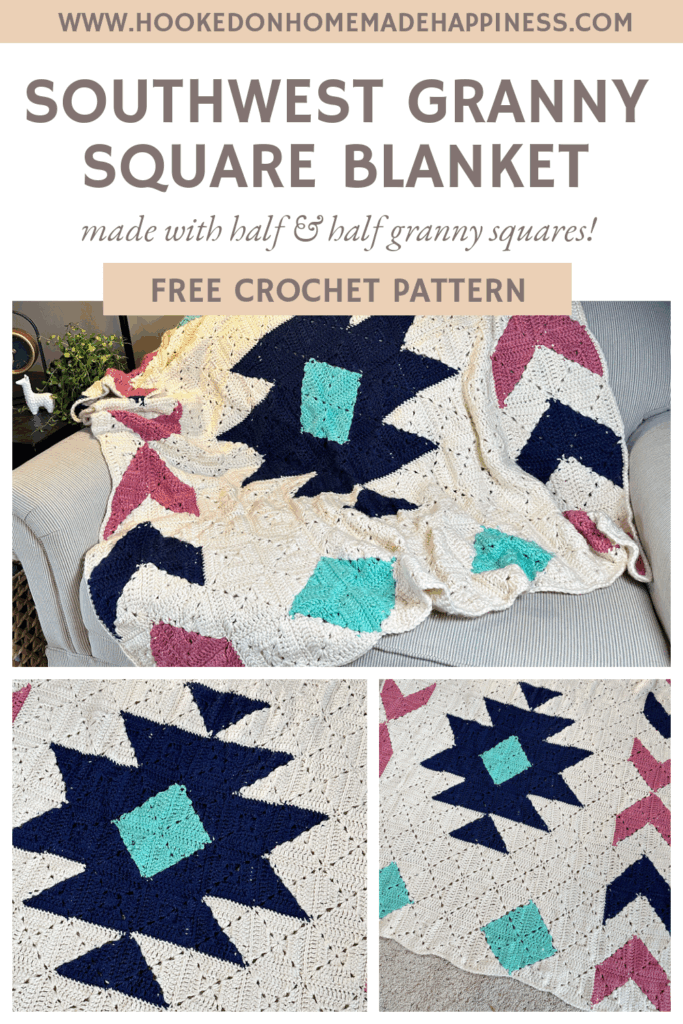
Southwest Granny Square Crochet Blanket
Wrap yourself in warmth and style with the Southwest Granny Square Blanket! Inspired by classic southwestern patterns, this crochet blanket uses a clever combination of half-and-half granny squares to form bold geometric designs and striking color contrasts. Whether you’re decorating your home or gifting something cozy, this eye-catching blanket is perfect for adding a pop of personality and warmth.

What Makes This Blanket Special?
Made with Red Heart Soft Essentials, a bulky acrylic yarn with a soft, silky finish – ideal for snuggly blankets.
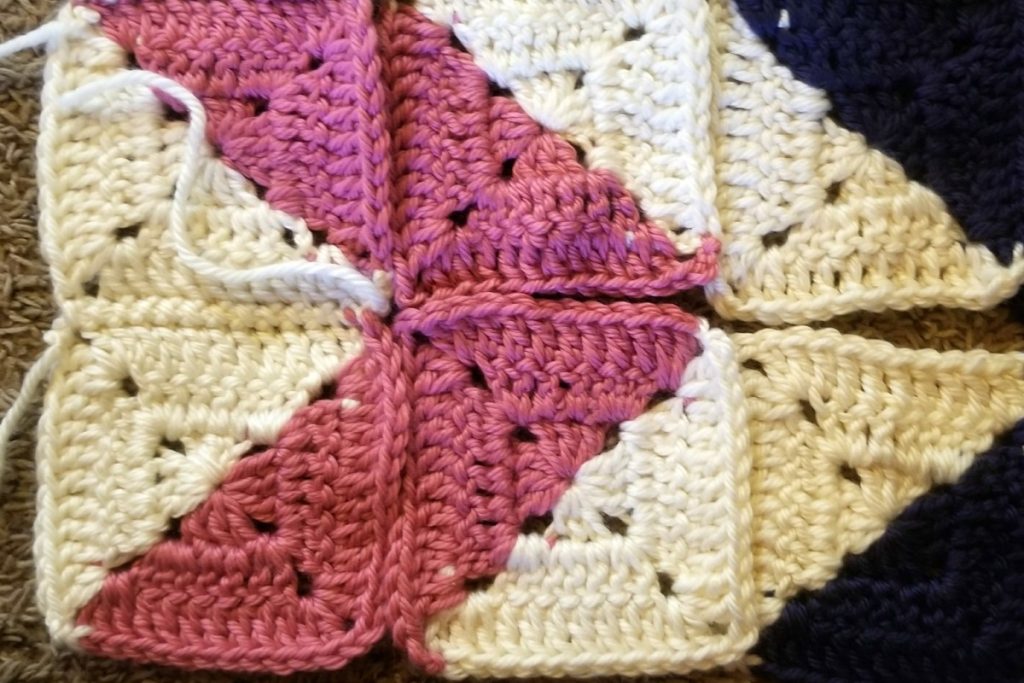
Half-and-half granny squares give a modern twist to a beloved classic. Each square is made with two contrasting colors, split diagonally to create a bold visual effect.
The finished layout forms a striking Southwest-style motif, reminiscent of woven textiles and desert landscapes.
Pattern Construction
The blanket is made up of half-and-half granny squares, which are joined together in a specific arrangement to form a southwest-inspired layout. Once all the squares are completed, they’re laid out like puzzle pieces, rotated to achieve the desired effect.
After joining the squares, a simple border brings everything together for a clean, finished edge.
Stitches Used
- Chain (ch)
- Double Crochet (dc)
- Slip Stitch (sl st)
This pattern is beginner-friendly with a twist – once you learn how to make the half-and-half squares, the rest is just arranging and assembling.
click here to pin this pattern for later >>>
Southwest Granny Square Crochet Blanket Pattern
Get the free pattern below or purchase the ad-free, printable PDF in my Etsy Shop or Ravelry Shop.
PIN for later HERE
Add to your Ravelry Queue HERE
Materials
Red Heart Soft Essentials in Cream 12 skeins (approx 1,472 yds)
Red Heart Soft Essentials in Navy 4 skeins (approx 524 yds)
Red Heart Soft Essentials in Peony 3 skeins (approx 393 yds)
Red Heart Soft Essentials in Minty 2 skeins (approx 262 yds)
6.0 mm hook
Yarn needle
Scissors
Optional
Blocking board (or whatever technique you like to use for blocking)
Level
intermediate
Pattern notes & stitches to know
Sl st – slip stich
Ch – chain
Dc – double crochet
Magic ring (or ch 4 and sl st to first ch to form a ring)
Sc – single crochet
Ch 3 at beginning of each round counts as dc
Approximate Finished
HALF AND HALF GRANNY SQUARE
Make 32 squares with Peony and Cream
Make 16 squares with Minty and Cream
Make 28 squares with Navy and Cream
Make 4 squares with Minty and Navy
FIND THE PHOTO TUTORIAL FOR HALF & HALF GRANNY SQUARES >>> HERE <<<
With Color A make a magic ring
Round 1: ch 3, 2 dc, ch 2, 3 dc, ch 1 into ring, join color B, drop color A and leave it there to pick up later, 3 dc, ch 2, 3 dc, ch 2, join to top of first ch 3 with sl st, pull ring closed (12 dc, 8 ch)
Round 2: Turn, sl st into the ch 2 space, ch 3, dc into ch 2 space, dc in next 3 stitches, (2 dc, ch 2, 2 dc) in ch 2 space, dc in next 3 stitches, 2 dc in ch 2 space, ch 1, pick up color A and join drop color B and leave it there to pick up later, 2 dc in ch 2 space, dc in next 3 stitches, (2 dc, ch 2, 2 dc) in ch 2 space, dc in next 3 stitches, 2 dc in ch 2 space, ch 2, join to top of first ch 3 with sl st (28 dc, 8 ch)
Round 3: Turn, sl st into the ch 2 space, ch 3, dc in ch 2 space, dc in next 7 stitches, (2 dc, ch 2, 2 dc) in ch 2 space, dc in next 7 stitches, 2 dc in ch 2 space, ch 1, pick up color B and join, drop color A, 2 dc in ch 2 space, dc in next 7 stitches, (2 dc, ch 2, 2 dc) in ch 2 space, dc in next 7 stitches, 2 dc in last ch 2 space, ch 2, join to first ch 3 with sl st (44 dc, 8 ch)
SOLID GRANNY SQUARES
The solid granny squares are still worked in turned rounds so they have the same “front and back” as the half and half squares
Make 56 in Cream
Make 8 in Navy
Make a magic ring
Round 1: ch 3, 2 dc, ch 2, 3 dc, ch 2, 3 dc, ch 2, 3 dc, ch 2, join to first ch 3 with sl st (12 dc, 8 ch)
Round 2: Turn, sl st into the ch 2 space, ch 3, dc into ch 2 space, dc in next 3 stitches, *(2 dc, ch 2, 2 dc) in ch 2 space, dc in next 3 stitches* repeat from * to * repeat from * to * 2 more times to last ch 2 space, (2 dc, ch 2) in ch 2 space, join to first ch 3 with sl st (28 dc, 8 ch)
Round 3: turn, sl st into ch 2 space, ch 3, dc into ch 2 space, dc in next 7 stitches, *(2 dc, ch 2, 2 dc) in ch 2 space, dc in next 7 stitches* repeat from * to * 2 more times to last ch 2 space, (2 dc, ch 2) in ch 2 space, join to first ch 3 with sl st (44 dc, 8 ch)
Fasten off, weave in the ends
Finished squares are approximately 5” x 5” (blocked)
Once all your squares are made and blocked, arrange them like so:
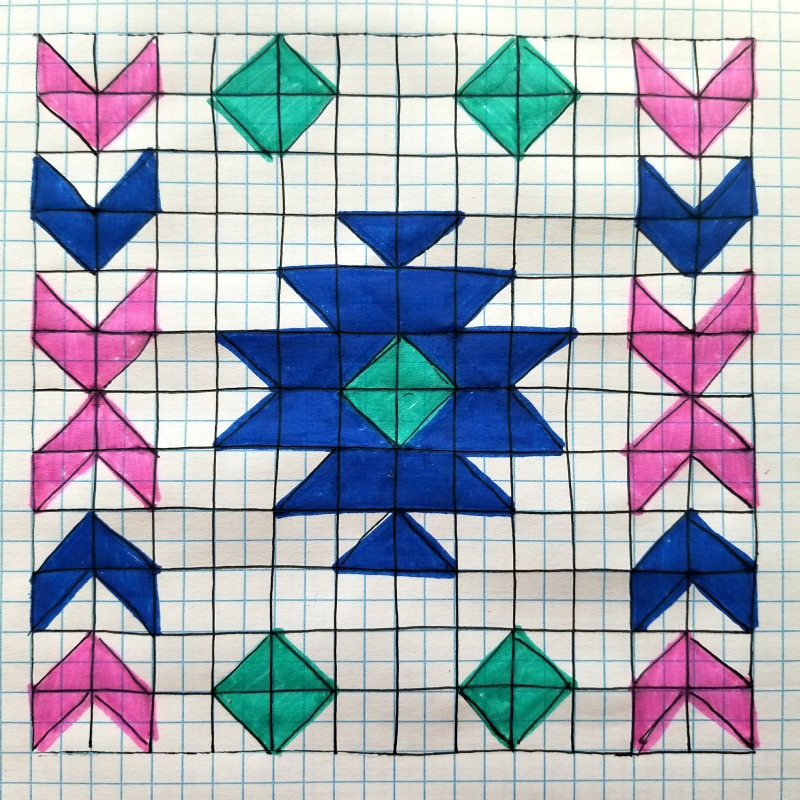
For the graph above, each black outlined square is one granny square
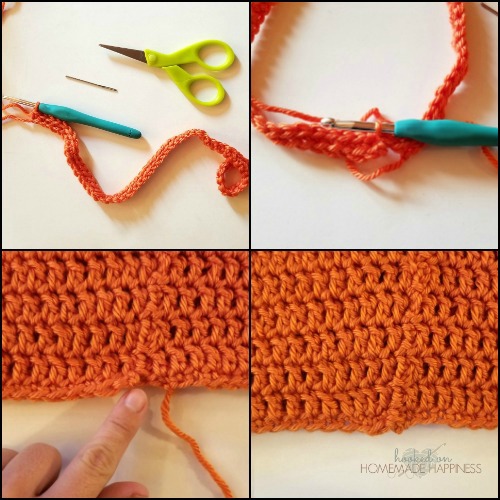
SEWING
When sewing the squares, I used a whip stitch and I changed the joining color to match the squares I was joining to make the blanket look as seamless as possible. There are a lot of ends to weave in, but the seamless look it very much worth it!
At some points there will be squares with two different colors next to each other. I just used the cream to sew these squares.
After setting out all my squares I sewed down all the rows vertically and the across horizontally.
Cut a long piece of yarn (no longer than 48” – otherwise it will easily get tangled)
With your yarn needle, join yarn in the topmost ch of the first 2 squares. Using a whip stich sew the squares together. Continue until you reach a different color, then fasten off
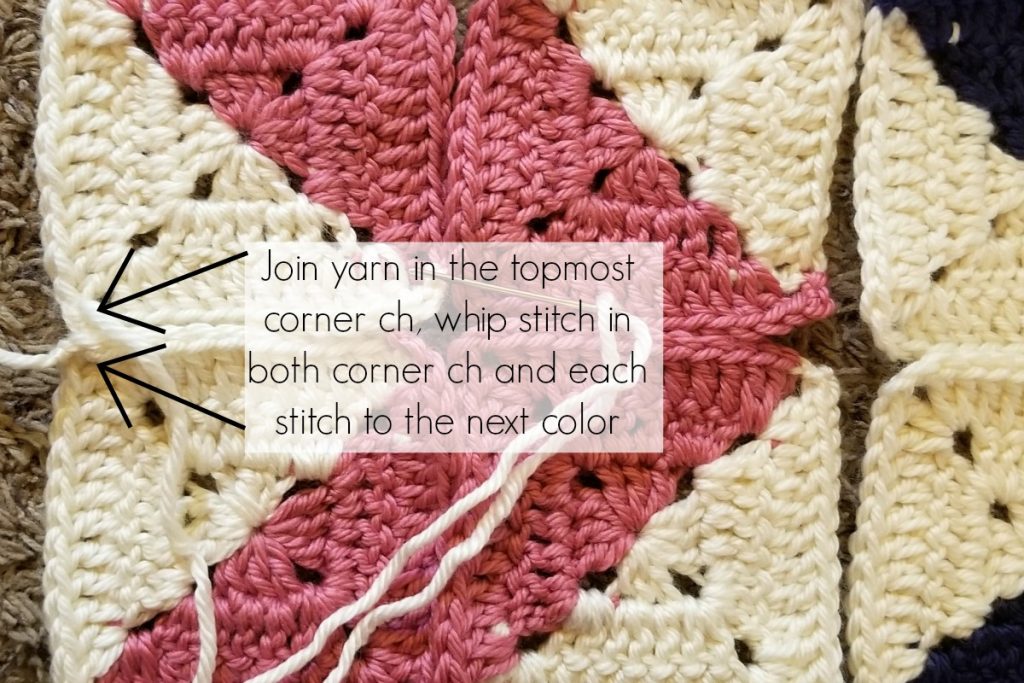
Join the next color in the last ch of the previous squares, then continue to whipstitch the squares together

Once finished, weave in all your ends.
BORDER
I did a very simple sc border all the way around.
Join cream in any corner ch 2 space, ch 1 *(sc, ch 1, sc) in corner space, sc in each stitch to the next corner* repeat from * to * around, join to first sc with sl st
Fasten off, weave in your ends.
And you’re done with your new blanket! I hope you love it!!
Looking for more patterns? Follow me on Facebook, Instagram, and Pinterest! Please share a pic of your finished product with me. I’d love to see it!


This is such a unique and beautiful way to use the two-color granny square! I love it! Thank you for sharing. Beautiful work!
Thank you!
Thank you so much for offering us your beautiful patterns! ?
You’re very welcome 🙂
Love the patterns! Wonder if you have same pattern but as baby blanket sizes? I’m not sure how to make it smaller. Thanks!
Love the patterns!! Wonder if you have same patterns but baby blanket sizes? Not sure how to make it smaller! thanks!
Hi! I would suggest using a light weight yarn maybe? To make it with less squares would change the design.