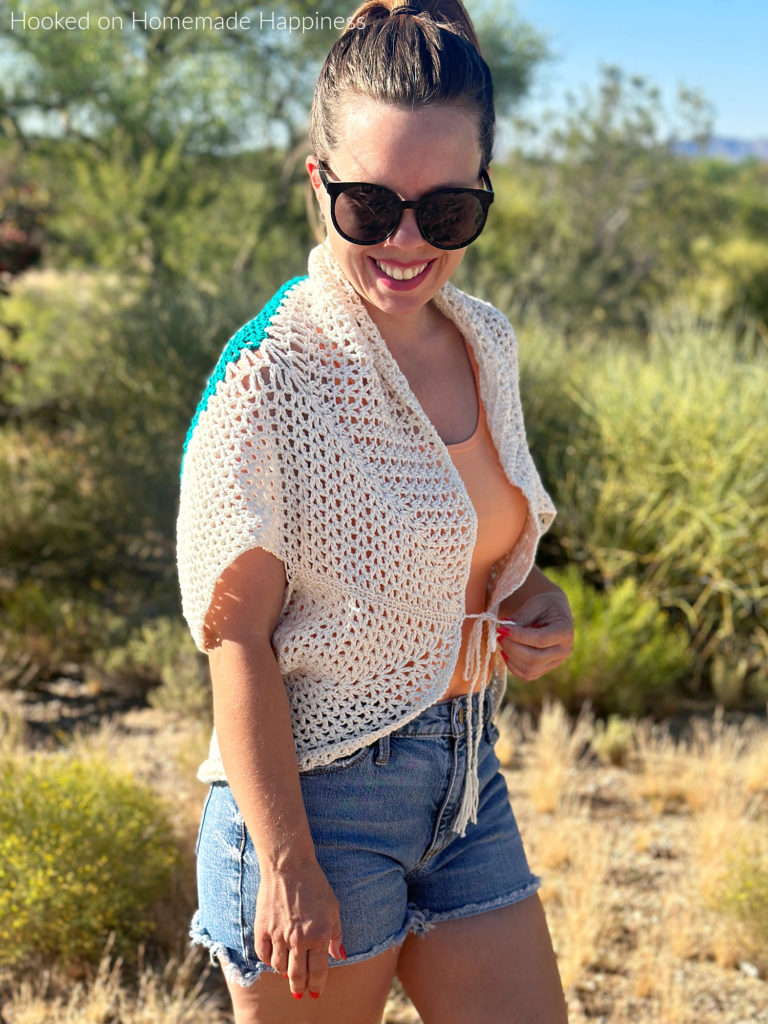
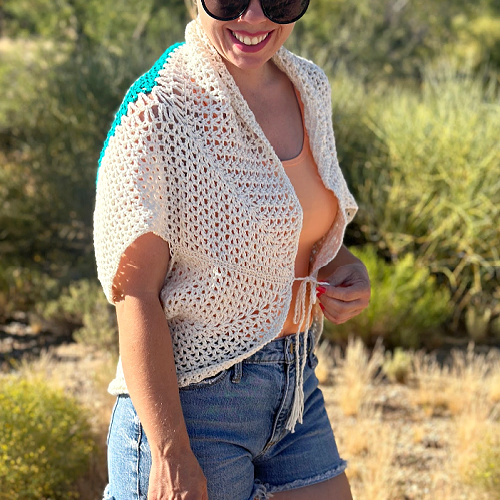
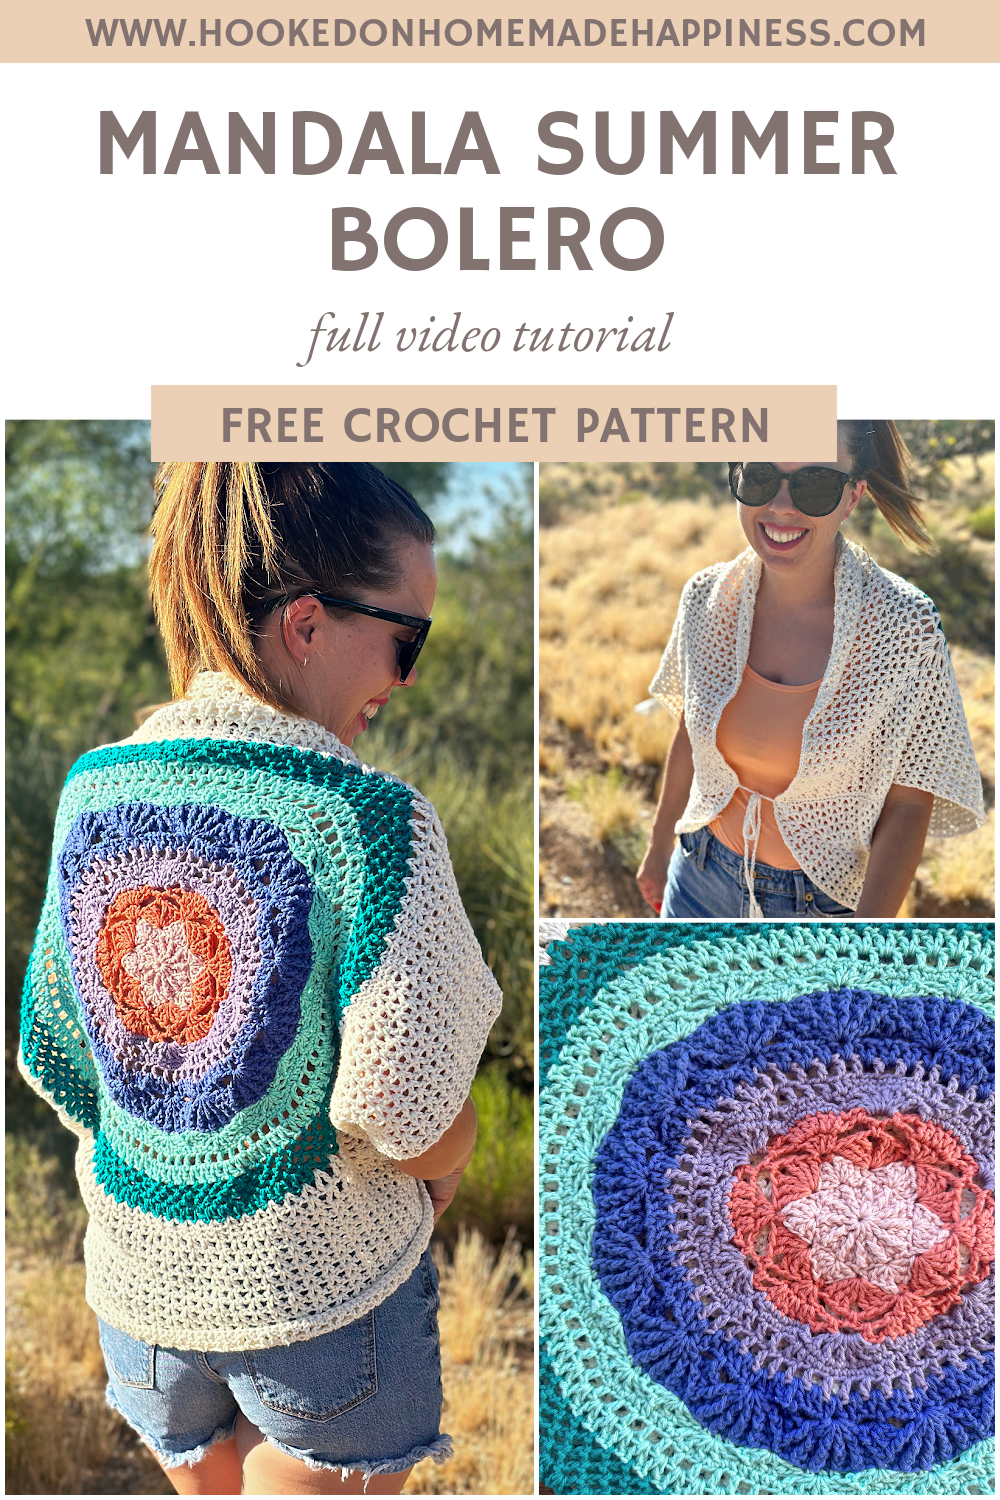
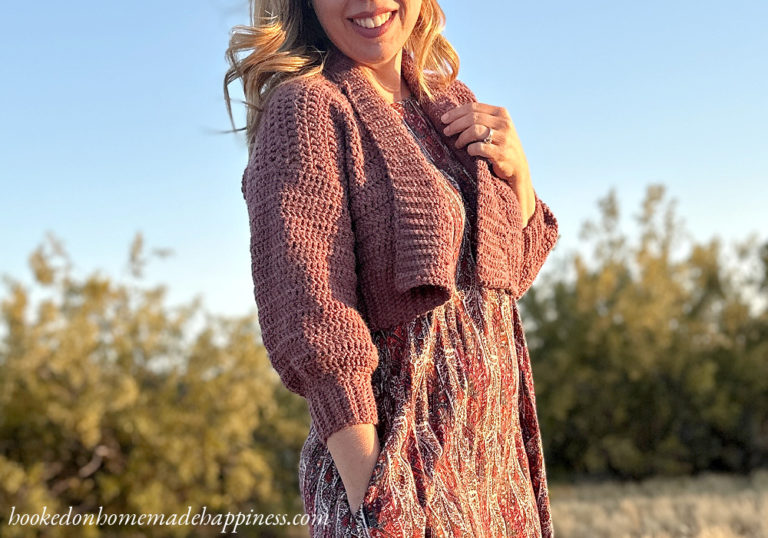
Mandala Summer Bolero Crochet Pattern
Add a light and breezy layer to your summer wardrobe with the Mandala Summer Bolero Crochet Pattern! This stylish bolero is a lightweight cocoon style cardigan that is worked in the round to create a beautiful mandala-style back that flows into delicate sleeves and a flattering open front. Designed with warm weather in mind, it’s made using CotLin yarn—a breathable cotton/linen blend that’s perfect for summer garments. Whether you’re heading to the beach or out for a casual evening, this bolero adds just the right touch of handmade charm. A full step-by-step video tutorial is included to guide you through every stitch! This pattern was originally released as a crochet along.

Purchase the ad-free, printable PDF for easy printing.
Choosing Your Yarn
For this pattern I used WeCrochet CotLin. This is one of my favorite summer yarns. Cotlin yarn from WeCrochet is a perfect choice for summer garments thanks to its soft blend of cotton and linen. This lightweight DK yarn is breathable and durable, with a lovely drape that makes it ideal for warm-weather wear. The linen adds just a touch of texture and structure, helping your finished pieces hold their shape while still feeling light and airy. It is so lightweight and comes in so many fun colors. It is perfect for summer garments and bags. Any DK weight yarn will work for this pattern.
Making Your Bolero
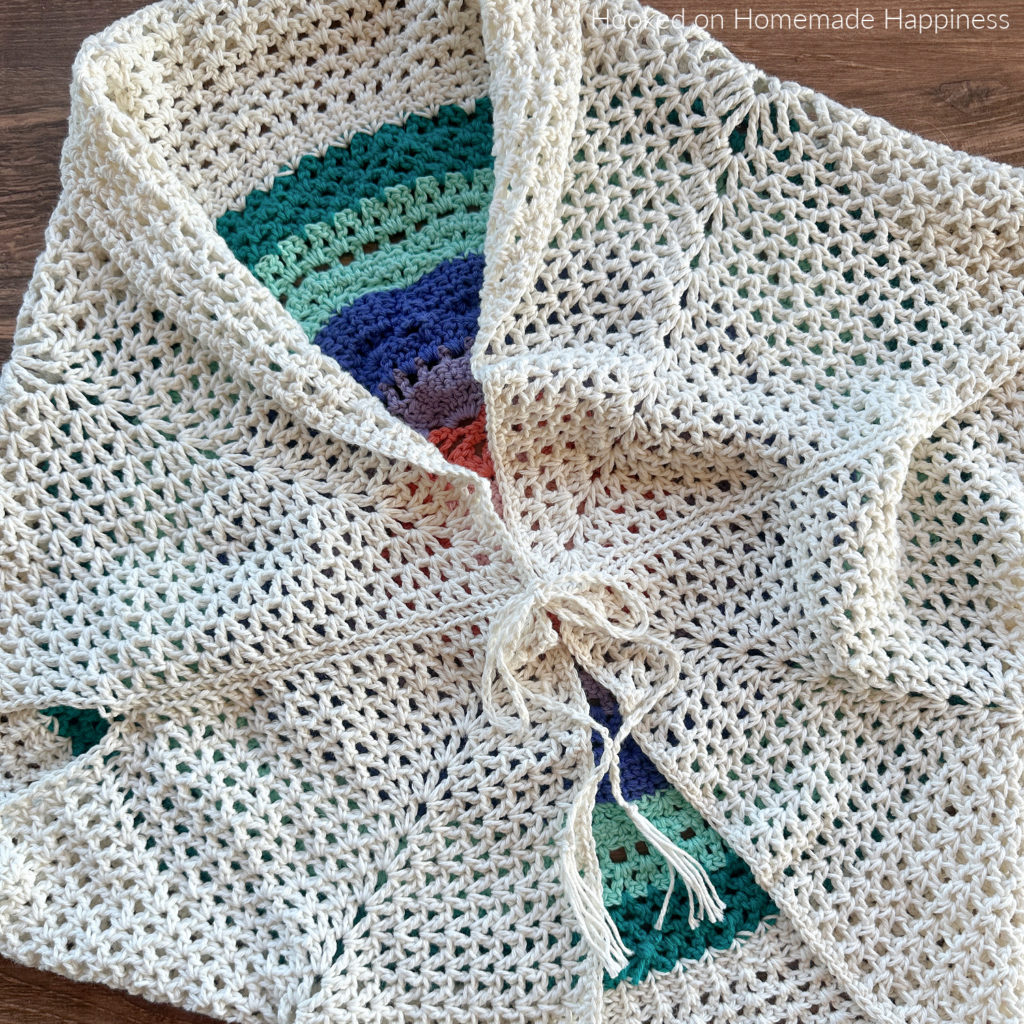
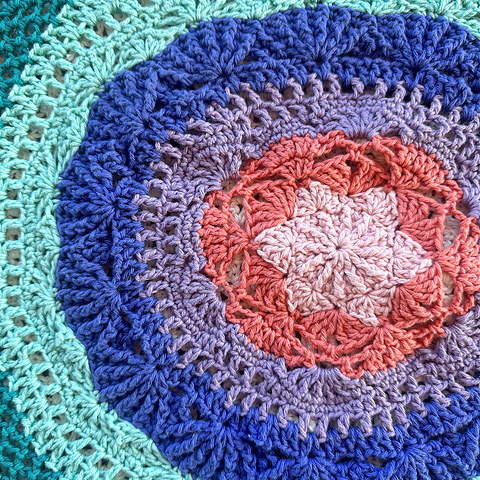
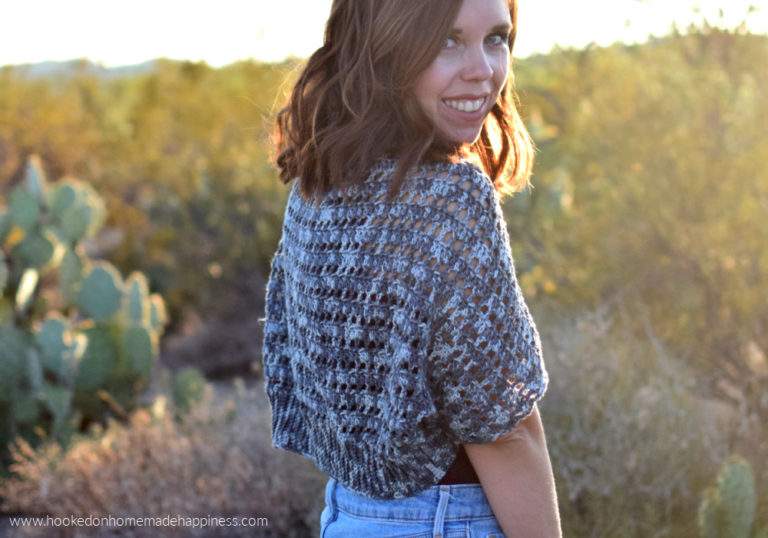
The construction of the Mandala Summer Bolero begins with a circular mandala design, worked from the center outward to create a stunning, lacy back panel. Once the mandala reaches the desired size, it transitions into a square by adding strategic shaping to the outer rounds. This square is then folded in half and the sides are seamed to form armholes, transforming it into a cozy cocoon-style bolero. The result is a lightweight, drapey piece with elegant sleeves and a relaxed, open fit—perfect for layering over your favorite summer outfits.
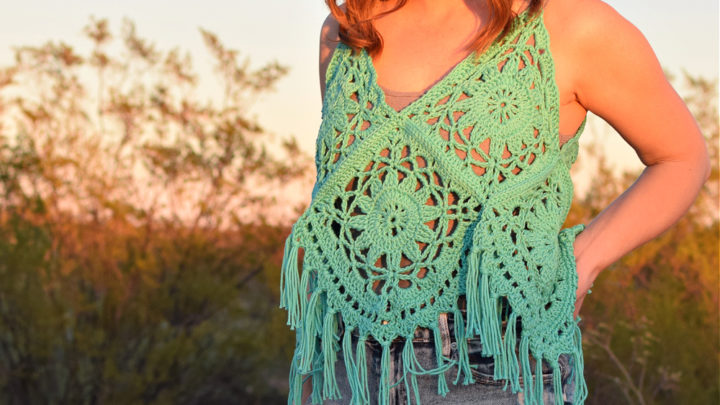
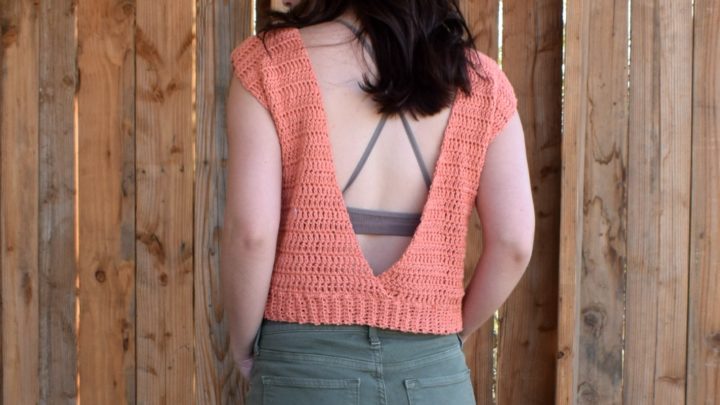
More Homemade Happiness
Making the Mandala Summer Bolero
Get the full free pattern below or purchase the ad-free, printable PDF
Materials
WeCrochet CotLin in Flamingo (1 skein), Conch (1 skein), Whisper (1 skein), Chicory (1 skein), Beach Glass (1 skein), Marina (1 skein), and Swan (6 for S/M, 7 for L/XL, 8 for 2X/3X)
G/4.0 mm hook
Yarn needle
Scissors
Level
intermediate
Pattern notes & stitches to know
ch – chain
sl st – slip stitch
sc – single crochet
dc – double crochet
fpdc – front post double crochet
hdc – half double crochet
tr – treble crochet
V st – (st, ch 1, st) in same stitch – which stitch to use is indicated in pattern
· written in US terms
· ch 2 does not count as dc
· ch 1 does not count as sc
· The pattern is a cocoon style cardigan. It is a rectangle folded and sewn to make a bolero shape.
· The width of the rectangle will determine the length of the sleeves. The width is from the end of one sleeve to the other.
· This pattern is written in sizes S-3X. The bolero is meant to fit loose with some positive ease. The sizing can be adjusted by simply changing the size of the finished rectangle.
· Creating your own measurements for a cocoon style sweater/boleri is simple. You can measure where you want the sleeves to start, across your back to the opposite sleeve. Then, in the last rounds, continue the pattern repeat until the square is the desired width. This pattern is a square, so the length will match the width.
· Any DK weight yarn would work great for this pattern. The color in the materials list as listed in order of use. From the center outward.
Approx Finished Size:
Bust: S/M (38”) L/XL (46”) 2X/3X (54”)
Length: S/M (30”) L/XL (38”) 2X/3X (46”)
Size S/M pictured. I am 5’0” with 34” bust.
Gauge: 6 V st x 8 rows = 4” x 4”
Watch the Tutorial
See how it’s done! This easy-to-follow video tutorial will walk you through each step of the pattern.
CROCHET PATTERN WRITTEN INSTRUCTIONS
>>FULL VIDEO TUTORIAL FOR PART 1<<
Starting with the most center color, ch 3, join to first ch with sl st to make a circle
Round 1: ch 2, 12 dc in circle, join to first dc with sl st (12 dc)
Round 2: ch 1, sc and fpdc in each stitch around, join to first sc with sl st (24)
Round 3: ch 1, *sc in sc, (sc, and fpdc) in next* repeat from * to * around, join to first sc with sl st (36)
Round 4: sl st to fpdc, ch 2, *(3 dc, ch 1, 3 dc) in fpdc, skip 2 stitches, sc in next, skip 2 stitches* repeat from * to * around, join to first sc with sl st (36 dc, 6 sc)
Fasten off current color.
Join next color to a ch-1 space
Round 5: ch 1, *sc in ch-1 space, skip 3 dc, (3 tr, ch 2, 3 tr) in sc, skip 3 dc* repeat from * to * around, join to first sc with sl st (36 tr, 6 sc)
Round 6: ch 2, *3 dc in sc, ch 3, skip 3 tr, sc in ch-2 space, ch 3, skip 3 tr* repeat from * to * around, join to first dc with sl st (18 dc, 6 sc)
Round 7: ch 2, *2 dc in 3 stitches, ch 2, sc in ch-3 space, ch 2, sc in ch-3 space, ch 2* repeat from * to * around, join to first dc with sl st (36 dc, 12 sc)
Fasten off current color.
Join next color to a center ch-2 space
Round 8: ch 2, *([dc, ch-1] repeat from [ to ] 5 more times for a total of 6) in ch-2 space, skip sc, skip ch-2 space, [sc in next stitch, 2 sc in next] repeat from [ to ] 2 more times, ch 1, skip ch-2 space, skip sc* repeat from * to * around, join to first dc with sl st (36 dc, 54 sc)
Round 9: ch 1, *sc in each dc and ch-1 space for a total of 11 sc, ch 1, skip ch-1 space, skip next 2 sc, sc in next 5 sc, ch 1, skip next 2 sc, skip ch-1 space* repeat from * to * around, join to first sc with sl st (96 sc)
Round 10: ch 2, *hdc in 2 stitches, sc in next 7, hdc in next 2, ch 1, dc in ch-1 space, ch 1, skip 1 stitch, dc in next, ch 1, skip 1 stitch, dc in next, ch 1, skip 1 stitch, dc in ch-1 space, ch 1* repeat from * to * around, join to first hdc with sl st (42 sc, 24 hdc, 24 dc)
Round 11: ch 2, *dc, ch 1, skip 1 stitch* repeat from * to * around, join to first dc with sl st (60 dc)
Fasten off current color.
Join next color to a ch-1 space
Round 12: ch 2, dc V st in each ch-1 space around, join to first dc with sl st (60 V st)
Round 13: sl st to ch-1 space, ch 2, *dc in ch-1 space, ch 1, skip next V st, ([dc, ch-1] repeat from [ to ] 5 more times for a total of 6) in next ch-1 space, skip next V st* repeat from * to * around, join to first dc with sl st (105 dc)
Round 14: ch, 1, *sc in dc, ch 1, [fpdc in dc, sc in ch-1 space] repeat from [ to ] 4 more times, fpdc in next dc, ch 1* repeat from * to * around, join to first sc with sl st (90 sc, 90 dc)
Round 15: sl st to fpdc, ch 2, *[fpdc in dc, sc in sc] repeat from [ to ] 4 more times, fpdc in next dc, skip ch-1 space, skip sc, skip ch-1 space* repeat from * to * around, join to first fpdc with sl t (90 dc, 75 sc)
Round 16: sl st to sc, ch 1, *[sc in sc, fpdc in dc] repeat from [ to ] 3 more times, sc in sc, fpdc around next 2 dc* repeat from * to * around, join to first sc with sl st (75 dc, 75 sc)
Fasten off current color.
>>FULL VIDEO TUTORIAL FOR PART 2<<
Join next color to center fpdc (one that went around 2 stitches)
Round 17: ch 2, *([dc, ch 1] repeat from [ to ] 3 more times, dc again in same stitch, skip 3 stitches, sc in next 3 stitches, skip next 3* repeat from * to * around, join to first dc with sl st (75 dc, 45 sc)
Round 18: sl st to 2nd ch-1 space, ch 1, *sc in 3 stitches, skip 4 stitches, [dc, ch 1] repeat from [ to ] 3 more times in next, dc again in same stitch, skip 4 stitches* repeat from * to * around, join to first sc with sl st (75 dc, 45 sc)
Round 19: ch 2, *hdc in 3 stitches, sc in next 9 stitches* repeat from * to * around, join to first hdc with sl st (45 hdc, 135 sc)
Round 20: ch 2, dc in first stitch, ch 1, skip 1, *dc in next stitch, ch 1, skip 1* repeat from * to * around, join to first dc with sl st (90 dc)
Round 21: sl st to ch-1 space, dc V st in each ch-1 space around, join to first dc with sl st (90 V st)
Fasten off current color.
Join next color to ch-1 space
Round 22: ch 3, *sl st to next ch-1 space, ch 3* repeat from * to * around, join to first ch-3 space with sl st (89 ch-3 space)
Round 23: ch 3, *sl st to next ch-3 space, ch 3* repeat from * to * around, join to first ch 3 with sl st (89 ch-3 space)
Round 24: ch 3, *sl st to next ch-3 space, ch 3* repeat from * to * around, join to first ch 3 with sl st (89 ch-3 space)
Round 25: *[ch 3, sl st to next ch-3 space] repeat from [ to ] 28 more times, ch 3, sl st in same ch-3 space* repeat from * to * one more time, *ch 3, sl st to next ch-3 space* repeat from * to * in remaining stitches, ch 3, sl st to same stitch, ch 3, sl st to first ch-3 space (92 ch-3 space)
Round 26: ch 2, dc V stitch in each ch-3 space around, join to first dc with sl st (92 V st)
Fasten off current color.
Join final cardigan color to ch-1 space
Round 27: ch 3, *(tr V st, ch 2, tr V st) in ch-1 space, tr V st in next 2 ch-1 spaces. dc V st in next 3 ch-1 spaces, hdc V st in next 3 ch-1 spaces, sc V st in next 6 ch-1 spaces, hdc V st in next 3 ch-1 spaces, dc V st in next 3 ch-1 spaces, tr V st in next 2 ch-1 spaces* repeat from * to * around, join to first tr with sl st (96 V st)
Round 28: sl st to ch-2 space, ch 3, *(tr V st, ch 2, tr V st) in ch-2 space, tr V st in next 3 ch-1 spaces. dc V st in next 3 ch-1 spaces, hdc V st in next 3 ch-1 spaces, sc V st in next 6 ch-1 spaces, hdc V st in next 3 ch-1 spaces, dc V st in next 3 ch-1 spaces, tr V st in next 3 ch-1 spaces* repeat from * to * around, join to first tr with sl st (104 V st)
Round 29: sl st to ch-2 space, ch 2, *(dc V st, ch 2, dc V st) in ch-2 space, dc V st in next 8 ch-1 spaces, hdc V st in next 3 ch-1 spaces, sc V st in next 4 ch-1 spaces, hdc V st in next 3 ch-1 spaces, dc V st in next 8 ch-1 spaces* repeat from * to * around, join to first dc with sl st (112 V st)
Do not fasten off.
>>FULL VIDEO TUTORIAL FOR PART 3<<
Round 30: sl st to ch-2 space. ch 2, *(dc V st, ch 2, dc V st) in ch-2 space, dc V st in each ch-1 space across* repeat from * to * around, join to first dc with sl st (120 V st)
Repeat Round 30 to Round 40 for S/M, 48 for L/XL, 56 for 2X/3X (each round increases by 8 V st)
Or until desired length and width
Fasten off. Weave in the ends.
The width of the square will be the measurement across the back, from one end of a sleeve to the other. The length of the square is the total length of the sweater.
>>FULL VIDEO TUTORIAL FOR PART 4<<
SEWING
Lay square right side up. Fold in half by bringing the top down.
With the fold at the top, sew each side closed about halfway up. Leave a space on the top on both sides for the sleeves.
Weave in the ends.
Turn right side out.
Grab the bottom of the square and pull up so it is a diamond shape with the armholes on either side.
EDGING
Join yarn to the inside collar at the seam. Ch 1, sc evenly around the inside collar of the cardigan. Join to first sc with sl st
Do not fasten off.
TIE
ch 50. Fasten off. Add fringe to the end of the chain.
Join yarn to opposite side, repeat tie pattern.
Weave in all ends.
Looking for more patterns? Follow me on Facebook, Instagram, and Pinterest! Please share a pic of your finished product with me. I’d love to see it!

10 Comments