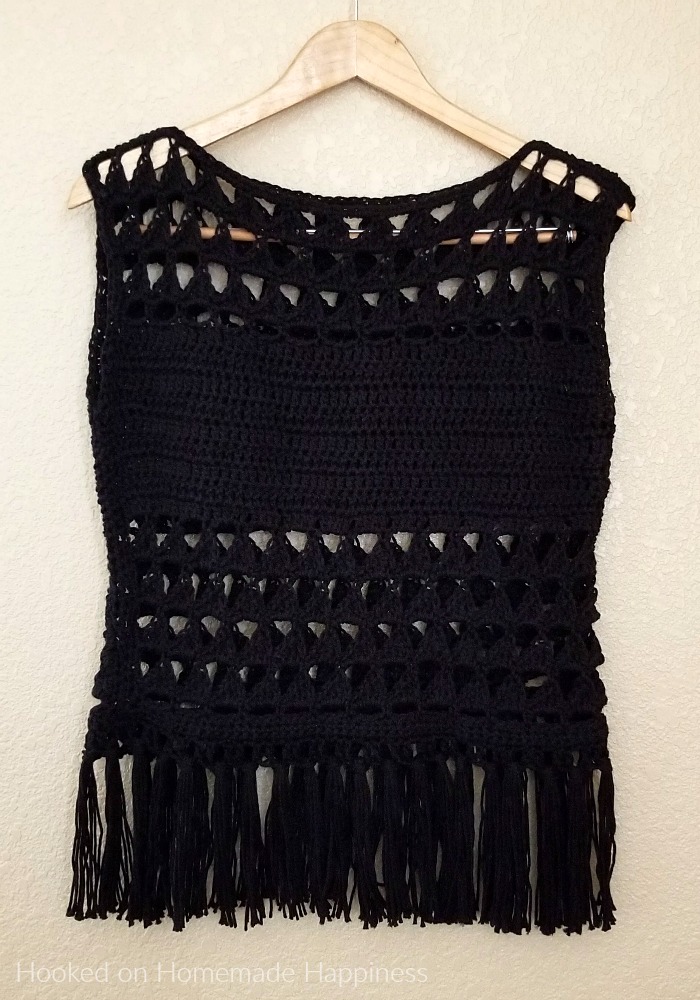
Triangles & Fringe Crochet Top Pattern
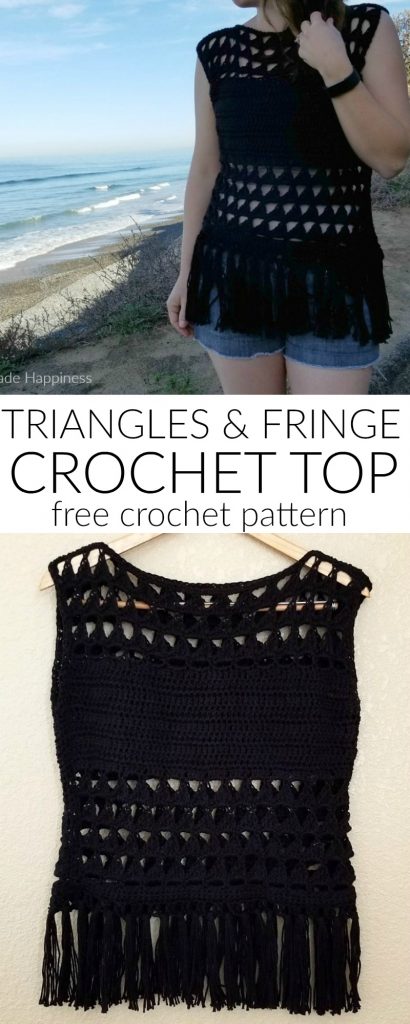
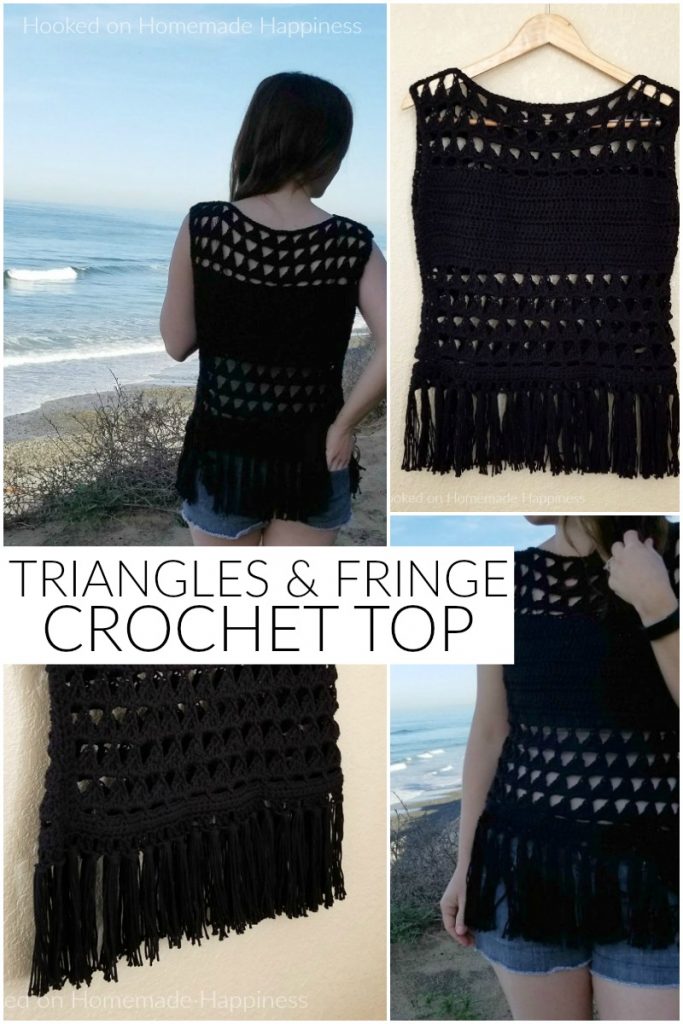
This Triangles & Fringe Crochet Top Pattern is made with cotton yarn, and with the fun peek-a-boo sections it makes this perfect for summer!
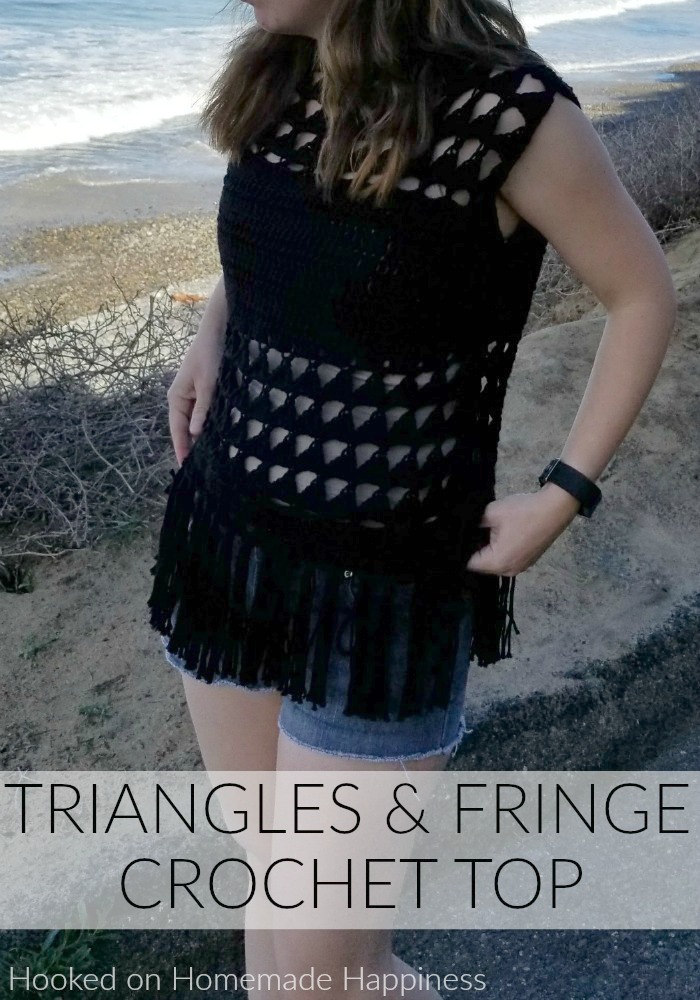
I used a stitch that creates a fun triangle pattern. What I like best (besides that it’s cute) is that it’s a tall stitch and works up SO FAST! Seriously, you’ll have this summer top finished up in no time.
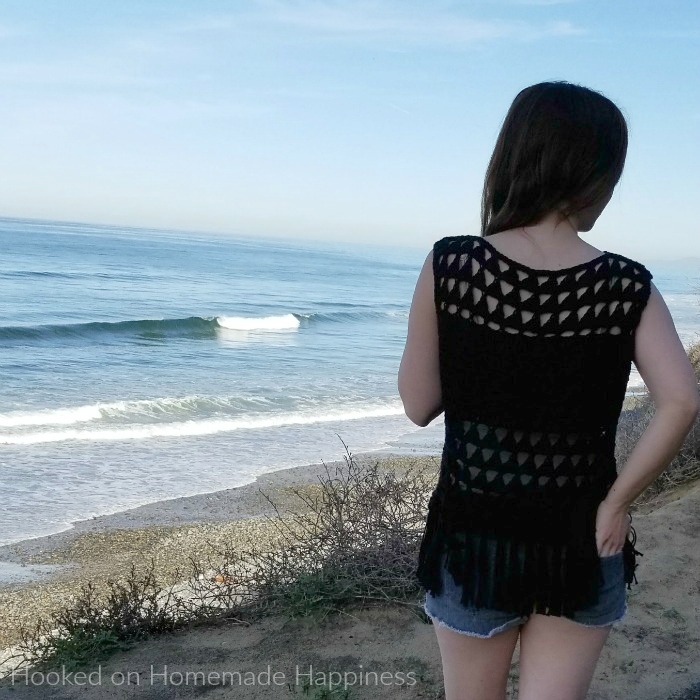
I might have a slight obsession with fringe! I love adding it to my spring and summer tops! It’s totally optional, this top would still be super cute without the fringe.
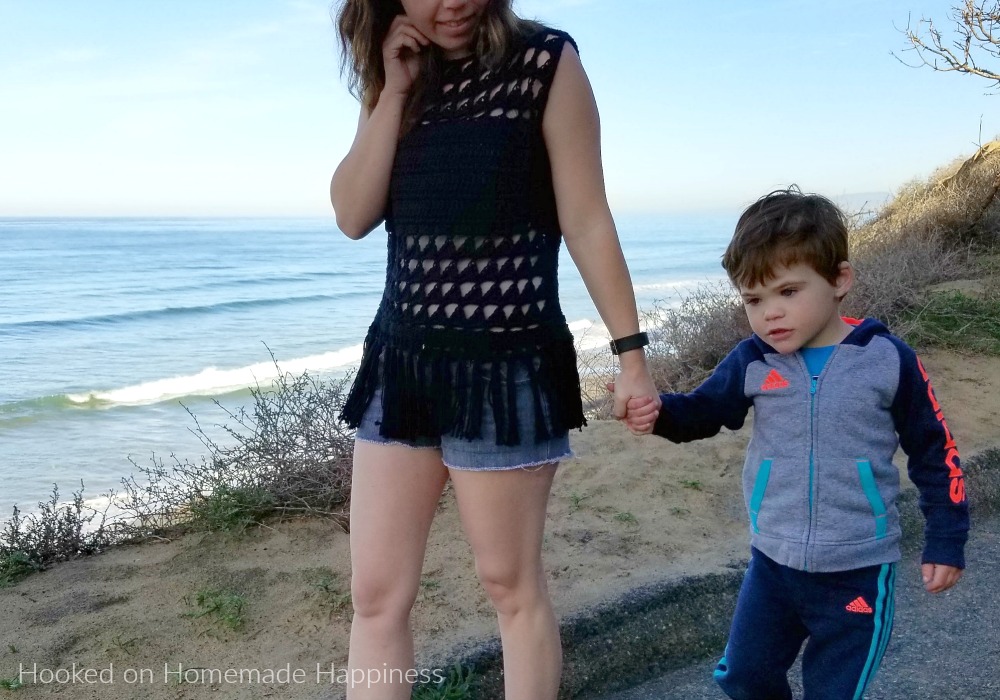
I used I Love this Cotton! from Hobby Lobby. It’s a nice and soft cotton yarn, especially for the price. Cotton is ideal for summer projects because it is a much lighter fiber and it’s easy to keep clean.
TRIANGLES & FRINGE CROCHET TOP PATTERN
– Get the complete free pattern below or this pattern is also available as an inexpensive, clearly formatted, PDF instant download in my Etsy shop or Ravelry Shop!
-PIN for later HERE
-Add to your Ravelry Queue HERE
Materials
I Love this Cotton! Yarn in Black (2 skeins for S/M, 3 skeins for L/XL)
I/5.5 mm hook
Yarn needle
Scissors
Level
Easy+ -you must be very familiar with basic crochet stitches
Pattern notes & stitches to know
Sl st – slip stich
Ch – chain
Sc – single crochet
Hdc – half double crochet
Dc – double crochet
Tr – treble crochet
Approximate Finished Sizes:
Width: S (17.5”) M (19”) L (21.5”) XL (23”)
Length: S (17”) M (18.5”) L (20”) XL (21.5”)
Gauge:
12 dc = 4”
6 rows = 4”
RECTANGLES (make 2)
Each rectangle is worked from the bottom up
Pattern written in S, M noted in ( ), L noted in [ ] , XL noted in { }
Ch 58, (62), [66], {70} (leave a long beginning tail for sewing)
Row 1: sc in 2nd ch from the hook and in each ch across (57 sc, (61 sc), [65 sc], {69 sc})
Row 2: ch 1, turn, sc in first stitch, *ch 3, skip 3 stitches, sc in next stitch* repeat from * to * across (14, (15), [16], {17} ch 3 spaces)
Row 3: ch 1, turn, *sc in next ch 3 space, ch 3, in same space work (tr, dc, hdc, sc)* repeat from * to * across (14, (15), [16], {17} triangles)
Row 4: ch 6 (counts as dc + ch 3), turn, sc in 3rd ch of first ch 3, *ch 3, sc in 3rd ch of next ch 3* repeat from * to * across (14, (15), [16], {17} ch 3 spaces)

Repeat rows 3 & 4 to row 10
Row 11: ch 3, turn, dc in same stitch, *3 dc in ch 3 space, dc in sc* repeat from * to * across to ch 6, 3 dc in ch 6 space, dc in 3rd ch of ch 6 (57 dc, (61 dc), [65 dc], {69 dc})
Row 12: ch 3, turn, dc in same stitch and in each stitch across (57 dc, (61 dc), [65 dc], {69 dc})
Repeat previous row to row 19 (21) [23] {25}
Row 20 (22) [24] {26}: repeat row 2
Row 21 (23) [25] {27}: repeat row 3
Row 22 (24) [26] {28}: repeat for 4
Repeat row 3 & 4 to row 26 (28) [30] {32}
Row 27 (29) [31] {33} ch 1, turn, sc in same stitch, *3 sc in ch 3 space, sc in sc* repeat from * to * across to ch 6, 3 sc in ch 6 space, sc in 3rd ch of ch 6 (57 sc, (61 sc), [65 sc], {69 sc})
Fasten off, leave a long tail for sewing
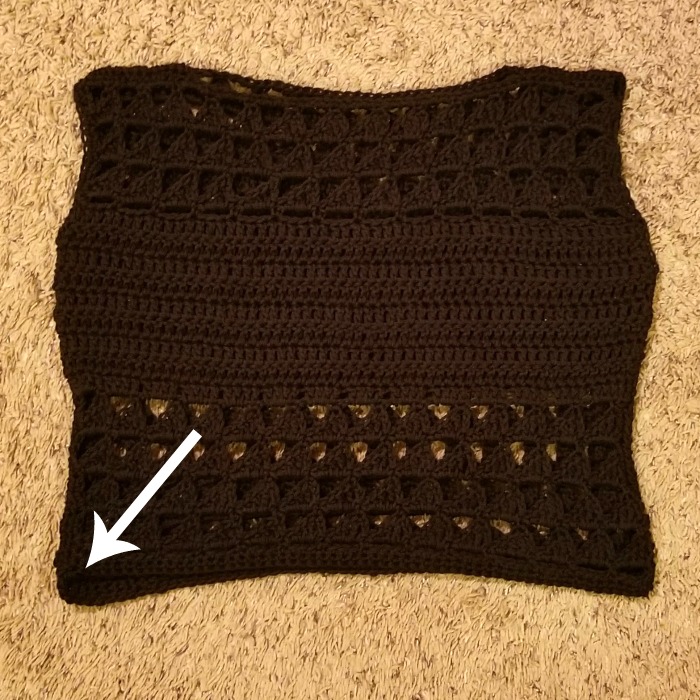
You’ll notice the solid rows are wider than the triangle rows. I blocked my rectangles to correct this a bit, but once it’s sewn and worn (since the solid rows are the bust area) it isn’t noticeable
CONSTRUCTION
Lay both rectangles together, use a stitch marker to mark where you want to sew the shoulders. I sewed about 13 stitches in on both shoulders.
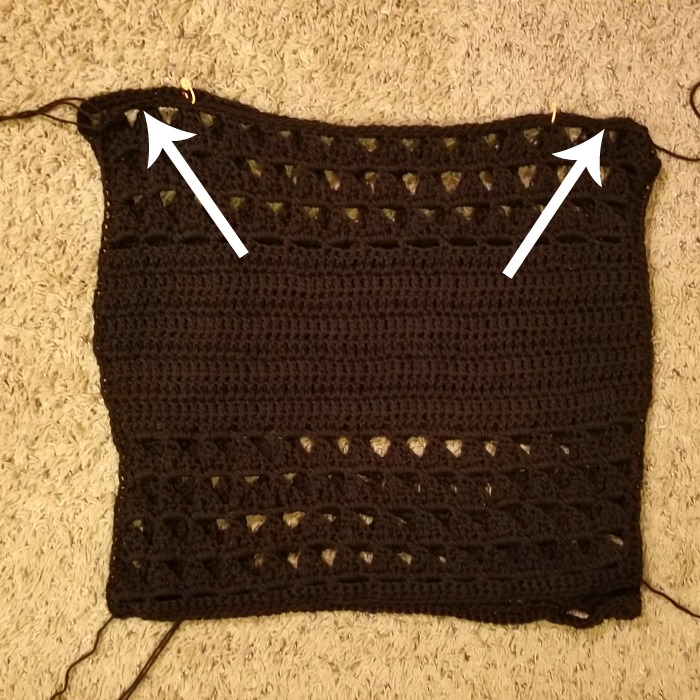
Sew the shoulders closed with a whip stitch (I used the long tail)
Then mark where you want to sew the sides closed. I marked about row 17.

Sew the sides closed with a whip stitch (I used the long tail)
Fasten off, weave in you ends. Turn rightside out
OPTIONAL LAST ROW & FRINGE
Join yarn in the bottom corner
ch 3 (counts as dc), dc in next stitch, ch 1, skip one stitch, *dc in next 2 stitches, ch 1, skip one stitch* repeat from * to * around, join to first ch 3 with sl st (it may not work out perfectly due to sewing and such, it’s ok. Just add an extra dc or skip 2 in the end)
Fasten off, weave in the ends
Then add 5 twelve inch pieces of fringe to each ch 1 space
And you’re finished with your new top!
Looking for more patterns? Follow me on Facebook, Instagram, and Pinterest! Please share a pic of your finished product with me. I’d love to see it!
MORE HOMEMADE HAPPINESS:
1. Peasant Top 2. Ruffle Top 3. Honeycomb Top

NEVER MISS A PATTERN!
Sign up for my newsletter and receive a FREE ebook with 3 of my favorite patterns PLUS patterns straight to your inbox. You’ll also get a heads up about upcoming giveaways, events, and crochet alongs.


Lover your patterns. Do any of them come in 2XL. I will try to add more stitches to make it bigger
Thank you! For this pattern you need a starting ch of a multiple of 4 + 2 more. I hope this helps!
I don’t have any patterns in 2x right now. I just don’t know enough about plus sizes to feel comfortable writing a pattern for it. But if there’s a pattern you want to make, let me know and I’ll help you adjust it 🙂
Can this pattern be made with 4 ply yarn as well or then is it too stretchy?
Hi! I used worsted weight (category 4) yarn
I’m working my first panel side XL, My count is on point but one of my sides is absolutely straight and the other side is leading to a weird angle. Is this normal?
Hi! Can you send me a picture? hookedonhomemadehappiness@gmail.com
But if it isn’t too much of an angle, you won’t be able to notice it once the top is sewn 🙂
This is lovely. Can’t wait to make one! Thanks for a fab pattern.
Thank you!!
ThankYou. I was thinking it was the cotton yarn. I am so excited to make this!!! Thanks again!
Making this today and I’m super excited about it!! Thanks for the awesome pattern!
YAY!!!
Can I get your crochet project videos in YouTube.
Hi, I don’t have video tutorials
Breann…I love this top!! I am going to make one for my daughter and niece.
Started “practicing” the triangle stitch yesterday and the sides of the rectangle are not straight!
One side leans to the right and the other to the left. I think I am following the pattern exactly. i took pics but not sure how to insert them into this comment.
Can u help please?
Hi! You can message me the pics on my facebook page 🙂 Also, I blocked my rectangle to make it more even, you might want to try that
I love this top! I have a question about row three. After completing the 17 triangles, do l double crochet in chain 3 at the end. I may be misinterpreting the 3rd row incorrectly, but it doesn’t say what to do after you complete the 17 triangles for size extra large. Thank you.
Hi! The last stitch should be the sc from the triangle. There isn’t an additional stitch after that. Hope this helps!
It would be really lovely if you can state the yarn weight like 3 light, 2 sport, dk, etc. I looked up the yarn used, however it doesnt’ state it either. thinking a 3 light weight would work just fine for this?
I used a worsted weight 4
im going to go with Buckle’s style of long really long fringe, should look great. Did this within 2 days nice pattern really nice!
That will be so cute! Thank you so much!
hello love this i cant wait to make it. your work is beautiful, did u use 5.5 hook for this?