Solaris Tote Bag Crochet Pattern by Lulo Stitch Co (Guest Designer)
Hello, I am Terri Ann, the designer behind Lulo Stitch Co, where I create simple, stylish and contemporary crochet pieces and publish the patterns on my blog www.lulostitchco.com. I have always loved crochet for its functionality and it’s beauty and the extra large Solaris Tote Bag Crochet Pattern I created for this guest post is a perfect example! Everyone needs an extra large bag for all their summer outings!
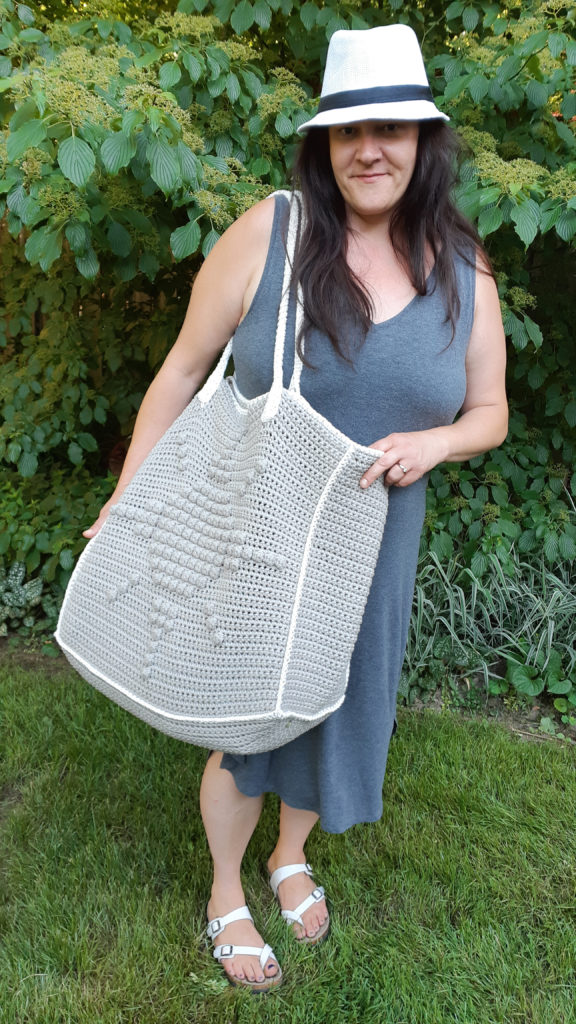
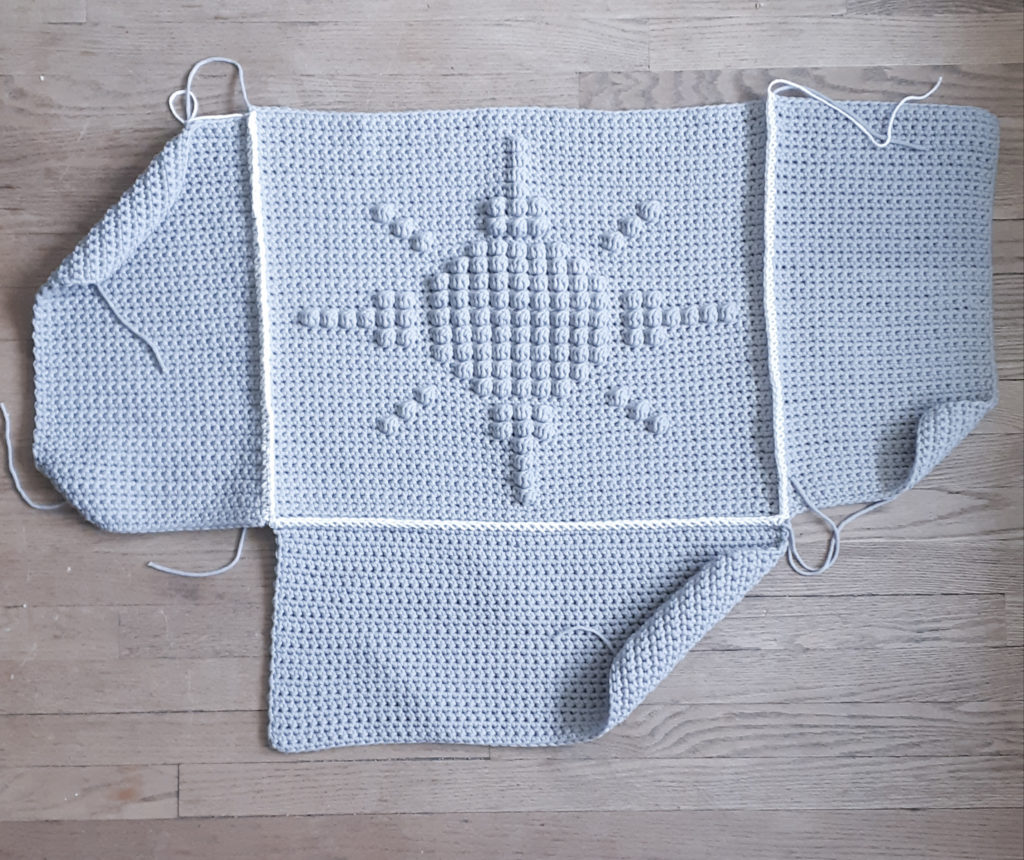
Summer is the time we all pack up our families and head for a fun outing. That requires a LOT of stuff! Blankets, towels, sunscreen, sporting equipment and toys for the kids, the list goes on. I wanted to create an oversized tote bag that would carry all of your outing essentials. Inspired by summer and sunshine, this super-functional tote bag features a bobble sun motif on the front, a contrasting seam and sturdy handles. And so much room in it!
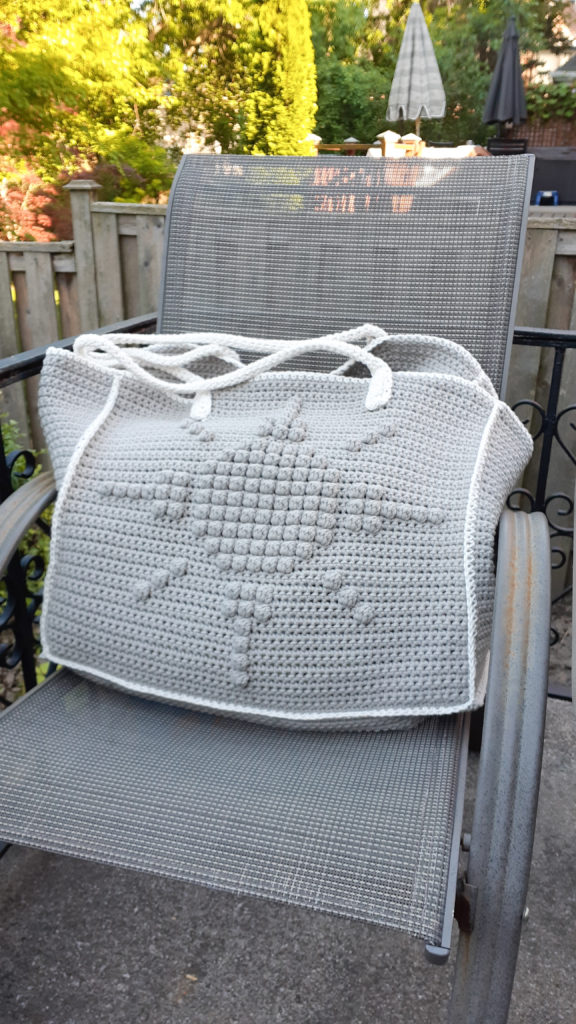
For this sturdy oversized tote bag, I wanted to use yarns I knew would hold up to lots of use and that wouldn’t stretch too much. The main panels of the bag use Bernat Maker Home Dec (in Clay) which is a bulky 5wt yarn that is a cotton/nylon blend. The contrasting seams and handles are made using Bernat Handicrafter Cotton (in White) to keep stretching to a minimum. After all, you’re going to be packing this bag with a lot of items. The Bernat Maker Home Dec yarn suggests an 8mm hook, but I wanted a tight stitch to reduce stretching even more, so used a 6mm hook.
Solaris Tote Bag Crochet Pattern
SUPPLY LIST
6mm hook
Bernat Maker Home Dec Yarn (color used: Clay) – Approx. yardage: 950 yards / 870 meters
Bernat Handicrafter Cotton (color used: White) – Approx. yardage: 15 yards / 13 meters
Scissors
Tapestry Needle
STITCHES & ABBREVIATIONS:
YO – yarn over
CH – chain
BB – back bump
ST – stitch
SC – single crochet
BS – bobble stitch
DIFFICULTY LEVEL:
Intermediate
PATTERN & SIZING NOTES:
– Must have knowledge of: bobble stitch, reading a chart, using single crochet to join pieces and whip stitch for the handles.
– This tote bag is made in 5 panels which are joined together via single crochet, and then the handles are created and sewn on with the tapestry needle.
– It is important to note that, for the bobble stitch, I only used 4 stitches instead of the traditional 5 to create the bobble, to keep the bobble from warping the panel but also to keep yardage down.
– Just a reminder that the bobble stitches are created in even rows, which are on the wrong side of the work, but pop out on the correct side.
– The CH 1 at the beginning of each row does NOT count as a stitch.
– With the exception of the front panel with the sun bobble motif, all other elements of the bag are done in single crochet.
– For the handles, you will create 2 long strips and whip stitch the majority of them together to create a rounded handle.
– The 6mm hook is used on both the main panels of the tote bag and also on the white accent seam and handles.
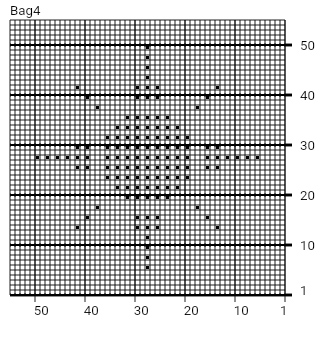
– I am providing a chart for the motif panel of the tote bag below, but am also providing written instructions.
– The stitch count is given in parentheses ( ) at the end of each row.
SIZING & GAUGE:
One Size
Gauge is 11.5 stitches x 14 rows = 4” x 4”
INSTRUCTIONS:
MAIN PANEL W/ BOBBLE SUN MOTIF
CH 55 + 1 to turn
Row 1: SC in the BB of each chain across, CH 1 & turn (55)
Row 2 to 5: SC in each ST across, CH 1 & turn (55)
Row 6: SC in each ST across *except* place a BS in ST# 28, CH 1 & turn (55)
Row 7: SC in each ST across, CH 1 & turn (55)
Row 8: SC in each ST across *except* place a BS in ST# 28, CH 1 & turn (55)
Row 9: SC in each ST across, CH 1 & turn (55)
Row 10: SC in each ST across *except* plae a BS in ST# 28, CH 1 & turn (55)
Row 11: SC in each ST across, CH 1 & turn (55)
Row 12: SC in each ST across *except* place a BS in ST# 28, Ch 1 & turn (55)
Row 13: SC in each ST across, CH 1 & turn (55)
Row 14: SC in each ST across *except* place BS’s in ST#’s [14, 26, 28, 30, 42], CH 1 & turn (55)
Row 15: SC in each ST across, CH 1 & turn (55)
Row 16: SC in each ST across *except* place BS’s in ST#’s [16, 26, 28, 30, 40], CH 1 & turn (55)
Row 17: SC in each ST across, CH 1 & turn (55)
Row 18: SC in each ST across *except* place BS’s in ST#’s [18, 38], CH 1 & turn (55)
Row 19: SC in each ST across, CH 1 & turn (55)
Row 20: SC in each ST across *except* place BS’s in ST#’s [24, 26, 28, 30, 32], CH 1 & turn (55)
Row 21: SC in each ST across, CH 1 & turn (55)
Row 22: SC in each ST across *except* place BS’s in ST#’s [22, 24, 26, 28, 30, 32, 34], CH 1 & turn (55)
Row 23: SC in each ST across, CH 1 & turn (55)
Row 24: SC in each ST across *except* place BS’s in ST#’s [20, 22, 24, 26, 28, 30, 32, 34, 36], CH 1 & turn (55)
Row 25: SC in each ST across, CH 1 & turn (55)
Row 26: SC in each ST across *except* place BS’s in ST#’s [14, 16, 20, 22, 24, 26, 28, 30, 32, 34, 36, 40, 42], CH 1 & turn (55)
Row 27: SC in each ST across, CH 1 & turn (55)
Row 28: SC in each ST across *except* place BS’s in ST#’s 6, 8, 10, 12, 14, 16, 20, 22, 24, 26, 28, 30, 32, 34, 36, 40, 42, 44, 46, 48, 50], CH 1 & turn (55)
Row 29: SC in each ST across, CH 1 & turn (55)
Row 30: SC in each ST across *except* place BS’s in ST#’s [14, 16, 20, 22, 24, 26, 28, 30, 32, 34, 36, 40, 42], CH 1 & turn (55)
Row 31: SC in each ST across, CH 1 & turn (55)
Row 32: SC in each ST across *except* place BS’s in ST#’s [20, 22, 24, 26, 28, 30, 32, 34, 36], CH 1 & turn (55)
Row 33: SC in each ST across, CH 1 & turn (55)
Row 34: SC in each ST across *except* place BS’s in ST#’s [22, 24, 26, 28, 30, 32, 34], CH 1 & turn (55)
Row 35: SC in each ST across, CH 1 & turn (55)
Row 36: SC in each ST across *except* place BS’s in ST#’s [24, 26, 28, 30, 32], CH 1 & turn (55)
Row 37: SC in each ST across, CH 1 & turn (55)
Row 38: SC in each ST across *except* place BS’s in ST#’s [18, 38], CH 1 & turn (55)
Row 39: SC in each ST across, CH 1 & turn (55)
Row 40: SC in each ST across *except* place BS’s in ST#’s [16, 26, 28, 30, 40], CH 1 & turn (55)
Row 41: SC in each ST across, CH 1 & turn (55) SC in each ST across *except* place BS’s in ST#’s [16, 26, 28, 30, 40], CH 1 & turn (55)
Row 42: SC in each ST across *except* place BS’s in ST#’s [14, 26, 28, 30, 42], CH 1 & turn (55)
Row 43: SC in each ST across, CH 1 & turn (55)
Row 44: SC in each ST across *except* place a BS in ST# 28, Ch 1 & turn (55)
Row 45: SC in each ST across, CH 1 & turn (55)
Row 46: SC in each ST across *except* place a BS in ST# 28, Ch 1 & turn (55)
Row 47: SC in each ST across, CH 1 & turn (55)
Row 48: SC in each ST across *except* place a BS in ST# 28, Ch 1 & turn (55)
Row 49: SC in each ST across, CH 1 & turn (55)
Row 50: SC in each ST across *except* place a BS in ST# 28, Ch 1 & turn (55)
Rows 51-54: SC in each ST across, CH 1 & turn (55)
Row 55: SC in each ST across, YO, pull through and tie off (55)
BACK PANEL
CH 55 + 1 to turn
Row 1: SC in the BB of each chain across, CH 1 & turn (55)
Row 2 to 54: SC in each ST across, CH 1 & turn (55)
Row 55: SC in each ST across, YO, pull through and tie off (55)
SIDE PANELS (x 2)
CH 25 + 1 to turn
Row 1: SC in the BB of each chain across, CH 1 & turn (25)
Row 2 to 54: SC in each ST across, CH 1 & turn (25)
Row 55: SC in each ST across, YO, pull through and tie off (25)
BOTTOM PANEL
CH 55 + 1 to turn
Row 1: SC in the BB of each chain across, CH 1 & turn (55)
Row 2 to 28: SC in each ST across, CH 1 & turn (55)
Row 29: SC in each ST across, YO, pull through and tie off (55)
HANDLES (x 2)
Using the Handicrafter Cotton and your 6mm hook:
CH 80 + 1 to turn
Row 1: SC in the BB of each CH across, CH 1 & turn (80)
Row 2: SC in each ST across, CH 1 & turn (80)
Row 3: SC in each ST across, CH 1 & turn (80)
Row 4: SC in each ST across, YO, pull through and tie off (80)
ASSEMBLY
-Using the Handicrafter Cotton, tie a slip knot
– Place the Front (bobble sun motif) panel and the left side panel wrong sides together
– Put your 6mm hook through both of the first ST’s at the top and SC through both panels’ stitches all the way down
– Continuing with the same working yarn, now place the bottom panel together along the bottom of the front panel (wrong sides together) and continue SC’ing through both panels’ stitches all the way across
– Continuing with the same working yarn, now place the other side panel together along the right side of the front panel (wrong sides together) and continue SC’ing through both panels’ stitches all the way up, YO, pull through and tie off
– Place the back panel together with the side panel on the right of the bag, wrong sides together and repeat the same process as you did for attaching the front panel
– You will now have all panels together and only the bottom sides will still be open, so tie on and SC these closed now as well
– Tie a slip knot and SC all the way around the top of the bag for the final seam.
– Using a length of Handicrafter Cotton about 2 feet, count in 9 stitches from each end and mark the stitches. Fold the short side of the handles together and whip stitch through the stitches on both sides (almost like you’re creating a tube) from ST 9 to ST 71 – repeat for both handles
– To attach the handles, count down 9 rows and in 12 stitches from each side (about 2.5” down from the top and 4.5” in from each side – but this is to your discretion) – pin to secure and, using your tapestry needle, sew the handles on in a rectangle on the flat portion – be sure not to go all the way through the bag, as you will see the stitches on the inside of the bag – instead, try to secure it through the front loops of stitches on the bag.
– Tie off and weave in all ends.
I hope you love making, and using, this extra large Solaris Tote Bag as much as I did! Now to head for the beach…
For another pattern from my blog using bobbles, check out the Your Heart In Mine Baby Blanket. For another fun textured project from my blog, take a look at the Belle Chunky Crochet Basket.
Happy crocheting everyone!


Everyone I know wants a large bag…this is beautiful…who would not love this!
I think I will add a cloth lining and a pocket..thank you for the pattern
Mary
It’s such a great pattern!!