Pumpkin Fairy Basket Crochet Pattern by Deb Picumbe (Guest Designer)
My name is Deb Pincumbe. I am so excited to be a guest designer. I have been crocheting for 38 years and designing for 3. I have had 5 patterns published in Annie’s magazines. I have a new one coming out in December in Crochet World. I have a pattern store on Ravelry, please check it out https://www.ravelry.com/designers/debby-pincumbe. The Pumpkin Fairy Basket Crochet Pattern is a nice addition to any Halloween party. It is great for putting candy in or anything you want to store.
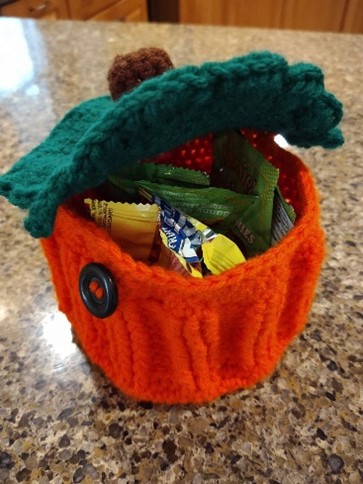
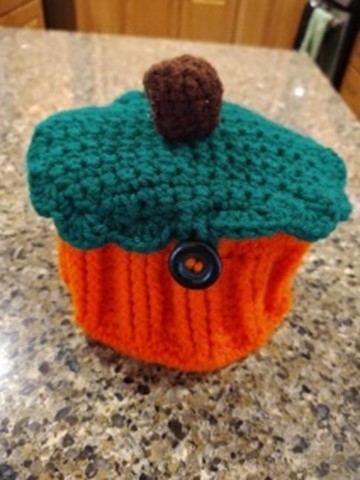
My design is a basket made to look like a pumpkin. It is easy to make and can be made larger
by adding rounds before the sides, if you choose. The button and top add to the look of the
pattern. It is great for Halloween. Directions are for the smaller basket.
Pumpkin Fairy Basket Crochet Pattern
Materials
I used Bernat Super Value yarn in Carrot, less than one skein, and Scraps of brown and green (any worsted weight -4- yarn)
H/5.0 mm hook
1 Button
Level
Beginner +
Pattern Notes & Stitches to Know
SC Single Crochet
FPHDC Front Post Half Double Crochet
BPHDC Back Post Half Double Crochet
SC2tog Single Crochet 2 stitches together
Blo back loops only
Gauge – 8 rounds = 2”, 9 sc stitches = 2”
Written in US terms
CROCHET PATTERN
Round 1: With orange or main color SC 6 into a magic circle
Round 2: 2 single crochets in each stitch (12)
Round 3: 1 SC in first stitch, 2 SC in the next repeat around. (18)
Round 4: 1 SC in the first two stitches, 2 SC in the next repeat around. (24)
Round 5: 1 SC in the first three stitches, 2 SC in the next repeat around. (30)
Round 6: 1 SC in the first four stitches, 2 SC in the next repeat around. (36)
Round 7: 1 SC in the first five stitches, 2 SC in the next repeat around. (42)
Round 8: 1 SC in the first six stitches, 2 SC in the next repeat around. (48)
Round 9: 1 SC in the first seven stitches, 2 SC in the next repeat around. (54)
Round 10: 1 SC in the first eight stitches, 2 SC in the next repeat around. (60)
Round 11: 1 SC in the first nine stitches, 2 SC in the next repeat around. (66)
Round 12: HDC in blo around (66) join
Round 13 – 26. Ch 2 *3 FPHDC, 3BPHDC, Repeat from *around. Join each round in the beginning FPHDC not the ch.
Round 27: SC around (66)
Round 28 – 29: *SC next 10 stitches, SC2tog. Repeat from * sc to end.
Change to green
Round 30: SC in 14 stitches in the back of the basket. CH1 Turn. (this forms the hinge on the back.)
(14)
Round 31 – 33: 2 SC in first stitch. Sc to the end of the row. CH 1 turn (increase 1 stitch per row)
(15,16,17)
Round 34.-36. HDC across CH1 Turn
Round 37 -38: HDC2tog in the first two stitches, HDC across to end. (16, 15)
Round 39 -41: HDC2tog at the beginning, hdc across to last 2 stitches Hdc2tog last 2 stitches. (13, 11, 9)
Round 42: SC on the outside of the basket going around the whole top including the hinged area
Round 43: Ch2 4DC in the same space, skip one space, sc in the next, *skip one space, 5 DC in next, skip one space, SC in next, Repeat from star around.
Sc around. Fasten off.
Top Made in brown
Round 1: 6 SC into a magic circle.
Round 2: 2 SC in each SC around
Round 3: SC around
Round 4: *SC2tog, SC repeat from *around
Round 5: *SC2tog, SC repeat form * around. Fasten off leaving a tail long enough to attach it to the top of the pumpkin.
Sew the top on the pumpkin. Add a button to the front. Attach green to the front of the top, (so it will fit over the button) ch 12, attach in the same space (for the loop). Weave in all ends. Fill it with your favorite things. Enjoy.
This is my original pattern. Please feel free to sell items made with this pattern, but link back to my pattern and give me credit.
Ask questions if you do not understand any part of this pattern.
grdeanni@debbiethurmond
https://www.ravelry.com/designers/debby-pincumbe
I hope you enjoyed this pattern. Please post pictures or send them to me. I love seeing things I designed being made. Here are links to two more patterns in my Ravelry store. Please take a look.
https://www.ravelry.com/patterns/library/peek-a-boo-tube-top
https://www.ravelry.com/patterns/library/the-ultimate-comfort-hoodie