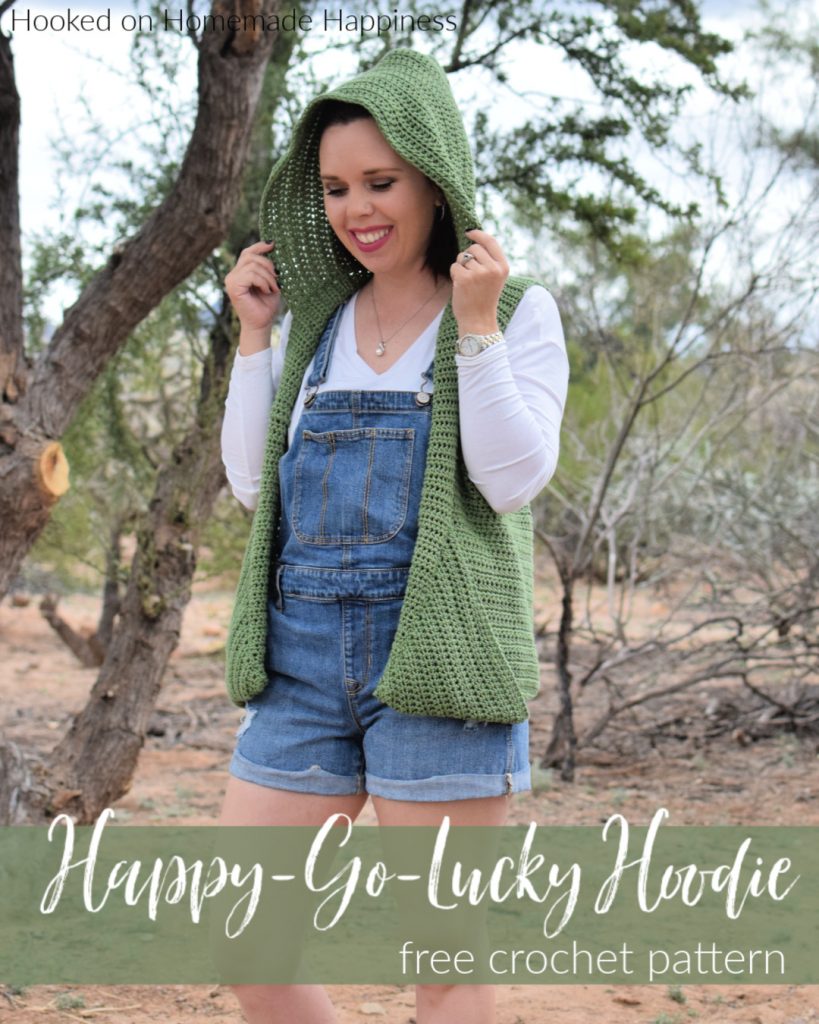
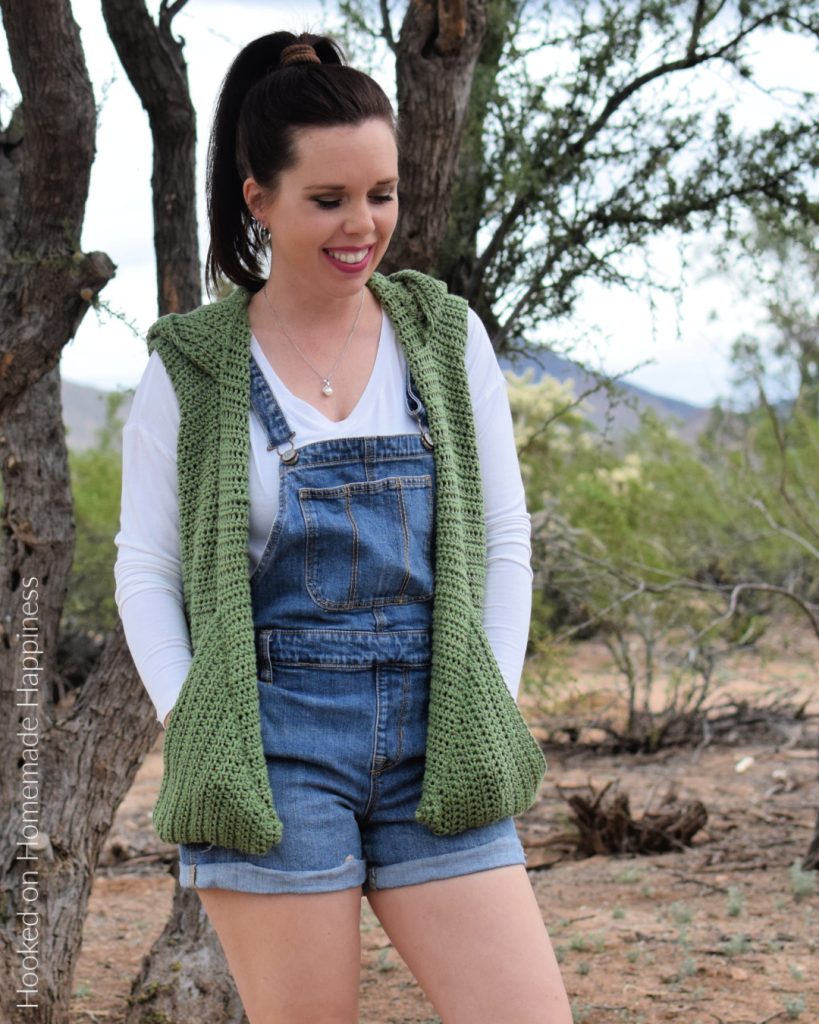
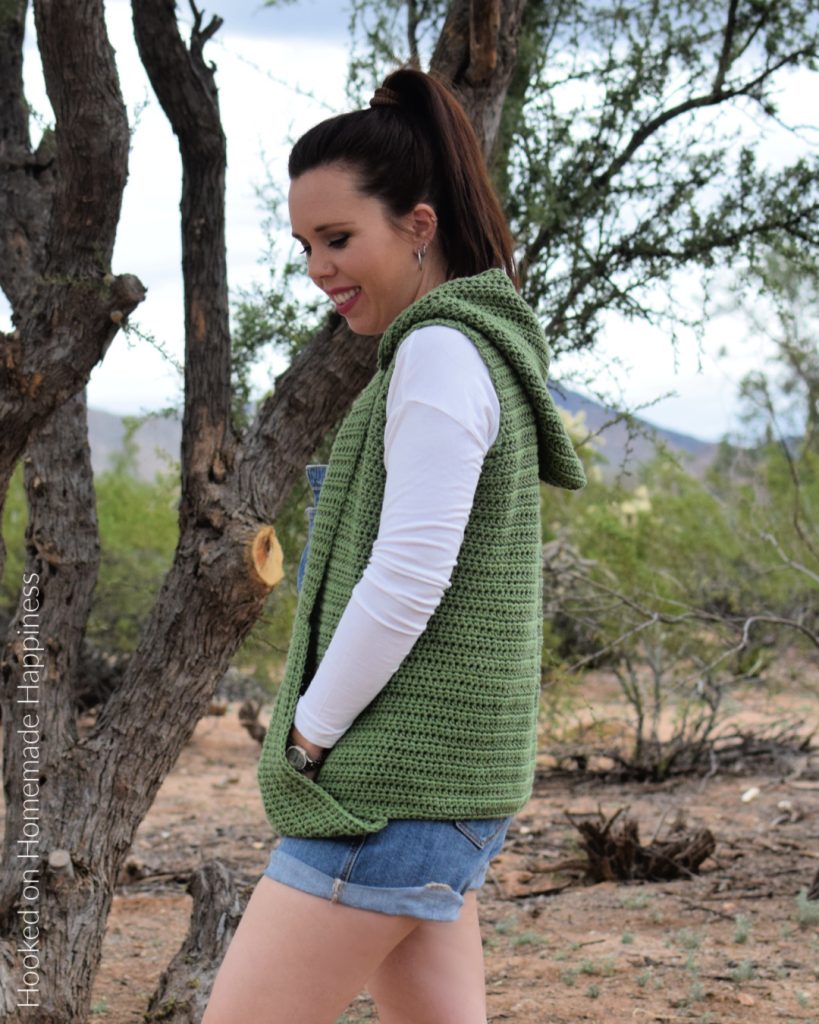
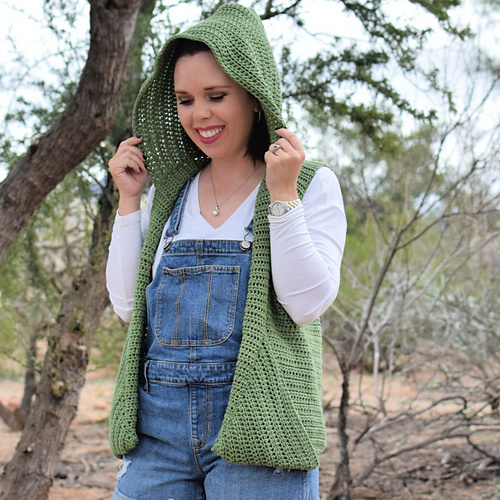
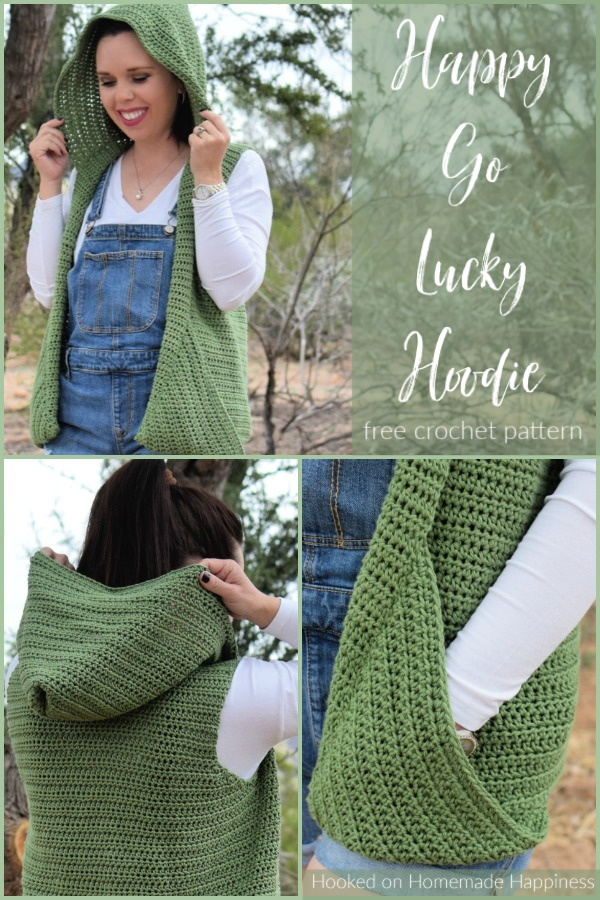
Happy-Go-Lucky Hoodie Crochet Pattern
If you love relaxing projects that are easy to wear and fun to make, the Happy-Go-Lucky Hoodie Crochet Pattern is just what you need. This sleeveless crochet hoodie vest is made entirely with half double crochet stitches, creating a smooth and cozy texture that’s perfect for layering. Featuring practical pockets, a roomy hood, and a casual fit, this cotton yarn crochet pattern is ideal for year-round style. Whether you’re new to garments or looking for a quick and satisfying make, this easy crochet wearable will become a staple in your handmade wardrobe.
Purchase the ad-free, printable PDF for easy printing.
🧶 Why You’ll Love This Pattern
- Completely beginner-friendly stitches (all hdc!)
- Designed as a sleeveless vest for layering
- Includes detailed instructions for adding pockets and a hood
- Made with comfortable cotton yarn for everyday wear
- Works up quickly with minimal shaping
✨ Key Features
- Construction Style: Worked flat in one panel, folded, and seamed
- Stitches Used: Half double crochet only (with some decreases)
- Fit: Relaxed, casual style with a flattering drape
- Skill Level: Easy/Advanced Beginner
- Sizes Included: Multiple sizes included (customizable length and width)
🧵 Yarn & Materials
- Yarn: Worsted weight cotton yarn
- Hook Size: 5.0 mm (or hook needed to obtain gauge)
- Extras: Yarn needle, stitch markers, scissors
- Optional: Buttons for adding closure or decorative edging
🎯 Perfect For…
- Layering over tanks and tees in warmer months
- Adding a cozy touch over long sleeves in fall
- Beginners wanting to make their first wearable garment
- Makers who love pockets and functional hooded designs
📏 Fit & Customization Tips
- Add extra rows at the hem for a longer tunic look
- Adjust hood depth to fit your style preference
- Customize the pocket size for the perfect hand-resting spot
- Use cotton for a light feel or acrylic for a warmer version

Making the Happy-Go-Lucky Hoodie Crochet Pattern
Get the full free pattern below or purchase the ad-free, printable PDF
Materials
I Love This Cotton Yarn in Sage (500g S, 600g M/L, 700g XL/2X, 800g 3X) – any worsted weight yarn would work
H/5.0 mm mm hook
yarn needle
scissors
stitch markers
Level
intermediate
Pattern notes & stitches to know
ch – chain
hdc – half double crochet
foundation hdc (video tutorial HERE)
hdc2tog – half double crochet 2 together
hdc3tog – half double crochet 3 together
· written in US terms
· ch 2 does not count as stitch
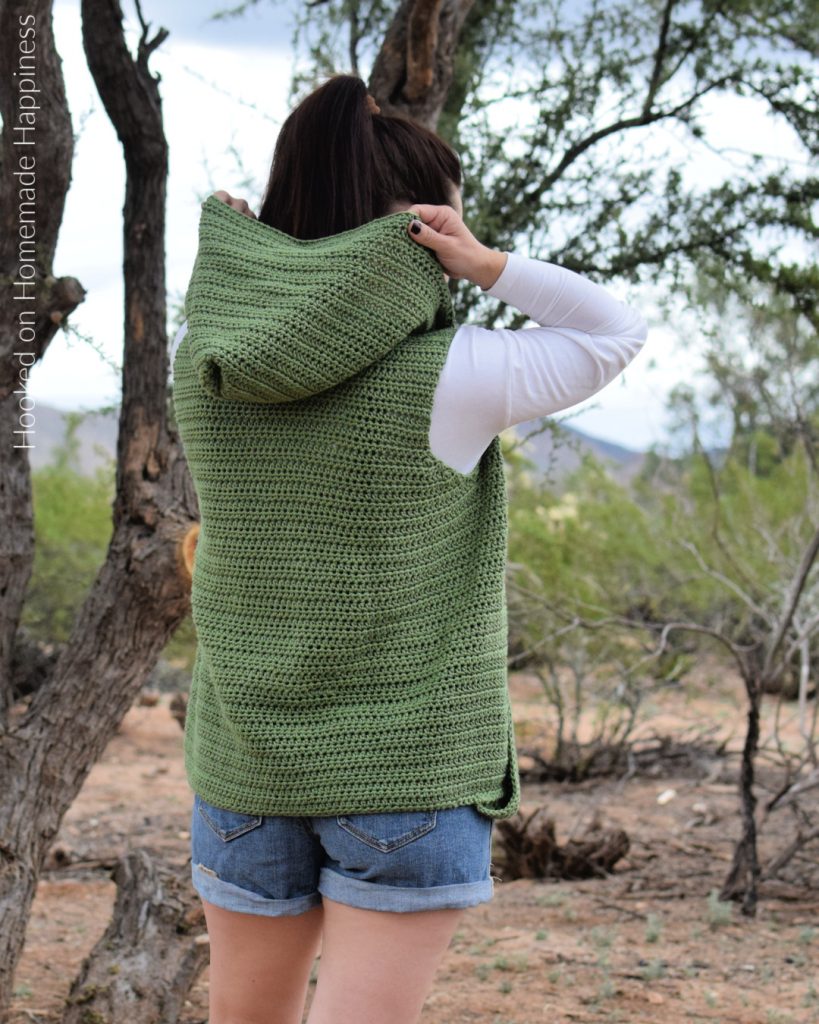
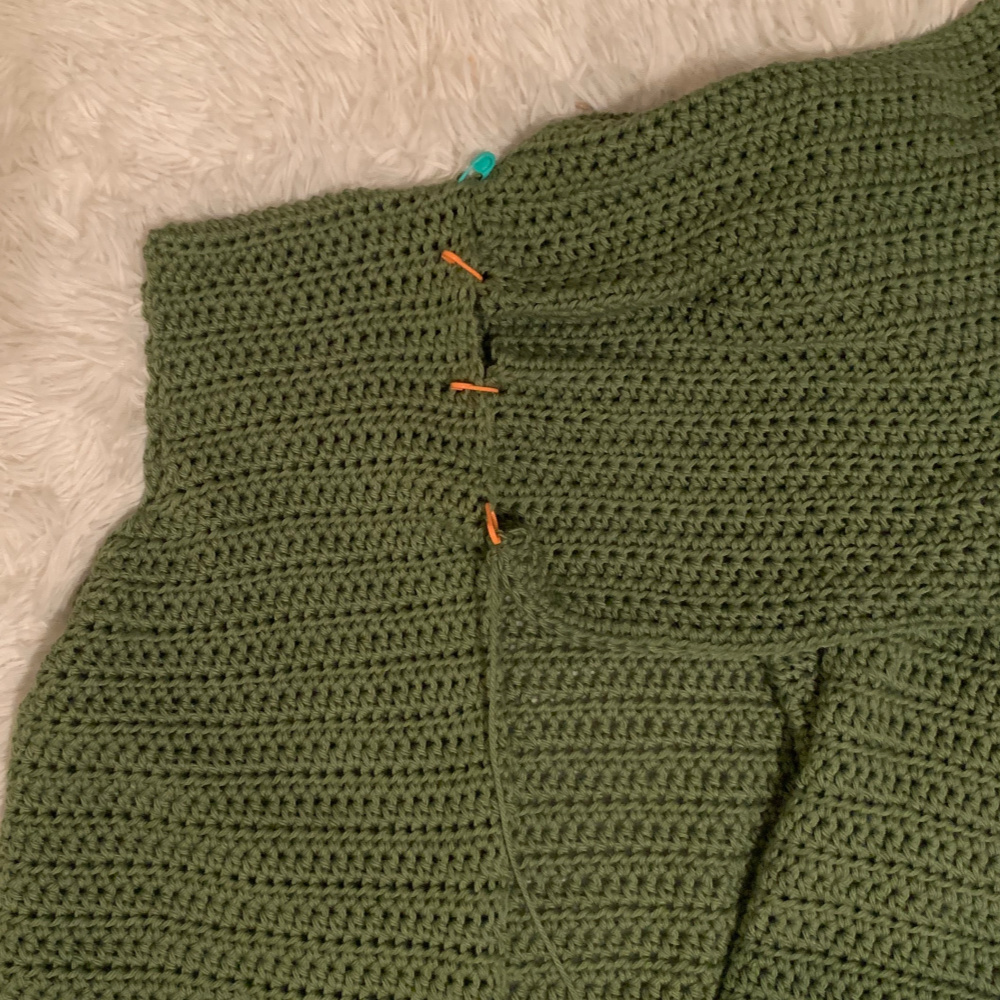
· This vest is constructed as one piece with spaces for the armholes. (photo in the pattern) The shoulders are sewn. And then the pockets and hoodie are made and sewn on.
– Gauge: 14 hdc x 9 rows = 4” x 4”
Sizes: S, M, L, XL, 2X, 3X – The pattern is written in these sizes consecutively. Example, when the pattern gives the end of the row count (125, 141, 157, 173, 189, 205 hdc) the 125 is for S, 141 is M, 157 is L, 173 is XL, 189 is 2X, 205 is 3X.
This vest has a classic fit with some positive ease.
Approx Finished Size:
Bust: S (36”) M (40”) L (45”) XL (49”) 2X (54”) 3X (58”)
Length: S (22”) M (23.75”) L (25.5”) XL (27.25”) 2X (29”) 3X (30.75”)
Armhole Depth: S (7.25”) M (8”) L (8.75”) XL (9.5”) 2X (10.25”) 3X (11”)
Size Small pictured. I am 5’0” with 34” bust
Pattern Support
Looking for pattern support or want to share your progress? Join our Crochet Community Facebook Group! It’s the perfect place to ask questions, get help, and connect with fellow makers.
CROCHET PATTERN WRITTEN INSTRUCTIONS
ch 3
Row 1: starting in the 3rd ch from the hook, foundation hdc 125, 141, 157, 173, 189, 205 (125, 141, 157, 173, 189, 205 hdc)
Row 2: ch 2, turn, hdc in each stitch across (125, 141, 157, 173, 189, 205 hdc)
Repeat row 2 to Row 36, 38, 40, 42, 44, 46
The split for the armholes start in the next row. The end result will look like the photo below
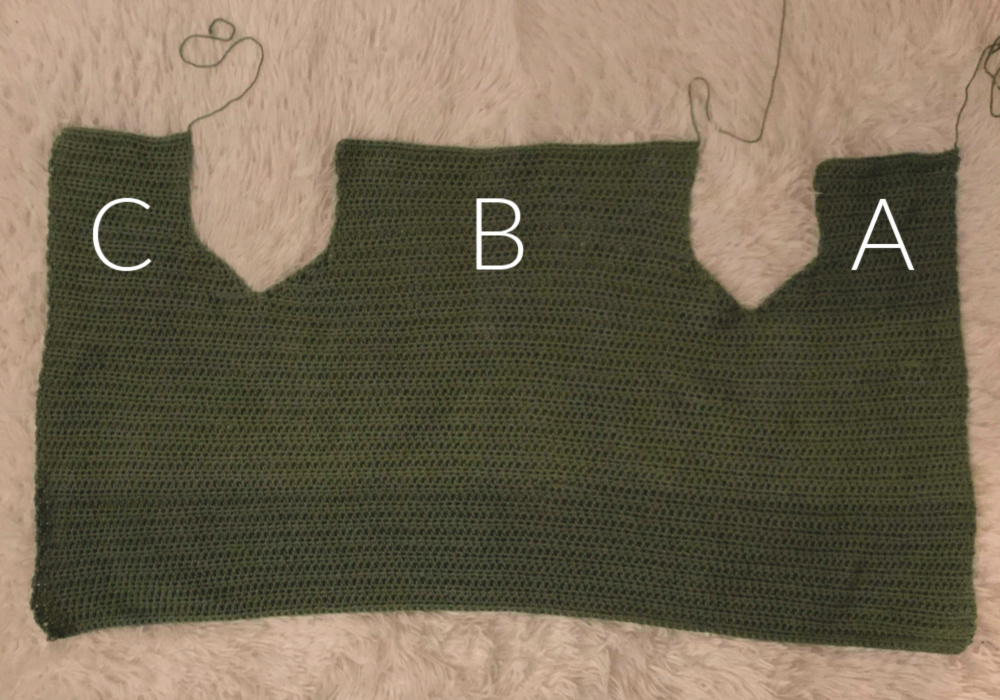
Start with section A
Row 37, 39, 41, 43, 45, 47: ch 2, turn, hdc in 28, 32, 36, 40, 44, 48 stitches, hdc2tog (29, 33, 37, 41, 45, 49 hdc)
Row 38, 40, 42, 44, 46, 48: ch 2, turn, hdc2tog, hdc in each stitch across (28, 32, 36, 40, 44, 48 hdc)
Row 39, 41, 43, 45, 47, 49: ch 2, turn, hdc across to last 2 stitches, hdc2tog (27, 31, 35, 39, 43, 47 hdc)
Row 40, 42, 44, 46, 48, 50: ch 2, turn, hdc3tog, hdc in each stitch across (25, 29, 33, 37, 41, 45 hdc)
Row 41, 43, 45, 47, 49, 51: ch 2, turn, hdc in across to last 3 stitches, hdc3tog (23, 27, 31, 35, 39, 43 hdc)
Row 42, 44, 46, 48, 50, 52: ch 2, turn, hdc3tog, hdc in each stitch across (21, 25, 29, 33, 37, 41 hdc)
Row 43, 45, 47, 49, 51, 53: ch 2, turn, hdc in each stitch across (21, 25, 29, 33, 37, 41 hdc)
Repeat previous row to Row 53, 57, 61, 65, 69, 73 (21, 25, 29, 33, 37, 41 hdc)
Fasten off. Leave a long end for sewing.
Section B: Rejoin yarn at Row 37, 39, 41, 43, 45, 47 in the stitch next to section A
Row 37, 39, 41, 43, 45, 47: ch 2, hdc2tog, hdc in 61, 69, 77, 85, 93, 101 stitches, hdc2tog (63, 71, 79, 87, 95, 103 hdc)
Row 38, 40, 42, 44, 46, 48: ch 2, turn, hdc2tog, hdc in each stitch to the last 2 stitches, hdc2tog (61, 69, 77, 85, 93, 101 hdc)
Row 39, 41, 43, 45, 47, 49: ch 2, turn, hdc2tog, hdc in each stitch to the last 2 stitches, hdc2tog (59, 67, 75, 83, 91, 99 hdc)
Row 40, 42, 44, 46, 48, 50: ch 2, turn, hdc3tog, hdc in each stitch to the last 3 stitches, hdc3tog (55, 63, 71, 79, 87, 95 hdc)
Row 41, 43, 45, 47, 49, 51: ch 2, turn, hdc3tog, hdc in each stitch to the last 3 stitches, hdc3tog (51, 59, 67, 75, 83, 91 hdc)
Row 42, 44, 46, 48, 50, 52: ch 2, turn, hdc3tog, hdc in each stitch to the last 3 stitches, hdc3tog (47, 55, 63, 71, 79, 87 hdc)
Row 43, 45, 47, 49, 51, 53: ch 2, turn, hdc in each stitch across (47, 55, 63, 71, 79, 87 hdc)
Repeat previous row to Row 53, 57, 61, 65, 69, 73 (47, 55, 63, 71, 79, 87 hdc)
Fasten off.
Section C: Rejoin yarn at Rejoin yarn at Row 37, 39, 41, 43, 45, 47 in the stitch next to section B
Row 37, 39, 41, 43, 45, 47: ch 2, hdc2tog, hdc in each stitch across (29, 33, 37, 41, 45, 49 hdc)
Row 38, 40, 42, 44, 46, 48: ch 2, turn, hdc in each stitch to the last 2, hdc2tog (28, 32, 36, 40, 44, 48 hdc)
Row 39, 41, 43, 45, 47, 49: ch 2, turn, hdc2tog, hdc in each stitch across (27, 31, 35, 39, 43, 47 hdc)
Row 40, 42, 44, 46, 48, 50: ch 2, turn, hdc in each stitch to the last 3, hdc3tog (25, 29, 33, 37, 41, 45 hdc)
Row 41, 43, 45, 47, 49, 51: ch 2, turn, hdc3tog, hdc in each stitch across (23, 27, 31, 35, 39, 43 hdc)
Row 42, 44, 46, 48, 50, 52: ch, 2 turn, hdc in each stitch to the last 3, hdc3tog (21, 25, 29, 33, 37, 41 hdc)
Row 43, 45, 47, 49, 51, 53: ch 2, turn, hdc in each stitch across (21, 25, 29, 33, 37, 41 hdc)
Repeat previous row to Row 53, 57, 61, 65, 69, 73 (21, 25, 29, 33, 37, 41 hdc)
Fasten off. Leave a long end for sewing.
POCKETS
ch 3
Row 1: 2 hdc in 3rd ch from the hook (2 hdc)
Row 2: ch 2, turn, 2 hdc in each stitch (4 hdc)
Row 3: ch 2, turn, 2 hdc in first stitch, hdc in next 2 stitches, 2 hdc in last stitc (6 hdc)
Row 4: ch 2, turn, 2 hdc in first stitch, hdc in each stitch across to last stitch, 2 hdc in last stitch (8 hdc)
Repeat row 4 to Row 20 (or until desired length)
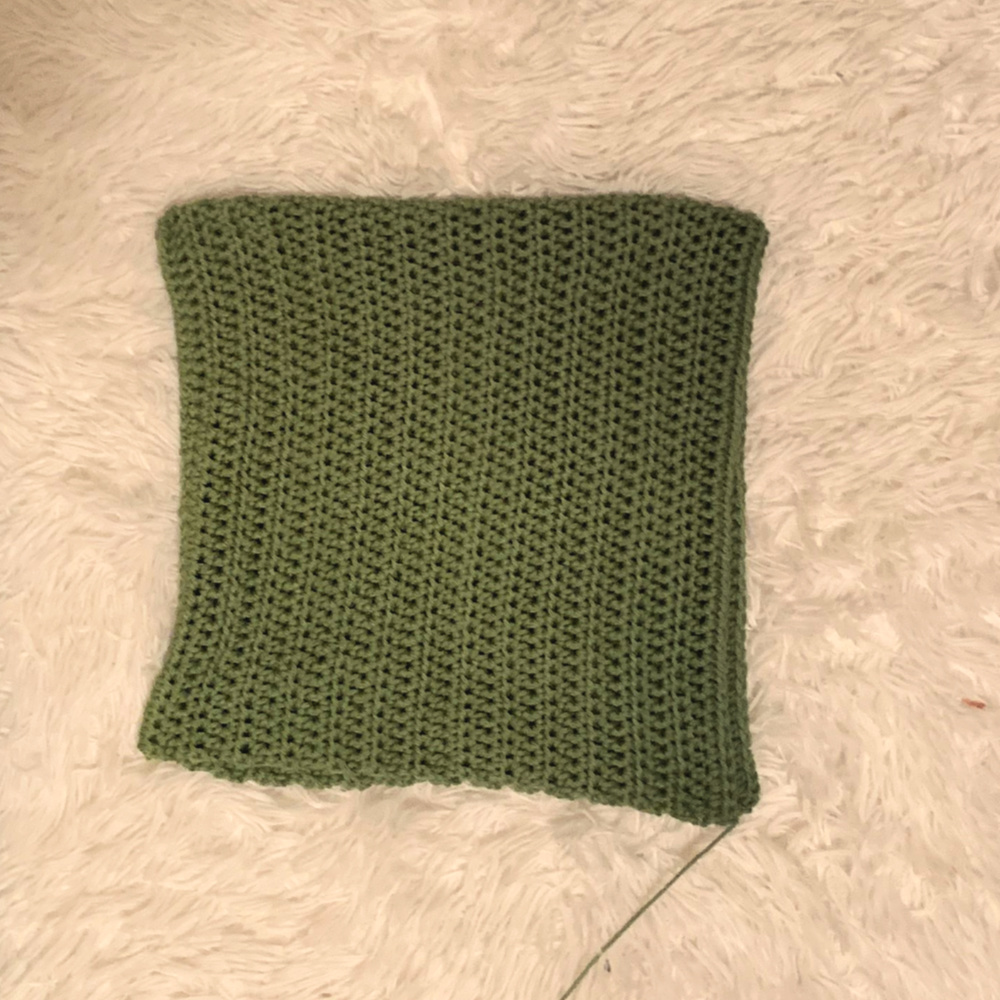
HOOD
ch 3 (leave a long end for sewing)
Row 1: starting in the 3rd ch from the hook, foundation hdc 75 (75 hdc)
Row 2: ch 2, turn, hdc in each stitch across (75 hdc)
Repeat row 2 to Row 28 (or until desired length)
Fasten off. Leave a long end for sewing.
SEWING
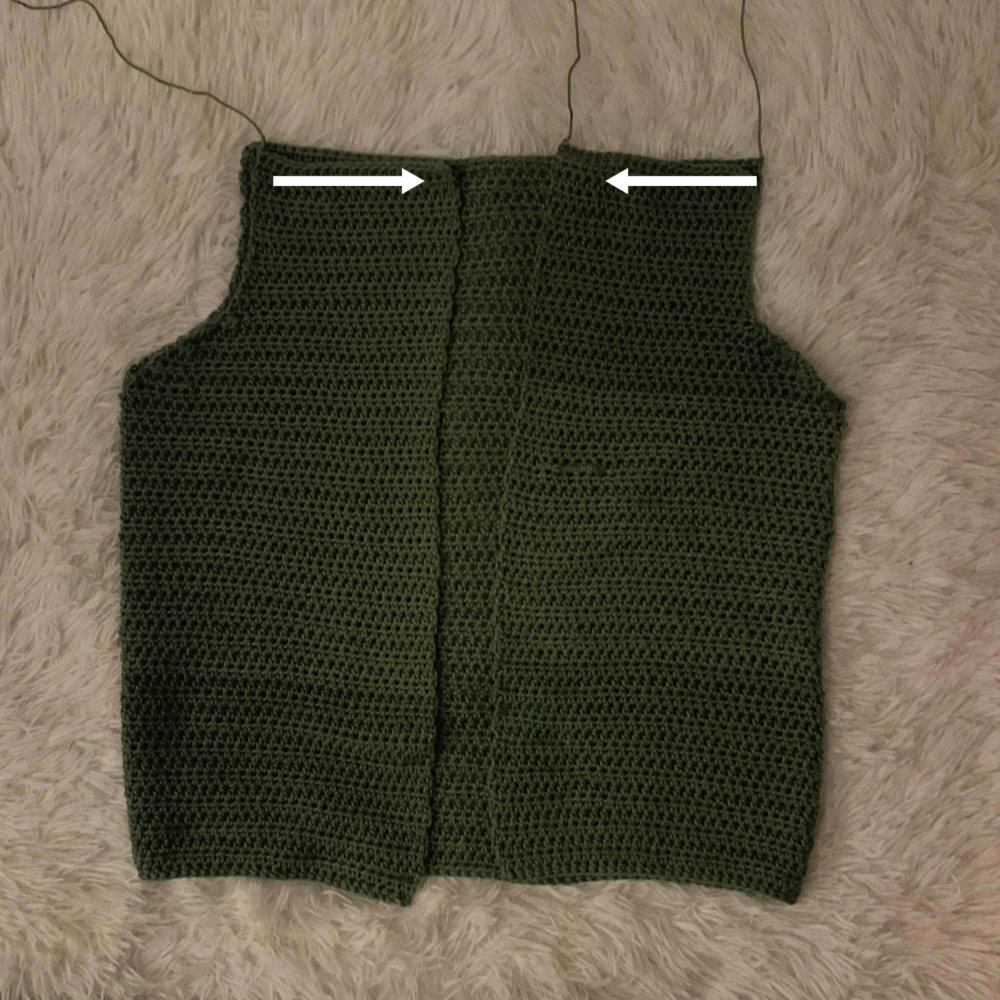
On the vest, fold sections A and C towards the center to section B. Use the long ends to sew the shoulders closed with a whip stitch. Fasten off. Weave in the ends.
Keep wrong side out. Line up the pockets along the front bottom corner. Use stitch markers to keep it in place.
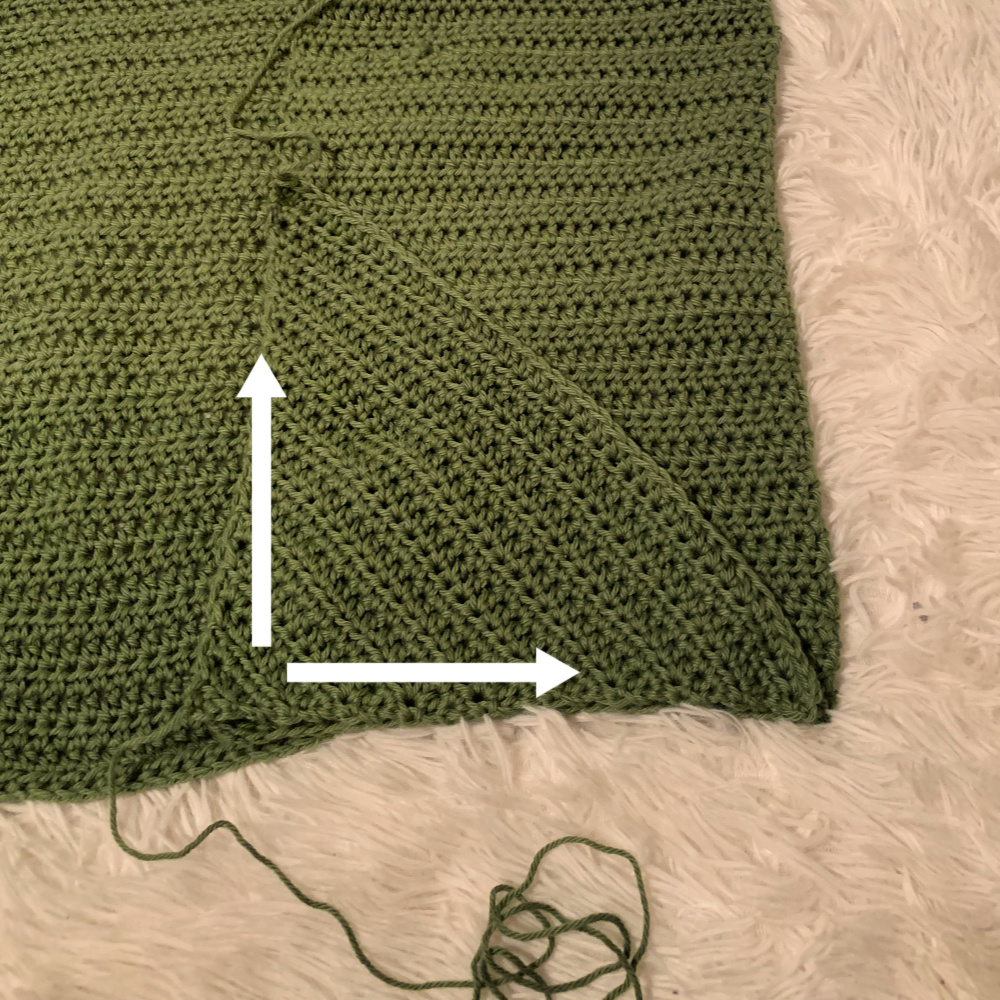
Use the long ends to sew the pockets to the corner with a whip stitch.
For the hood, fold it in half so the rows run vertically. Sew the back closed (row 1) with a whip stitch
Line the hood up along the collar of the vest. Use stitch markers to keep it in place. Bunch it up slightly. Do not line it up row per row. This will be too tight. Line up the center back of the hood with the top of the collar and then I have the bottom of the hood lined up with the middle of the armhole.
Sew the hood to the vest with a whip stitch.
Fasten off. Weave in the ends.
Turn right side out.
And you’re done with this cute hoodie vest! I hope you love it!
Looking for more patterns? Follow me on Facebook, Instagram, and Pinterest! Please share a pic of your finished product with me. I’d love to see it!


Very adorable!! Thank you Breann (=
Love your patterns and they are very clear to understand. Thank you for the giveaway.
Adore the turquoise yarn in the Unstash My Stash giveaway posted on April 1st.
Thank you for the opportunity to explore new yarns.
Hi,
I’m working on the vest and am at 104 chains in the foundation, and it’s probably 5’ long – is that correct???
Thank you, Jeannie
I am working on the xl and I am worried about the length when I get done. I crochet pretty tight and I am using Caron Cotton cake the although it is classified as a 4 weight, it is smaller then the I love this cotton. Can you tell me the measurement from bottom to the armpit? I want to add rows if I need to. Thank you.
I’m making a size medium
Jeannie
Hey this is Jeannie again. I just figured out what I was doing wrong!!! Sorry to have bothered you 🙂
Ok ? let me know if you have more questions
Thank you! This may be beyond my skill set, but have to give it a try!! It’s sooo cute!
You may hear from me again 🙂
Hi Breann,
I was wondering if I could use Lion Brands Comfy Cotton Blend yarn? It is a
#3 yarn.
Thank you,
Ann
Hi! Yes, but it will be smaller than the approx measurements given 🙂
Ok, thank you!
Ann
Hi Breann!
First, let me say I loved this pattern. It was easy for me to understand – I had no problems – when I began I wasn’t sure if it was over my head or not, but it was not! However, I made a small and it is big – wide, longer than what yours appears to be – checked gauge and it’s correct. I used an acrylic worsted weight yarn – would that make a difference over cotton???
I would make another one if I knew how to make it smaller 🙂
Hi! Hm… I wonder what happened? Do the final measurements match what’s given? To make it smaller you could go down a hook size 🙂
It looks like the width is 6” wider, 7” longer and armholes 10” rather than 7.25. I apologize if I sound crazy, but……I checked gauge and counted rows, etc. Thought I followed things to a “T” :).
Thank you!
Jeannie
Wow! That’s a big difference! You have 125 hdc across? And 53 rows?
I finished a second vest. Used a different worsted weight yarn and the fit is like it should be – a made a small. Very easy to follow pattern – and I’m very pleased with what I created! Thank you – I look forward to more fun patterns.
Jeannie
Thank you Brean I’m going to try my skills at this gorgeous little jacket ?
Yay! Thanks! Let me know if you have any questions 🙂
Hi! Could I use acrylic yarn for this project?
Definitely 🙂
Could sleeves be added to this pattern easily??
Definitely!! I would just join yarn to the bottom of an armhole and work in rounds.
I did a small for my niece. I used scrap red heart 4 med yarn in several colors. She’s very tall and a skateboarder so I made the arm holes longer to get length on the vest. She loves it. Now the other cousins want one and they all want something different. This pattern is a good one.
Yay! Thank you so much!!
Hi!
Before I make this design, I wanted to know if you knew how many yards of yarn you used.
Thanks!