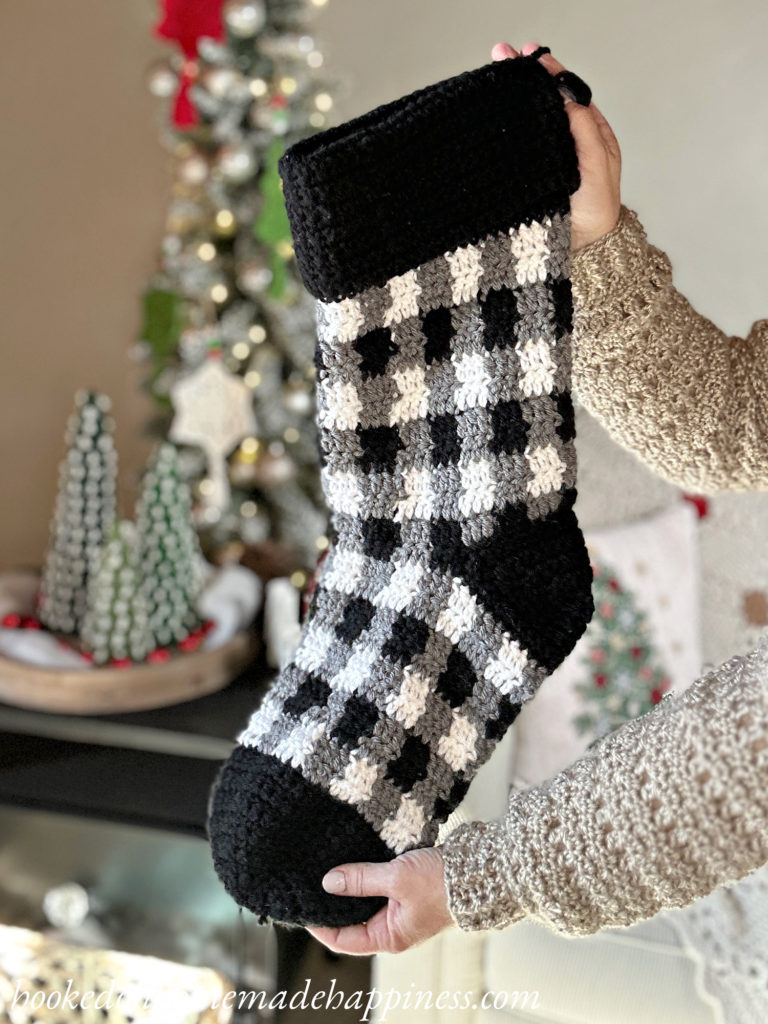
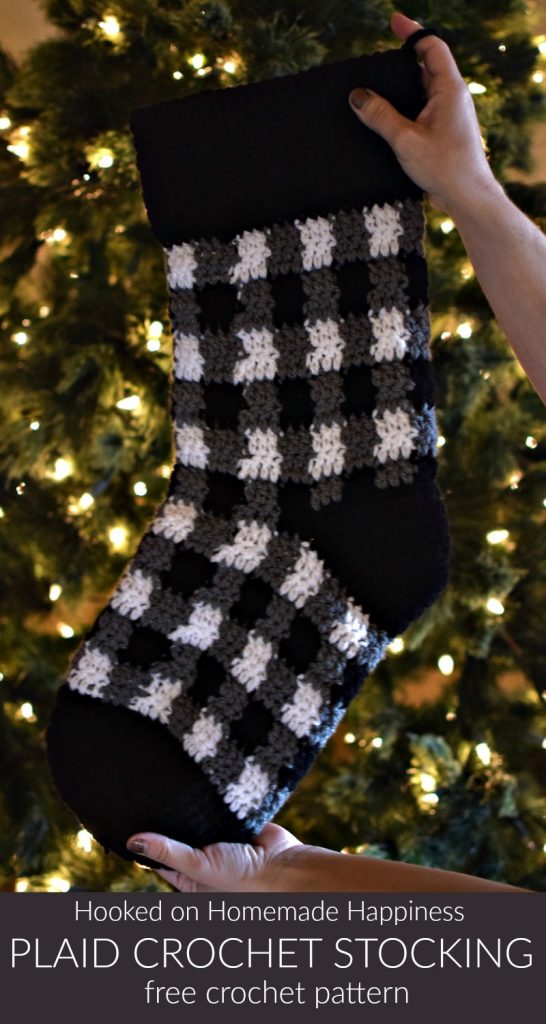
Plaid Crochet Stocking Pattern
Add a cozy, handmade touch to your holiday décor with this Plaid Stocking Crochet Pattern. Featuring a classic plaid design and a timeless Christmas look, this crochet stocking is perfect for hanging on the mantel, filling with small gifts, or gifting to someone special. Whether you love traditional holiday colors or want to experiment with a modern palette, this plaid crochet stocking can be customized to fit your style.
This pattern is designed to be approachable for confident beginners and enjoyable for experienced crocheters who love textured, colorwork projects.

Purchase the ad-free, printable PDF for easy printing.
Why You’ll Love This Plaid Stocking Crochet Pattern
- Classic plaid crochet stocking design for timeless Christmas décor
- Works up beautifully in traditional or modern color combinations
- Great project for holiday decorating or handmade gifts
- Structured shape that holds its form when hung
- Fun way to practice color changes and crochet plaid techniques
This pattern calls for bulky weight yarn and a J/6.0 mm hook. But worsted weight yarn could definitely be used. I would go down to an H/5.0 mm hook and your stocking will come out slightly smaller than the pattern suggests.
Pattern Details
This plaid stocking crochet pattern creates a bold, eye-catching design without complicated shaping. The plaid effect is created through strategic color changes, resulting in a stocking that looks detailed and festive while still being easy to follow.
- Skill Level: Easy to Intermediate
- Construction: Worked in sections and finished with a hanging loop
- Design: Plaid pattern with a classic stocking shape
Yarn & Supplies
To make this crochet plaid stocking, you’ll need just a few basic supplies:
- Bulky weight yarn in three coordinating colors
- J/6.0 mm Crochet hook
- Yarn needle
- Scissors

Plaid Crochet Stocking Pattern
Get the free pattern below or purchase the ad-free, printable PDF in my Etsy Shop or Ravelry Shop
PIN for later HERE
Add to your Ravelry Queue HERE
Materials
Bulky weight yarn in 3 colors, 100g gray and white, 200g black (I used Paintbox Simply Chunky)
J/6.0 mm hook
yarn needle
scissors
Level
intermediate
Pattern notes & stitches to know
magic ring
sl st – slip stitch
ch – chain
sc – single crochet
dc – double crochet
sc2tog – single crochet 2 together (single crochet decrease)
· written in US terms
· ch 1 does not count as sc
· ch 2 does not count as dc
· Pattern is made from the bottom up with turned rounds
· Gauge: 12 sc x 14 rows = 4” x 4”
· Approx Finished Size (with cuff folded): 21.5” x 8”
PLAID CROCHET STOCKING PATTERN
With Black, make a magic ring
TOE
Round 1: ch 1, 6 sc in ring, pull ring closed tight, join to first sc with sl st (6 sc)
Round 2: ch 1, turn, 2 sc in each stitch around, join to first sc with sl st (12 sc)
Round 3: ch 1, turn, *sc in 1 stitch, 2 sc in next* repeat from * to * around, join to first sc with sl st (18 sc)
Round 4: ch 1, turn, *sc in 2 stitches, 2 sc in next* repeat from * to * around (24 sc)
Round 5: ch 1, turn, *sc in 3 stitches, 2 sc in next* repeat from * to * around, join to first sc with sl st (30 sc)
Round 6: ch 1, turn, *sc in 4 stitches, 2 sc in next* repeat from * to * around, join to first sc with sl st (36 sc)
Round 7: ch 1, turn, *sc in 5 stitches, 2 sc in next* repeat from * to * around, join to first sc with sl st (42 sc)
Round 8: ch 1, turn, *sc in 6 stitches, 2 sc in next* repeat from * to around, join to first sc with sl st (48 sc)
Round 9 – 14: ch 1, turn, sc in each stitch around, join to first sc with sl st (48 sc)
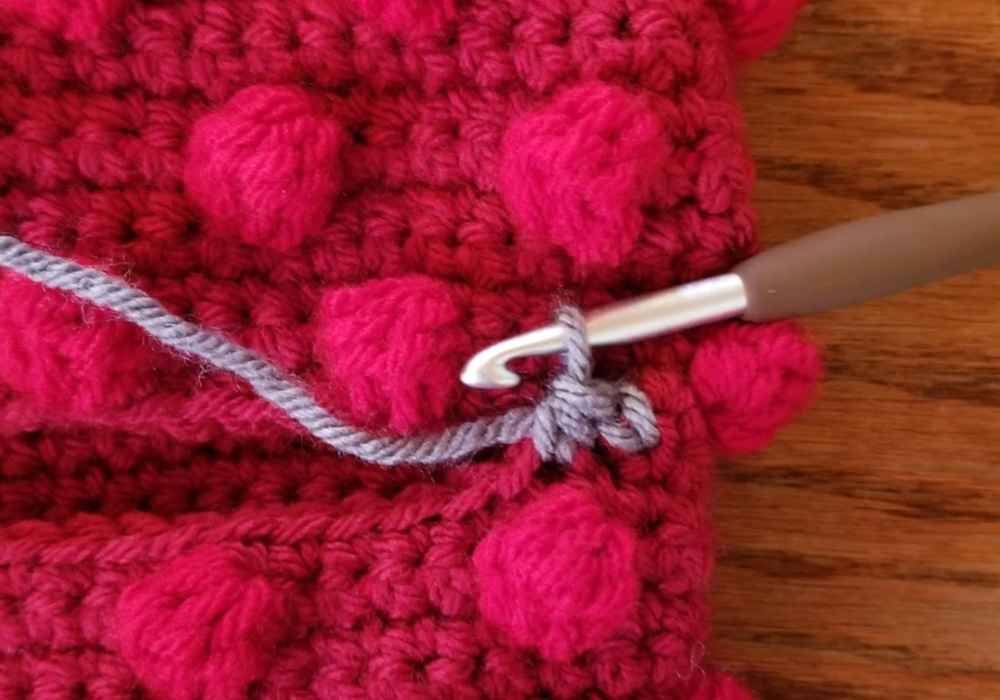
Change to White, do not fasten off black.
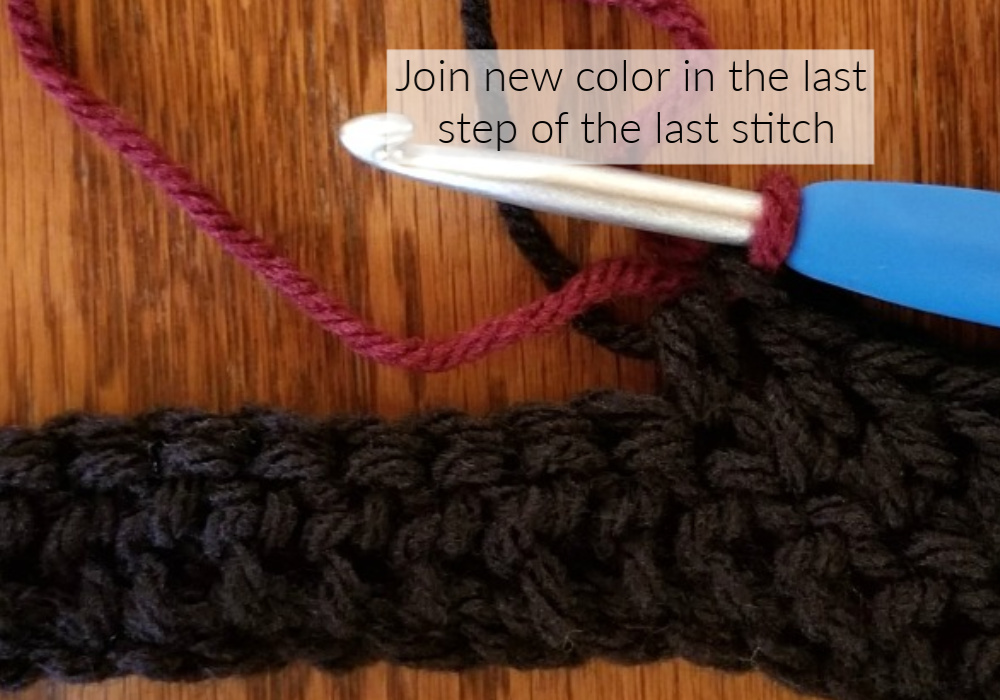
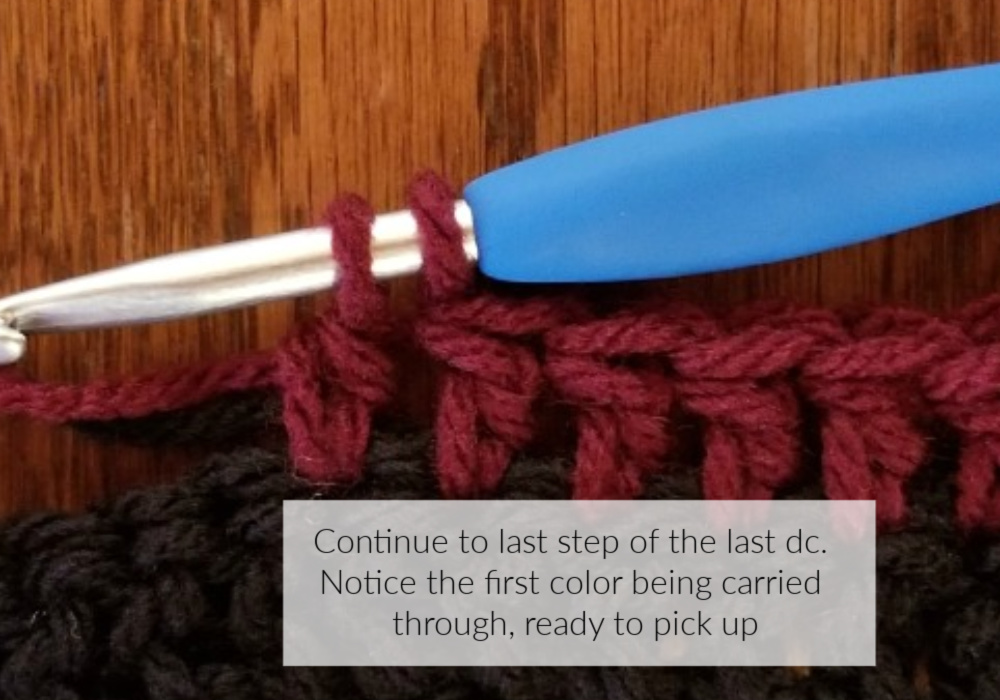
Plaid begins in the next round. Do not fasten off any colors, unless otherwise indicated.
Photos are from a swatch, but the method is the same.
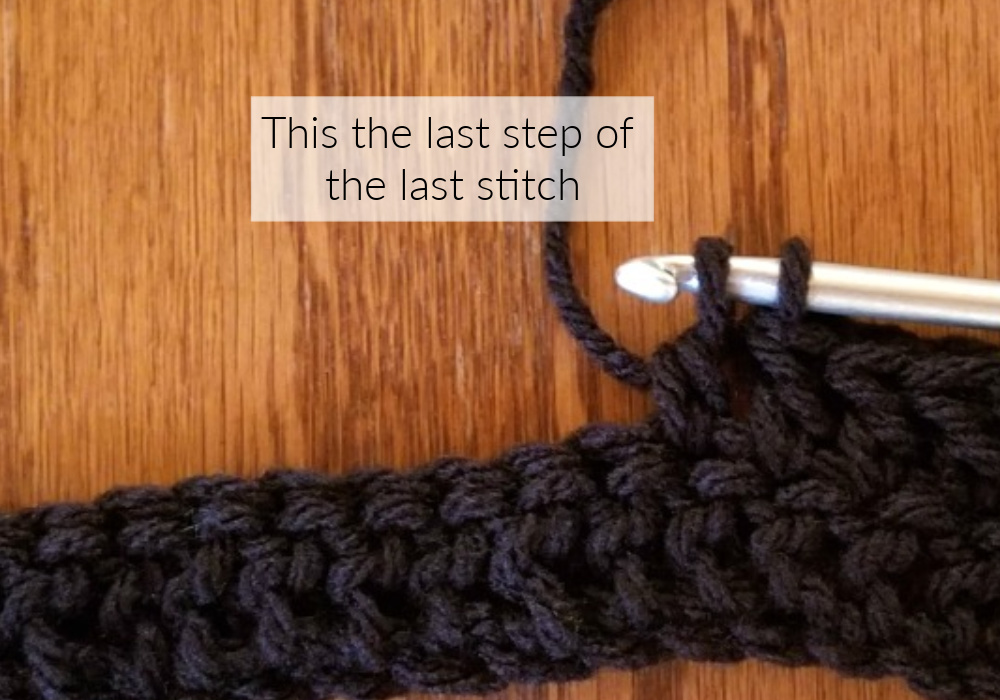
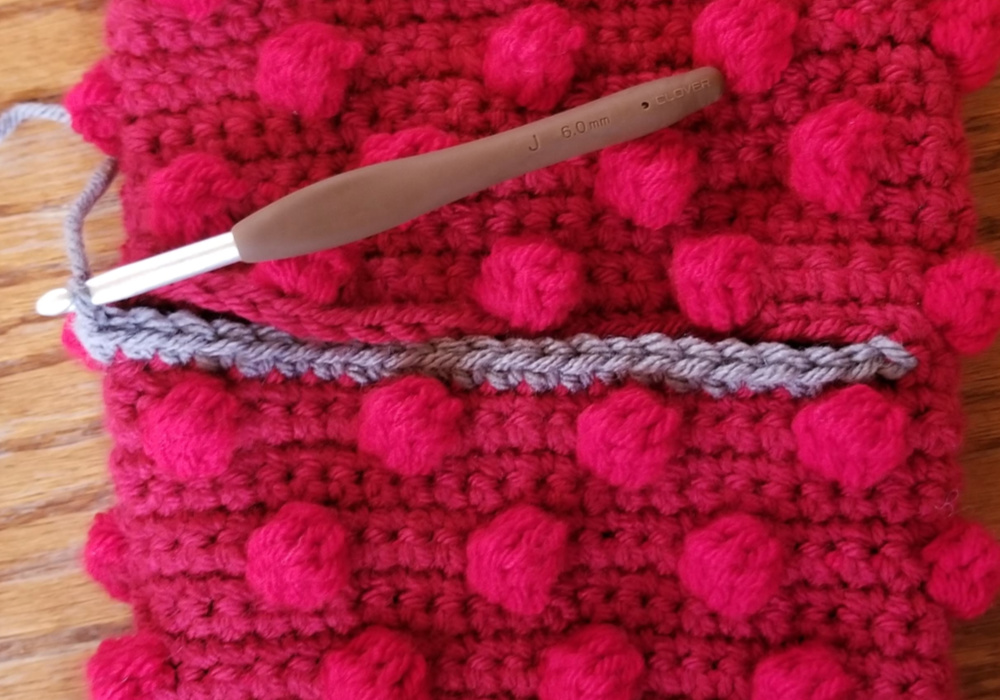
Round 15: ch 2, turn, *dc in 3 stitches with white, change to gray in last step of last dc, dc in 3 stitches with gray, join white in last step of last dc* repeat from * to * around, (do not join white in the last stitch of the round, keep with gray), join to first dc with sl st (48 dc)
Round 16: ch 2, turn, *dc in 3 stitches with gray, change to white in last step of last dc, dc in 3 stitches with white, join gray in last step of last dc* repeat from * to * around, (change to gray in last step of last dc of the round), join to first dc with sl st (48 dc)
Round 17: ch 2, turn, *dc in 3 stitches with gray, change to black in the last step of last dc, dc in 3 stitches with black, join gray in last step of last dc* repeat from * to * around, (do not join gray in the last stitch of the round, keep with black), join to first dc with sl st (48 dc)
Round 18: ch 2, turn, *dc in 3 stitches with black, change to gray in the last step of last dc, dc in 3 stitches with gray, join black in last step of last dc* repeat from * to * around, (join white in the last step of the last dc in the round), join to first dc with sl st (48 dc)
Repeat rounds 15 – 18 to Round 24 (48 dc)
The space for the heel is made in the next round
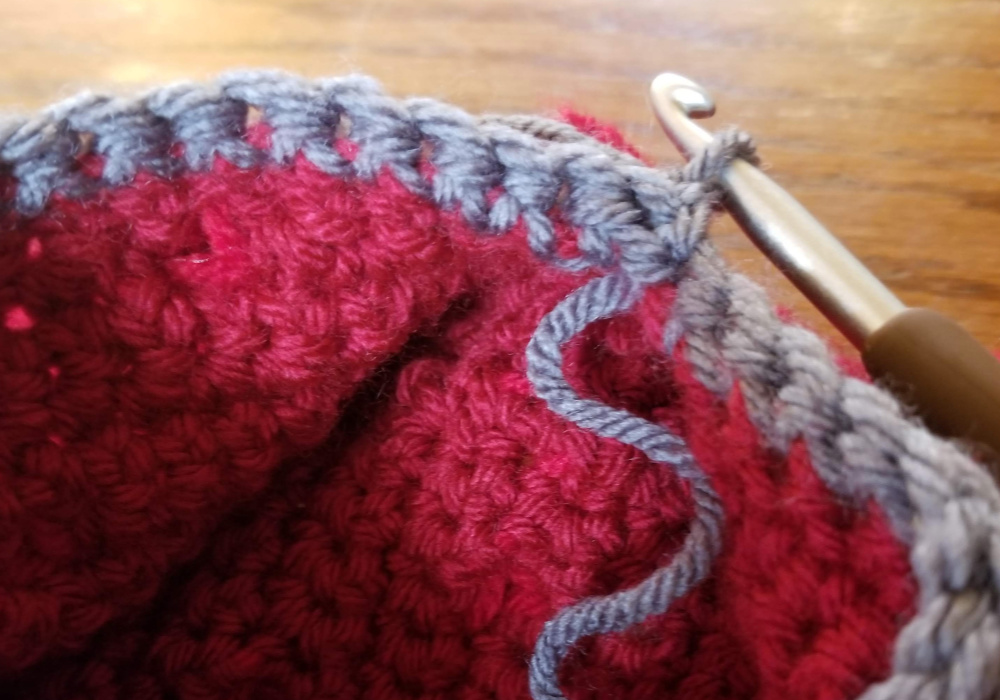
Round 25: ch 2, turn, dc in 3 stitches with gray, change to black in the last step of last dc, dc in 3 stitches with black, do not join gray, fasten off gray, ch 21, skip 21 stitches, dc in next 3 stitches, change to gray in the last step of the last dc, *dc in 3 stitches with gray, change to black in last step of last dc, dc in 3 stitches with black, join gray in last step of last dc* repeat from * to * around, , (do not join gray in the last stitch of the round, keep with black), join to first dc with sl st (27 dc)
There will be a hole where the heel is. Leave it for now. The heel will be finished at the end.
In the next round, work in each stitch and ch around
Round 26: ch 2, turn, *dc in 3 stitches with black, change to gray in the last step of last dc, dc in 3 stitches with gray, join black in last step of last dc* repeat from * to * around, (join white in the last step of the last dc in the round), join to first dc with sl st (48 dc)
Repeat rounds 15 – 18 to Round 36 (48 dc)
CUFF
Change to black
Round 37 – 49: ch 1, turn, sc in each stitch around, join to first sc with sl st (48 sc)
The hanger is made in the next round. Make sure it’s lined up with the back of the heel.
Round 50: ch 1, turn, sc in each stitch to the back of the heel (approx., 30 stitches) ch 6, sc in next stitch (do not skip any stitches), sc in remaining stitches around, join to first sc with sl st (48 sc)
Round 51 – 64: ch 1, turn, sc in each stitch around, join to first sc with sl st (48 sc)
Fasten off. Weave in the ends.
HEEL
(photos are from a different stocking, but the pattern is the same)
Join Black to the corner of the heel space
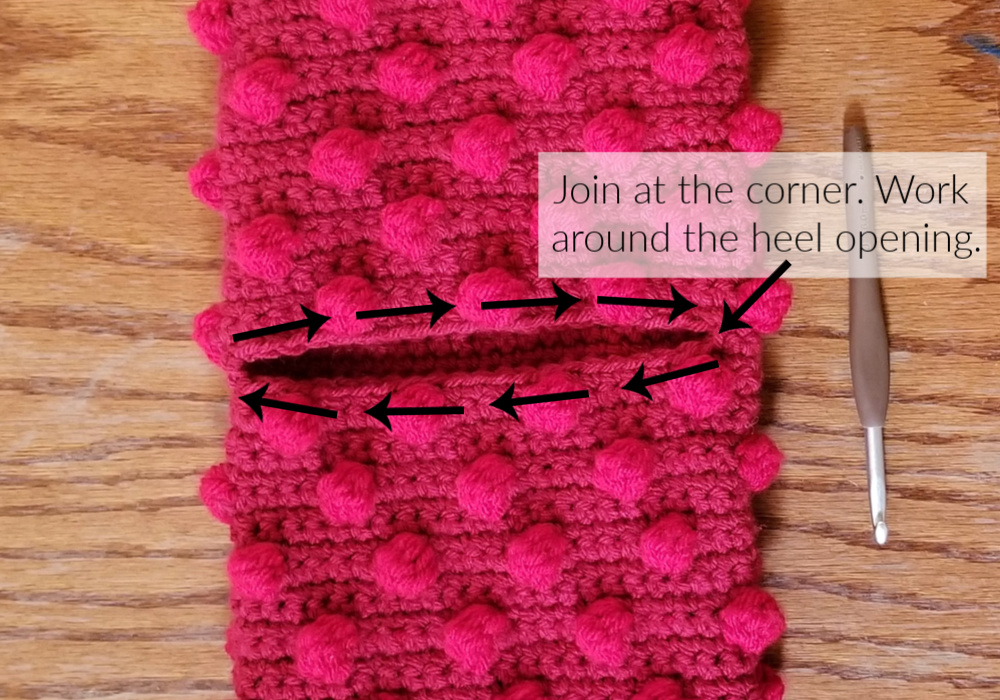
Round 1: ch 1, sc2tog, sc across to opposite corner (approx. 19 stitches), sc2tog, turn so your working across the top of the heel, sc2tog, sc across (approx. 19 stitches) to last 2 stitches, sc2tog, join to first sc2tog with sl st
Round 2: ch 1, turn, sc2tog, sc across to opposite corner (approx. 17 stitches), sc2tog, turn so your working across the top of the heel, sc2tog, sc in across (approx. 17 stitches) to last 2 stitches, sc2tog, join to first sc2tog with sl st
Repeat round 2, decreasing the stitch count by 4 each round, to Round 8
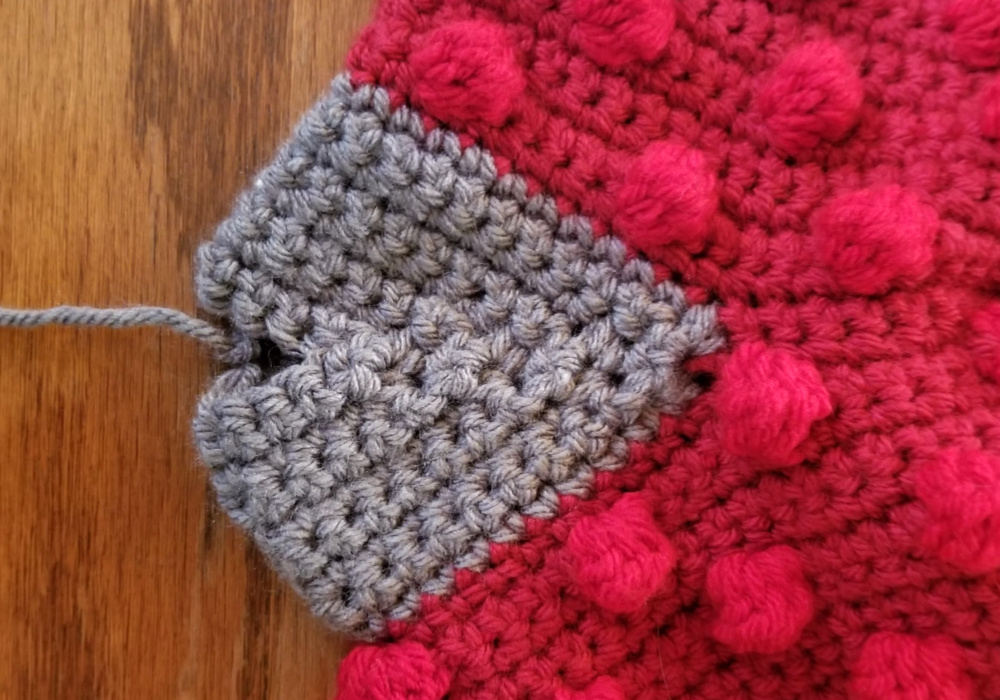
Fasten off. Leave a long end for sewing.
Use the long end to sew the opening closed.
Weave in the ends.
And you’re done with this plaid stocking!! I hope you love it!
Looking for more patterns? Follow me on Facebook, Instagram, and Pinterest! Please share a pic of your finished product with me. I’d love to see it!


This is amazing. I can’t wait to try it out
I’m beginning row 25 and confused with ch2, turn, ch2, turn. What do you do with the first ch2?
That’s a typo 😀 Sorry about that! Just one ch 2, turn
Thank you!
Oh ok thank you very much
Hi there love this pattern, for the cuff row 50 says to do the hanging loop but then says to continue to row 64 but that will mean the loop will be half way down the cuff and yours isn’t in the picture
It should be in the middle so when you fold the cuff down it will be on the top 🙂
How many stitches should there be when I start to sew the heel after row 8?
Hi! Looks like 8 – 10? I’m not 100% sure. As long as it’s small enough to just sew up, it will be fine 🙂
Love this pattern my stockings turned out great, a question if I was to cut this pattern in half to make a smaller stocking how would I go about doing that? For the toe would I cut the rows in half?
Love this stocking, but trying to figure out the best way to carry yarns as I work and do I leave one strand as I’m working with the other two Color’s?