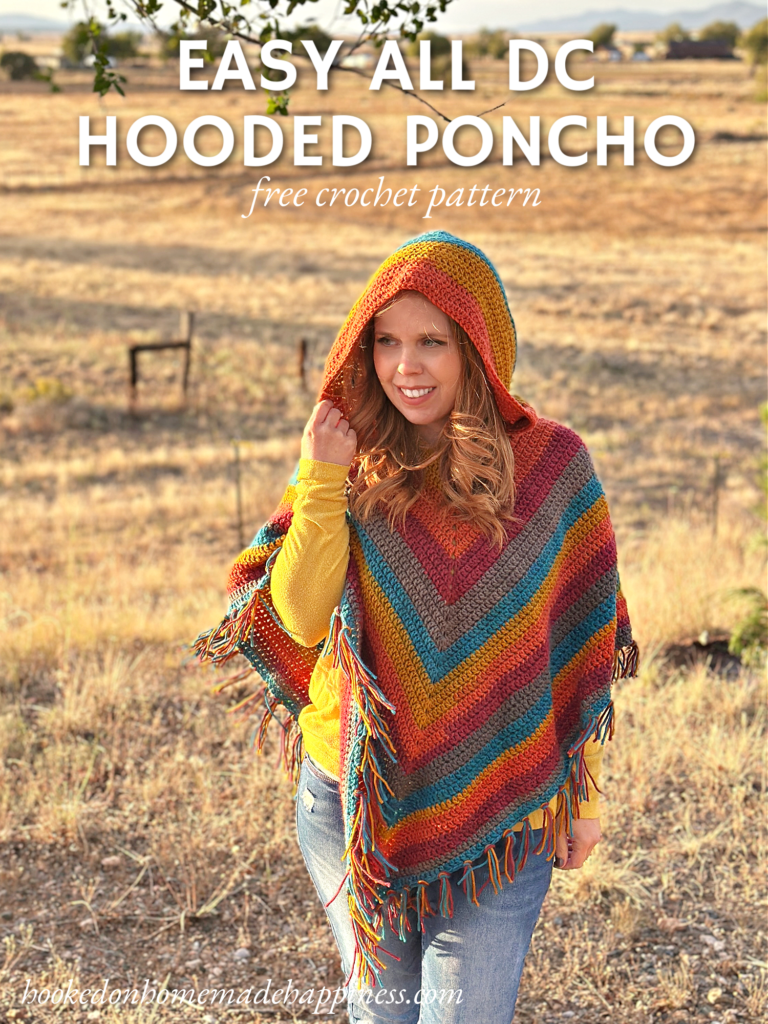
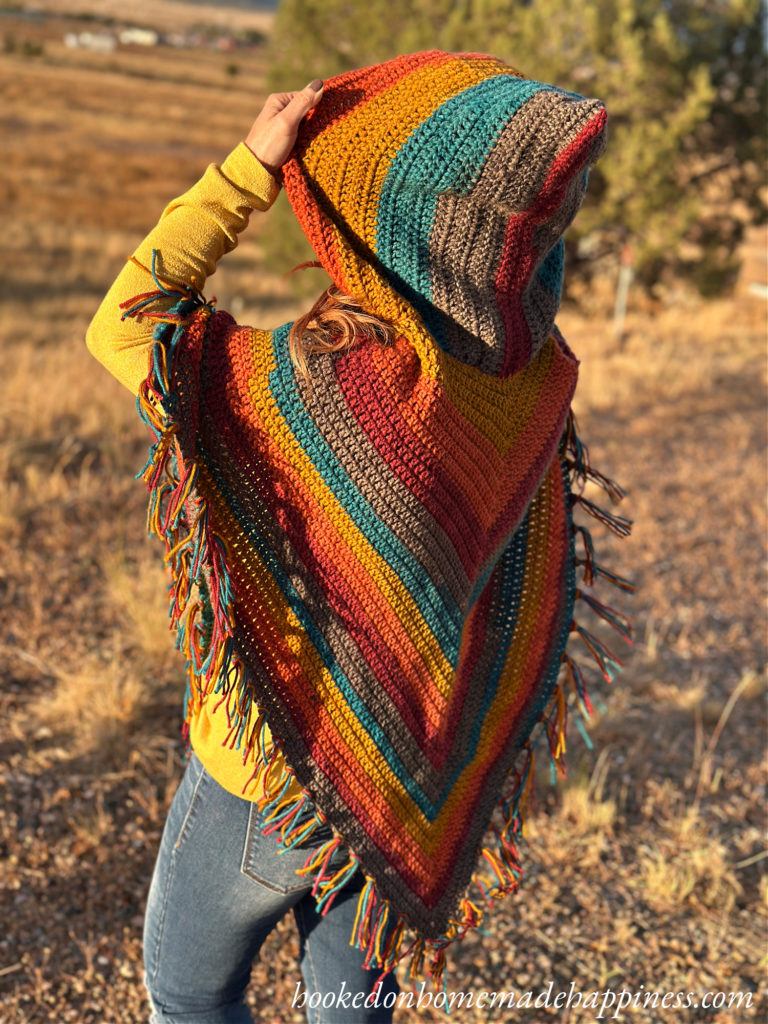
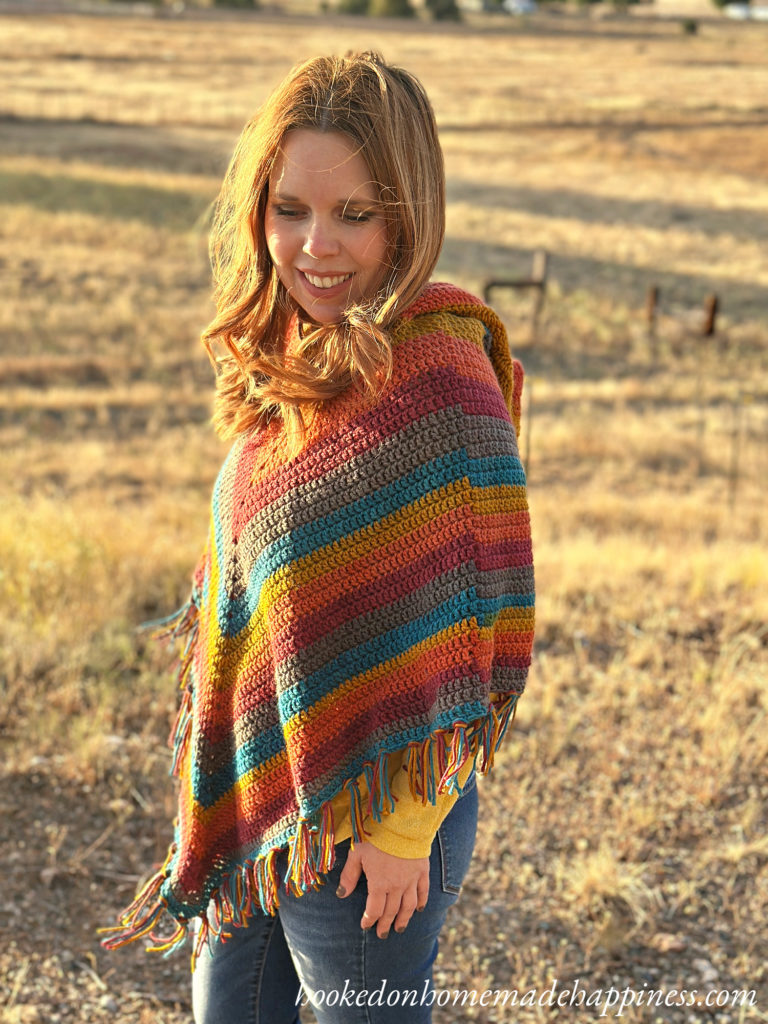
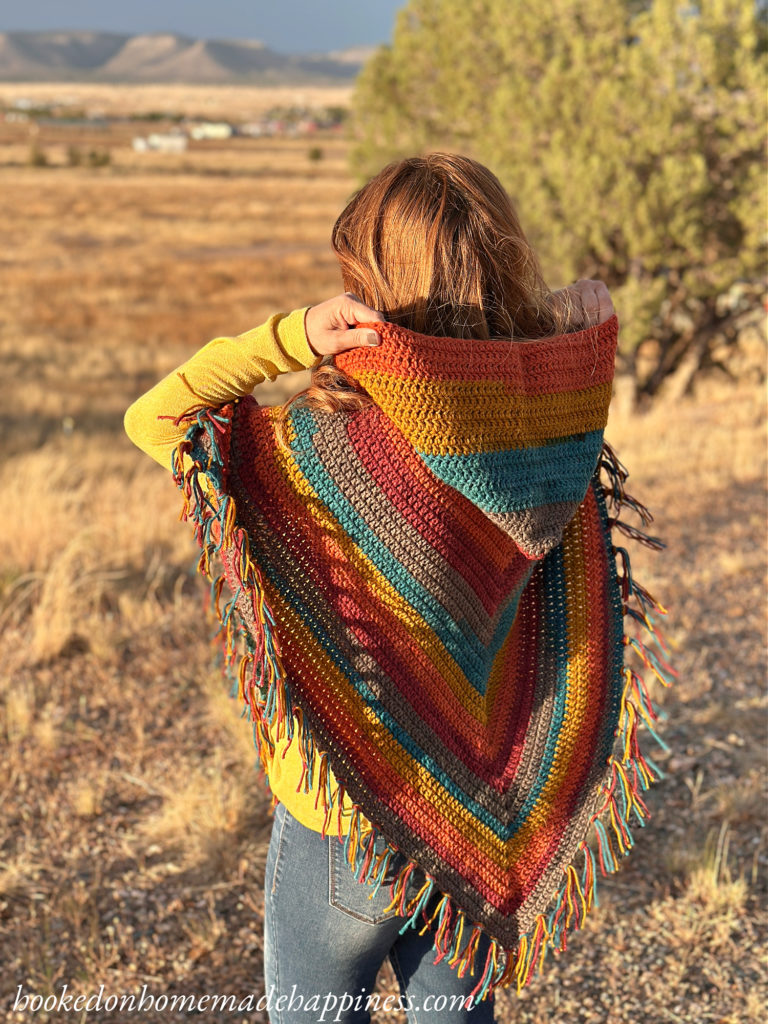
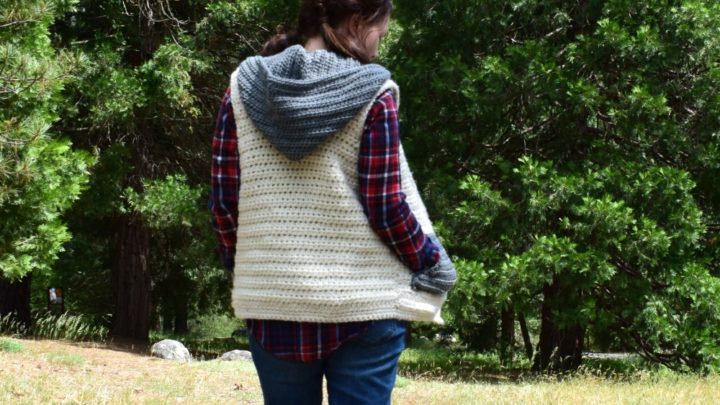
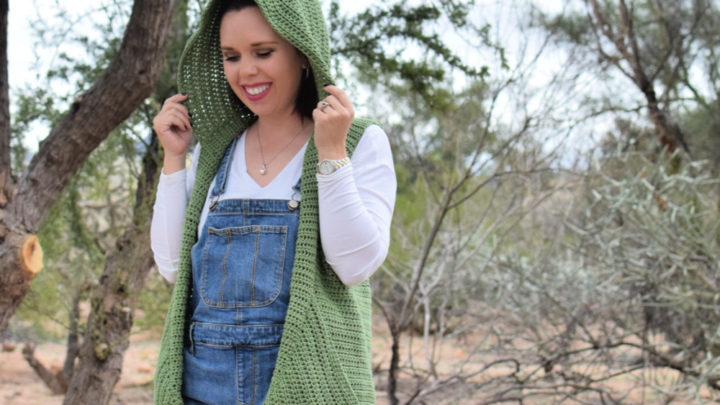
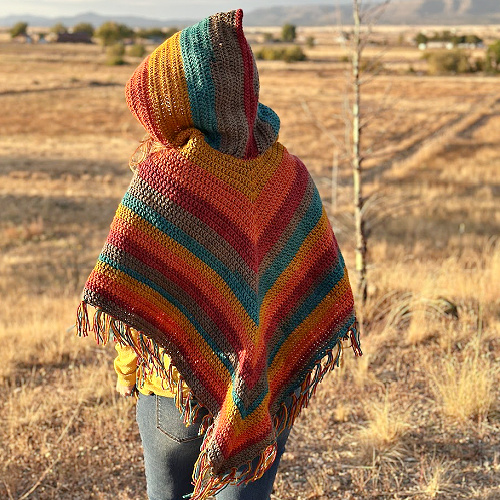
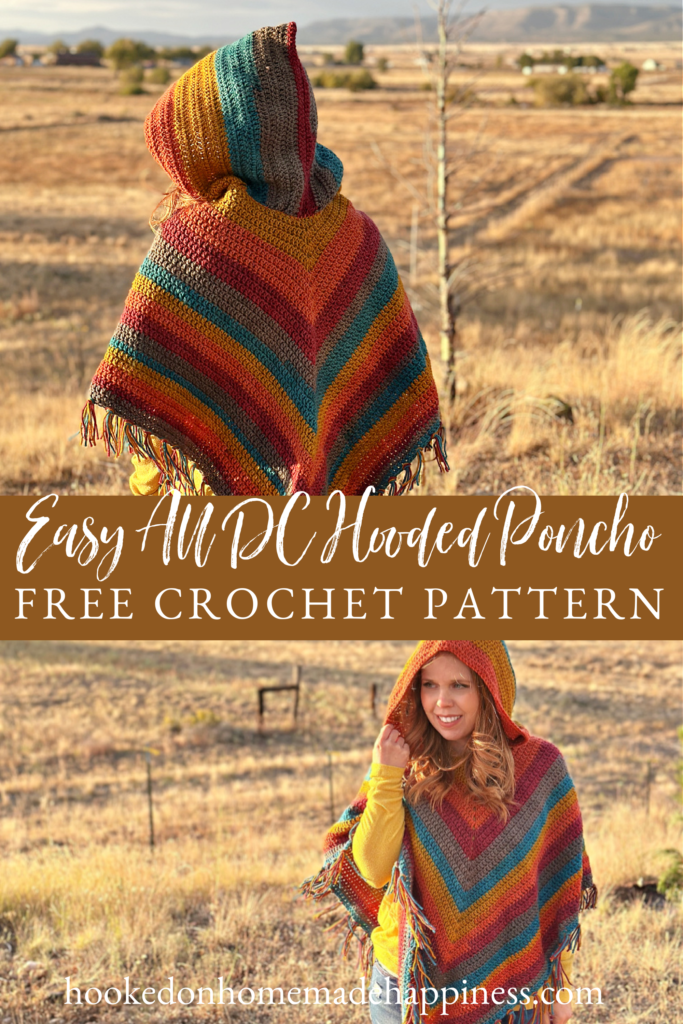
Easy All Double Crochet Hooded Poncho – Free Crochet Pattern Using Caron Big Cakes
Looking for a cozy, beginner-friendly poncho pattern? This Easy All DC Crochet Hooded Poncho is made entirely with double crochet stitches and works up quickly with colorful, self-striping Caron Big Cakes yarn. Whether you’re new to crochet or just want a relaxing project, this free pattern is a great way to create something warm and wearable with minimal shaping. Plus, the addition of a hood makes it extra cozy for chilly days! There is a children’s version of this pattern HERE!
Purchase the ad-free, printable PDF for easy printing.
Yarn Used: Caron Big Cakes
For this poncho, I used Caron Big Cakes – a soft, self-striping worsted weight yarn that comes in generous 300g cakes. One of the best parts of working with Big Cakes is the effortless color changes. There’s no need to weave in extra ends or plan your striping – the yarn does all the work for you! It’s a 100% acrylic yarn, making it easy to care for and perfect for outerwear like ponchos, shawls, or blankets. Plus, the large cakes mean fewer joins and a smoother finish overall.
Reasons to try self-striping yarn:
- Saves time and effort – Instead of manually changing colors by attaching new strands of yarn, self-striping yarn does the job for you. This drastically reduces the time spent on color transitions, also minimizing the number of yarn tails to weave in at the end of the project.
- Offers a variety of colors – Self-striping yarn is available in a plethora of color combinations. It can elevate your crochet projects by incorporating multiple hues that blend seamlessly into one another, thus creating an interesting visual appeal.
- Enhances creativity – Using self-striping yarn sparks innovation. It is exciting to witness how different colorations emerge and intermingle. This spontaneous display of colors can result in unique and surprising patterns, adding an element of wonder to your crochet journey.
- Eliminates color matching dilemmas – Picking the right color combinations can be tricky. Self-striping yarn takes away those concerns by providing pre-matched color palettes, minimizing the risk of color clashes.
- Convenient for beginners –For those new to crocheting, using self-striping yarn is a great starting point. It allows them to focus on mastering the stitches without worrying about the intricacy of color transitions.
Stitches Used: All Double Crochet
This pattern uses only double crochet (dc) stitches throughout, making it perfect for beginners or for anyone who wants an easy, TV-friendly project. Double crochet creates a soft, flexible fabric with a nice drape, especially when paired with a larger hook.
Why You’ll Love This Pattern
- ✅ Beginner-friendly: uses only one stitch
- ✅ Quick to make: works up fast with worsted weight yarn
- ✅ Colorful results: the yarn stripes for you!
- ✅ Cozy and practical: includes a hood for extra warmth
- ✅ Size-inclusive: easy to adjust for any size
Making the Easy All DC Hooded Poncho Crochet Pattern
Get the full free pattern below or purchase the ad-free, printable PDF
Materials
Caron Big Cakes in Toffee Brickle (2 for S/M, 3 for L/XL/2X/3X)
H/5.0 mm hook
yarn needle
scissors
stitch markers
Level
easy
Pattern notes & stitches to know
ch – chain
sl st – slip stitch
dc – double crochet
fdc – foundation double crochet (optional)
· written in US terms
· ch 2 does not count as dc
· This poncho is made with joined rounds. The hood is made with turned rows and then sewn to the poncho.
Sizes:
(S/M, L/XL, 2X/3X) – The pattern is written in these sizes consecutively.
Approx Finished Size
To fit bust: S/M (32-38”) L/XL (40-46”) 2X/3X (48-54”)
Width across bust: S/M (21”) L/XL (25”) 2X/3X (29”)
Length w/out fringe: S/M (25”) L/XL (28”) 2X/3X (31”)
Size S/M pictured. I am 5’0” with 34” bust.
Gauge: 12 dc x 8 rounds = 4” x 4”
Pattern Support
Looking for pattern support or want to share your progress? Join our Crochet Community Facebook Group! It’s the perfect place to ask questions, get help, and connect with fellow makers.
CROCHET PATTERN WRITTEN INSTRUCTIONS
PONCHO
ch 3
Round 1: starting in 3rd ch from the hook fdc (80, 90, 100) join to first dc with sl st (80, 90, 100 dc)
Starting chain alternative: ch 82, 92, 102 dc in 3rd ch from the hook and across (80, 90, 100 dc)
Round 2: ch 2, dc in next (19, 21, 23) stitches, (2 dc, ch 2, 2 dc) in next, dc in next (39, 44, 49) stitches, (2 dc, ch 2, 2 dc) in next, dc in remaining stitches, join to first dc with sl st (86, 96, 106 dc)
Round 3: ch 2, dc in each stitch to ch-2 space, (2 dc, ch 2, 2 dc) in ch-2 space, dc in each stitch to next ch-2 space, (2 dc, ch 2, 2 dc) in ch-2 space, dc in remaining stitches, join to first dc with sl st (94, 104, 114 dc)
Round 4 – Round 32, 40, 46: repeat round 3 (each round will increase by 8 stitches)
Or until desired length.
Fasten off. Weave in the ends.
HOOD
ch 3 (leave a long end for sewing)
Row 1: starting in 3rd ch from the hook, fdc 75 (75 dc)
Starting chain alternative: ch 77 dc in 3rd ch from the hook and across (75 dc)
Row 2: ch 2, turn, dc in each stitch across (75 dc)
Row 3: ch 2, turn, dc in each stitch across (75 dc)
Row 4 – Row 21: repeat row 3
Or until desired length.
Fasten off. Leave a long end for sewing.
SEWING
Fold the hood in half so the rows run vertically. Sew the back closed (row 1) with a whip stitch.
Line the hood along the top of the poncho. Line up the center back of the hood to the top center of the back of the poncho and then the end of the hood lined up 3 inches from the center front. Bunch it up slightly. Use stitch markers to keep it in place. Use the long end to sew the hood to the poncho with a whip stitch.
FRINGE
Add three 8” strands of fringe every 4th stitch along the bottom row.
Trim to your liking
HOW TO ADD FRINGE VIDEO TUTORIAL
Looking for more patterns? Follow me on Facebook, Instagram, and Pinterest! Please share a pic of your finished product with me. I’d love to see it!


I’m so in love with your patterns, especially the ponchos and shawls. Thank you for such beautiful work.
Thank you so much!!
Hi. I am loving this pattern. Could you tell me how you measure for length? Is it from the V in the front or from the shoulder?
Thank you
Down the V in the front
I am in the middle of completing a double crochet stitch poncho, decided I wanted to add a hood. I found your site and easy peasy directions to add the hood to my project. Thank you very much. Eli
Awesome!! Thank you so much 🙂
Are you able explain how you are doing the first join of the slip stick on the double crochet on the first row on the poncho part? Is it the top of the double crochet? Note I’m not doing the fdc.
Hi! Yes, slip stitch to the top two loops of the first double crochet 🙂
The pattern says crochet with joined rounds but the picture has a seam down the front as if 2 rectangles are sewn together. Can you explain ?
Because I like the picture. Thank you.
Hi! That isn’t a seam down the front, it’s the corner spaces 🙂
Oh I get it now. Thank you.
i love this! could you maybe explain the second round of the poncho? how are the 6 stitches added?
You will be adding the corner (2 dc, ch 2, 2 dc) in 2 stitches. So each stitch will increase by 3 stitches 🙂
Love this! Thanks Breann ❤️
Hi Lindsay. You need to do the first stitch of the round in the same stitch as the chain two.
Hi, am I reading correctly that there are only 2 points of increases? Perhaps I am working to tightly but even size 2xl is very narrow and makes little more than a pointed tube, do you have any suggestions?
Hi! You can try doing (3 dc, ch 2, 3 dc) for each increase?
Do you pull/start with the middle of the cake or the outside?
I pull from the middle, but it doesn’t really matter 😊
I feel silly bc I can’t reconcile in my mind how the ch2 at the beginning of each row fits into the pattern without leaving a gap that I don’t see in the photos. I’m forming a gap where there shouldn’t be one, but I can’t figure out what I’m missing.
Hi! This video is for a beanie, but the join method I use is the same with the ch 2 at the beginning of the round 🙂
Hey, thank you for the pattern!
I was wondering how you are able to increase the total number of stitches in round two by 6 compared to the previous round. Do you stitch the chain 2 in the beginning as well?
Hi! You are making the corner stitch (2 dc, ch 2, 2 dc) in one stitch. This adds 3 stitches to this stitch. Then repeat for the second corner. Adding 3 more again. Making 6 more stitches total for the round.
Then in the remaining rounds you are adding the corner to the ch space (rather than a stitch). So it will add 8 stitches total for the round.
How is the gauge swatch done? It says rounds but I did rows and I got close to gauge but could only get it with 7mm hook but the fabric came out too open and loose? With 5mm I got 3.5×3.75″ and with 7mm I got 4×4.25″.
On round 4 to round 30 are they all increasing rounds or just the bold numbers increasing and just double crocheting on round 4
Hi, If I want to make a bigger size, how many chains should I make?
Hi! I have an adult version here: https://www.hookedonhomemadehappiness.com/easy-all-double-crochet-hooded-poncho/
Hello. I love both your cowel neck granny stitch poncho & the double crochet hooded poncho.
I have been given a bag of yarn with no lables. It’s chunkier than Aran, but not super chunky/bulky. Im wondering if you have a poncho pattern for chunky yarn or what pattern do you think would be easiest to adapt?
Hi! I don’t have a chunky poncho pattern. Since ponchos aren’t made to be fitted in general, I think either one would work 🙂
A video of how to start this would be extremely helpful.
Hello! I’ve just purchased this pattern and I am looking forward to starting it. For the foundation double crochet row it says to start with a chain 3. Most of the fdc instructions I’ve read say to start with a chain 2 because that does not count as a dc but if you chain 3 it does count as your first dc. Is this the case here? Does the chain 3 count as dc #1? Sorry, I’m new to the fdc. And thank you!
By chaining 3 you will have 2 chains because the first dc will go in the 3rd chain. The chain 2 does not count as a stitch