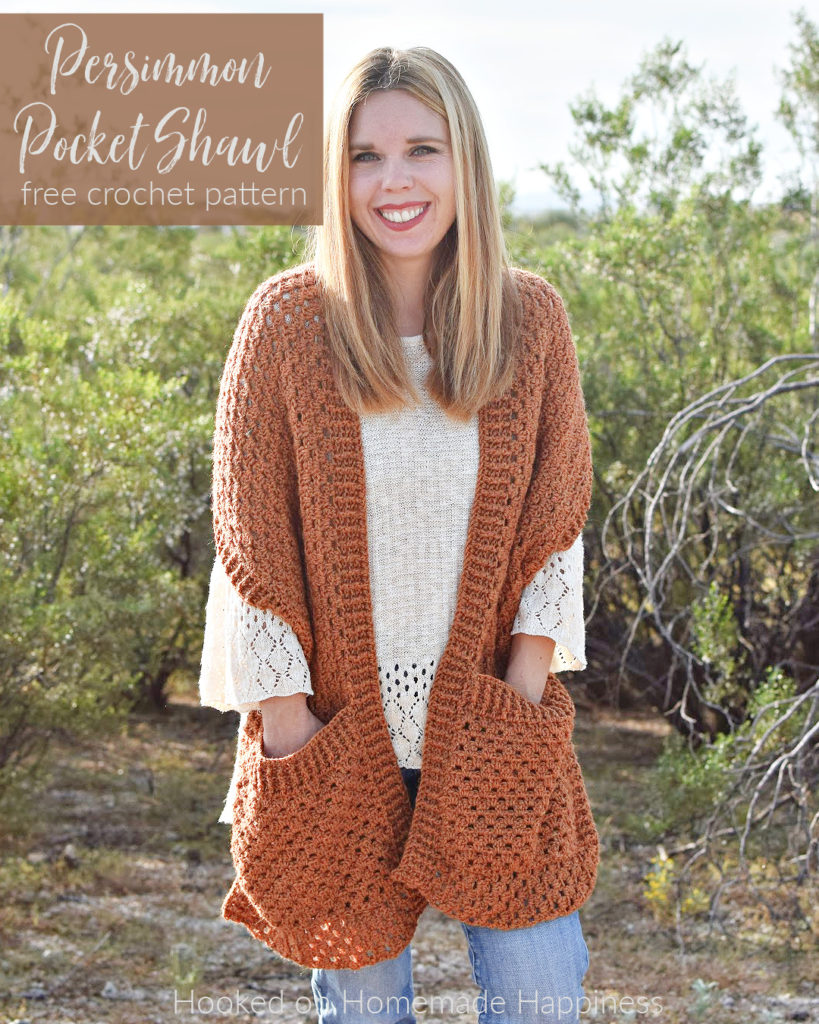
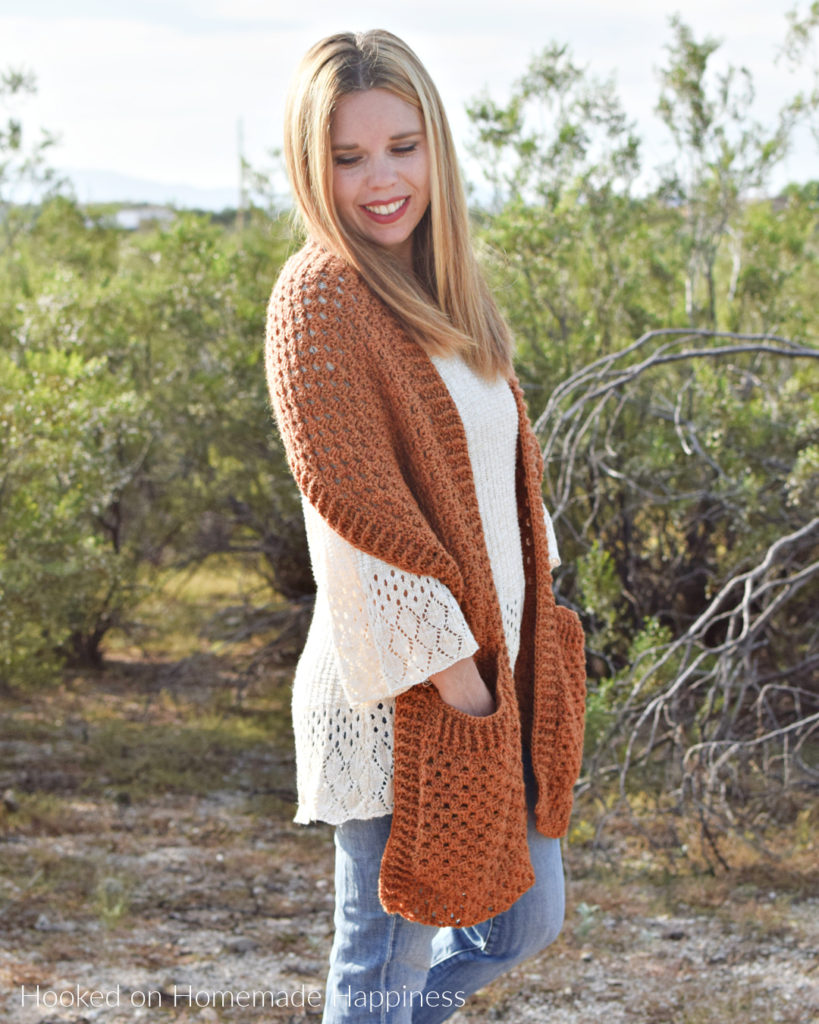
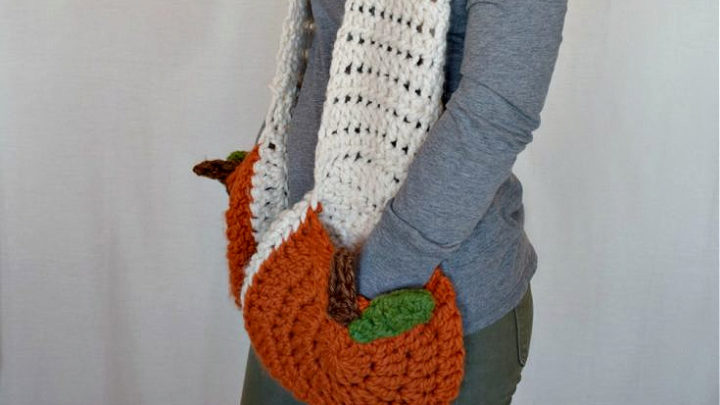
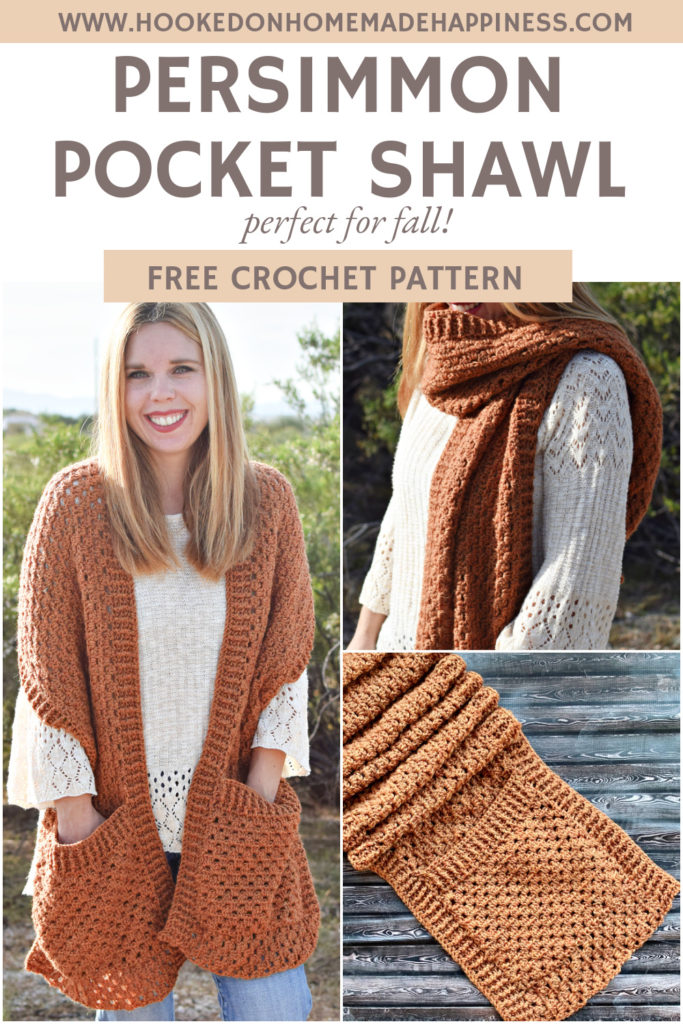
Persimmon Pocket Shawl Crochet Pattern
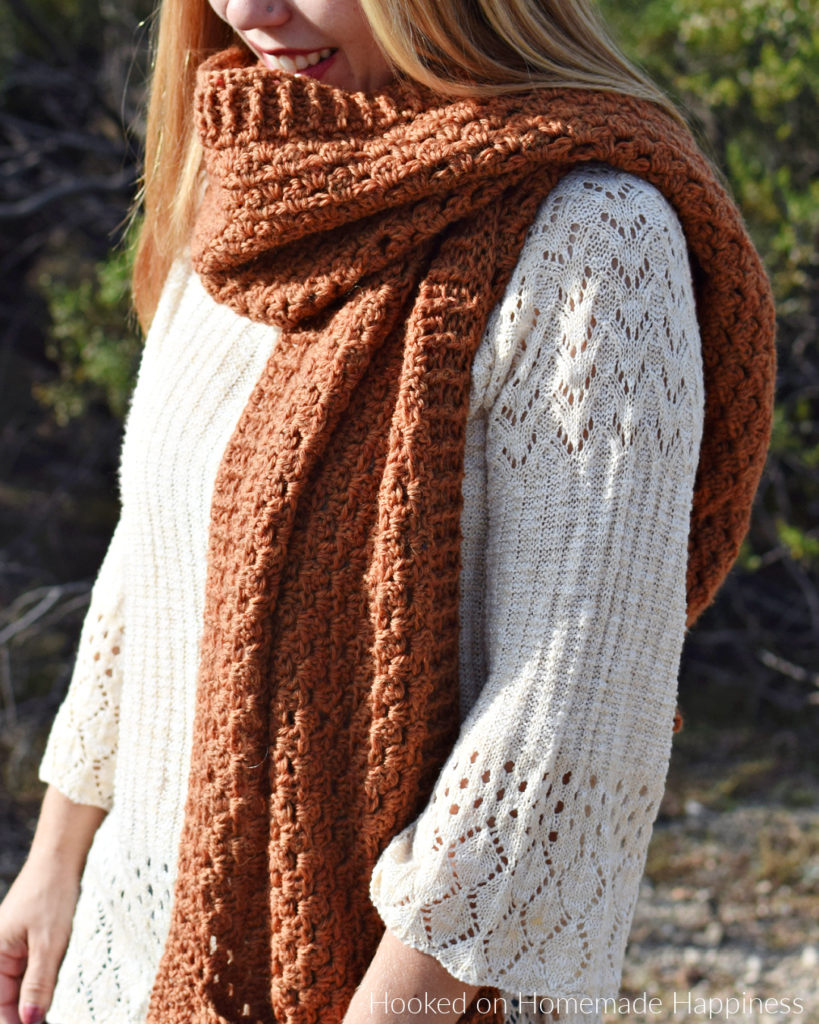
Wrap yourself in warmth and style with the Persimmon Pocket Shawl Crochet Pattern, a cozy crochet accessory that’s as functional as it is beautiful. Featuring classic granny stitches and deep, practical pockets, this shawl is the perfect layering piece for chilly days. With easy construction and timeless texture, it’s a must-make for fall and winter!
Yarn Details
For this shawl, I used Wool of the Andes Worsted from WeCrochet. This 100% Peruvian Highland wool yarn is warm, sturdy, and holds its shape beautifully—perfect for garments and accessories like this one. The rustic texture of the yarn gives the granny stitch an extra cozy feel, and it comes in a beautiful range of colors to match any wardrobe.
If you prefer to use a different yarn or need a more accessible option, here are some great substitutes that work well with this pattern:
- Paintbox Yarns Wool Mix Aran – A wool/acrylic blend that’s soft and affordable, with great stitch definition.
- Cascade 220 – 100% wool, very similar to Wool of the Andes, and available in tons of colors.
- Lion Brand Wool-Ease – A wool/acrylic blend that’s easy to find in stores and machine washable.
- Berroco Vintage – A soft and sturdy blend of acrylic, wool, and nylon; great for sensitive skin.
- Stylecraft Special Aran – 100% acrylic and budget-friendly with a soft feel, perfect for those avoiding wool.
Stitches & Techniques Used
The Persimmon Pocket Shawl uses:
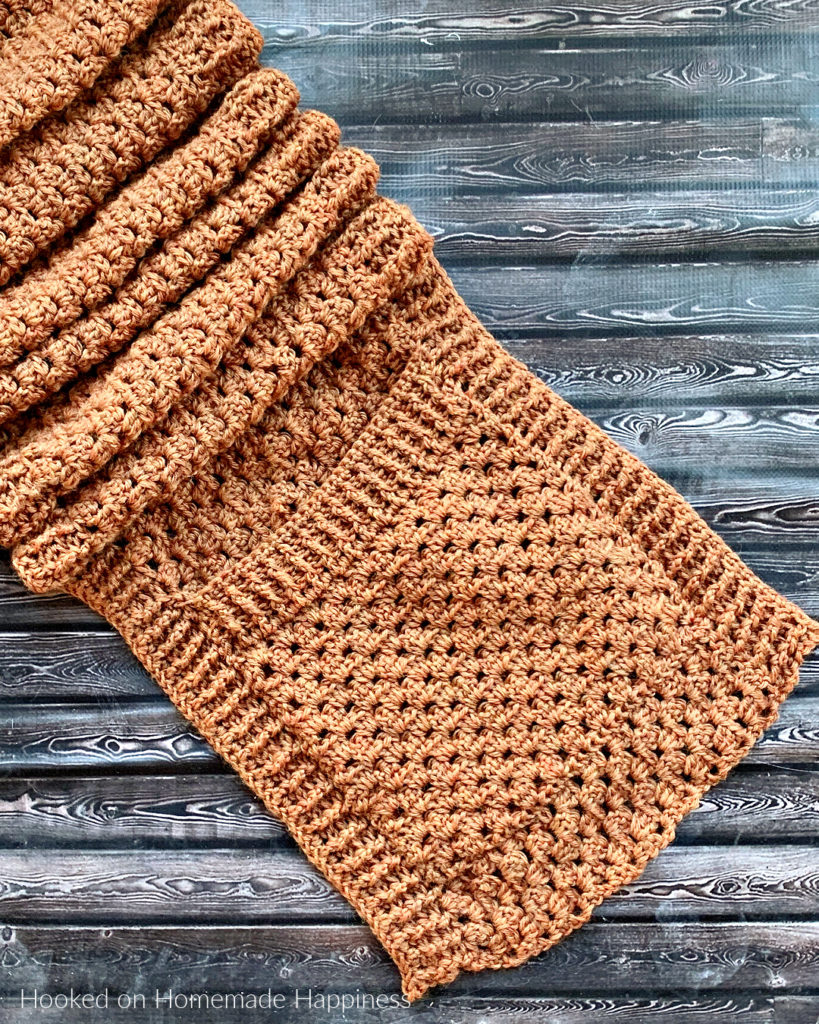
- Granny Stitch: A classic combo of double crochet clusters that creates a beautiful, open texture.
- Post Stitches: Front and back post double crochet are used to create the ribbing along the sides of the shawl and around the pockets. These add structure and a knit-like look that complements the granny stitch perfectly.
If you’re comfortable with basic crochet stitches and are ready to try out post stitches, this is a great project to grow your skills.


click here to pin for later >>>
Persimmon Pocket Shawl Crochet Pattern
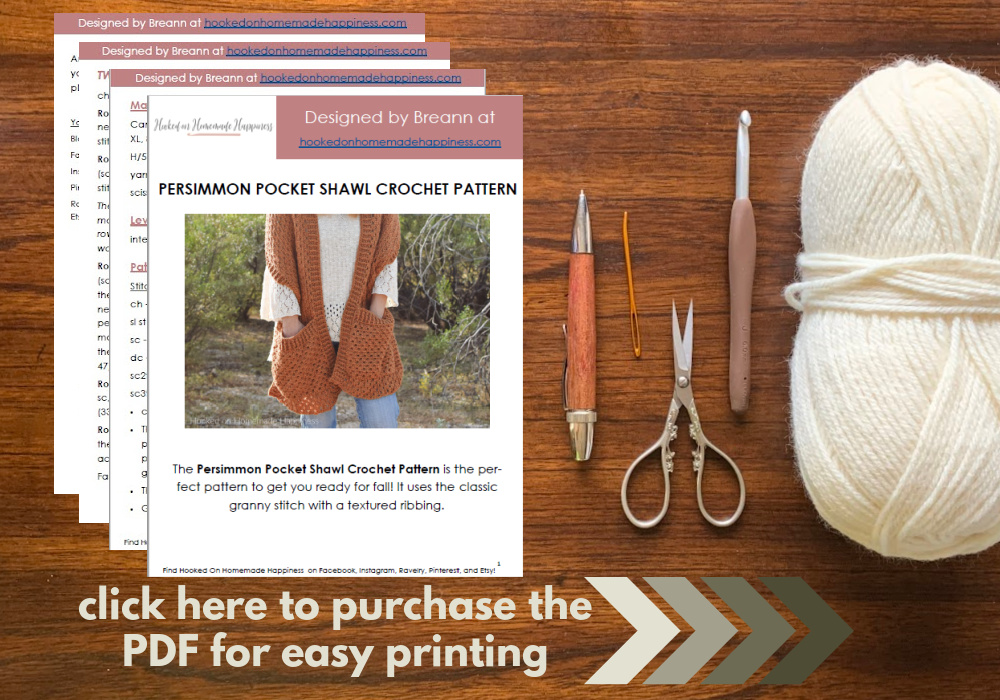
Get the free pattern below or purchase the ad-free printable PDF in my Ravelry Shop
PIN for later HERE
Add to your Ravelry Queue HERE
Materials
WeCrochet Wool of the Andes in Persimmon Heather (11 skeins (550g/1,210yds))
I/5.5 mm hook
Yarn needle
Scissors
stitch markers
Level
easy+
Pattern notes & stitches to know
ch – chain
sc – single crochet
fsc – foundation single crochet (video tutorial: https://www.youtube.com/watch?v=Z2PsECMK58M&t=3s )
dc – double crochet
fpdc – front post double crochet
bpdc – back post double crochet
CL – cluster – 3 dc in same stitch
· written in US terms
· ch 1 does not count as sc
· ch 3 counts as dc
· Approx Finished size: 11.5” x 72”
PERSIMMON POCKET SHAWL CROCHET PATTERN
ch 2
Row 1: starting in the 2nd ch from the hook work 241 fsc (241 sc)
Row 2: ch 3, turn, dc in next stitch and each stitch across (241 dc)
Row 3: ch 3, turn, fpdc in next, *bpdc in next, fpdc in next* repeat from * to * across to last stitch, dc in last stitch (241 dc)
Row 4: ch 3, turn, bpdc in next, *fpdc in next, bpdc in next* repeat from * to * across to last stitch, dc in last sttich (241 dc)
Row 5: ch 3, turn, fpdc in next, *bpdc in next, fpdc in next* repeat from * to * across to last stitch, dc in last stitch (241 dc)
Row 6: ch 3, dc in same stitch, *skip 2 stitches, CL in next* repeat from * to * across to last stitch, 2 dc in last stitch (79 CL)
Row 7: ch 3, turn, CL in the space between the CL from the previous row across, dc in turning ch (80 CL)
Row 8: ch 3, turn, dc in same stitch, CL in the space between the CL from the previous row across, 2 dc in turning ch space (79 CL)
Row 9 – 26: repeat rows 7 & 8
Row 27: ch 3, turn, dc in next stitch and in each stitch across (241 dc)
Row 28: ch 3, turn, fpdc in next, *bpdc in next, fpdc in next* repeat from * to * across to last stitch, dc in last stitch (241 dc)
Row 29: ch 3, turn, bpdc in next, *fpdc in next, bpdc in next* repeat from * to * across to last stitch, dc in last sttich (241 dc)
Row 30: ch 3, turn, fpdc in next, *bpdc in next, fpdc in next* repeat from * to * across to last stitch, dc in last stitch (241 dc)
Row 31: ch 1, turn, sc in each stitch across (241 sc)
Fasten off. Weave in the ends.
POCKETS (make 2)
Row 1: starting in the 2nd ch from the hook work 31 fsc (31 sc)
Row 2: ch 3, dc in same stitch, *skip 2 stitches, CL in next* repeat from * to * across to last stitch, 2 dc in last stitch (9 CL)
Row 3: ch 3, turn, CL in the space between the CL from the previous row across, dc in turning ch (10 CL)
Row 4: ch 3, turn, dc in same stitch, CL in the space between the CL from the previous row across, 2 dc in turning ch space (9 CL)
Row 5 – 17: repeat rows 3 & 4
Row 18: ch 3, turn, dc in next stitch and in each stitch across (32 dc)
Row 19: ch 3, turn, *fpdc in next, bpdc in next*, repeat from * to * across to last stitch, dc in last stitch (32 dc)
Row 20: ch 3, turn, *fpdc in next, bpdc in next*, repeat from * to * across to last stitch, dc in last stitch (32 dc)
Row 21: ch 3, turn, *fpdc in next, bpdc in next*, repeat from * to * across to last stitch, dc in last stitch (32 dc)
Row 22: ch 1, turn, sc in each stitch across (32 sc)
Fasten off. Leave a long end for sewing.
SEWING
Line a pocket up about 3” from the bottom and centered between the ribbing. Make sure the ribbed edge of the pocket is on the top. Use stitch markers to secure it in place. Use the long end to whip stitch to sew the three bottom sides to the scarf.
Weave in the ends.
Repeat for other pocket.
Looking for more patterns? Follow me on Facebook, Instagram, and Pinterest! Please share a pic of your finished product with me. I’d love to see it!


Thank you once again!!
Breann,
Thank you for sharing this pattern with everyone. Your instructions were exellent.
I am totally delighted with the results!
🧡 Love it! – Annie
Thank you so much!!
Just what I was looking for!! Thanks for sharing this pattern! God bless you!!
Thank you once again!! I was just seeking a pattern for a pocket shawl!
Love this pattern. Thank you for sharing it here.
Beautiful and the colours are perfect!
I really like your pocket shawl pattern. Thank you so much for sharing your beautiful pattern with all of us.
I am wondering if one would want to make it wider than the 11 1/2″, could you just continue to follow the pattern until you have the desired width?
Thank you so much for your answer
Hi! You can just add more rows of the granny stripe stitch 🙂
Thank you so much!
Mine turned out lovely…. I had to make it a bit shorter (204 hdc foundation) as I am 5’4″… I love it, made it in a heather blue to wear with jeans… love it 🙂 thank you 🙂
Awesome! Thank you so much!
I need it to be longer and wider. How would I figure adding length? Wide I know just add extra rows. Thank you in advance
Hi! Row 1 can be any multiple of 3 + 1 🙂
Thank you! Such a beautiful pattern and can’t wait to get started. I understand to make it longer I can add to Row 1, with multiples of 3 + 1. If I want to make it wider, is there a certain pattern repeat I should do, or just keep adding rows? Thanks so much, I greatly appreciate it!
Hi! I would continue to repeat the granny stripe stitch 🙂
That is the prettiest pattern I have seen! Lovely Thank you!
I just have to say you are so precious! I love your hair highlights. Just beautiful
Thank you ❤️ this is an old pic, back to brown hair now 😊
Thanks for the lovely pattern. Roughly, how long does this take to work up for a beginner+ (not quite an intermediate but I do ok).?
Hi! I’m not really sure. I think everyone crochets at different speeds even across levels 🙂 And I’m not good at gauging how long something takes me since I usually have so many projects, LOL! But maybe a shot-in-the-dark guess… less than a week? Depending on your free time to crochet.
This is gorgeous, and I a placing this on my “must make” list for the new year. Thank you so much for your generosity to your crochet community. We appreciate you!
Thank you so much!!
Hello! In the beginning, can you skip the FSC and just chain 241 and continue on with the pattern?
Yes you can 🙂
Hi, at the start of the pattern it says to chain 2, do u mean chain 241 instead?
Hi! No, because you use fsc (foundation single crochet). This is where you will crochet the foundation chain and the first row of single crochet at the same time. You can find a video tutorial linked above 🙂
Thank you, I’m also wondering that if 3 ch counts as a dc how are there 241 dc. Also, is it ok if I do chains and sc in them instead. Can u make a chart for the pattern? It would really help. Tysm in advance
Thank you, I’m also wondering that if 3 ch counts as a dc how are there 241 dc. Also, is it ok if I do chains and sc in them instead. Can u make a chart for the pattern? It would really help. Tysm in advance
Thank you, I’m also wondering that if 3 ch counts as a dc how are there 241 dc. Also, is it ok if I do chains and sc in them instead. Can u make a chart for the pattern? It would really help. Tysm in advance.
Yes, the chain 3 counts as a dc. Sorry, I’m not able to make a chart!
And you can definitely use a starting chain instead of the foundation single crochet 🙂