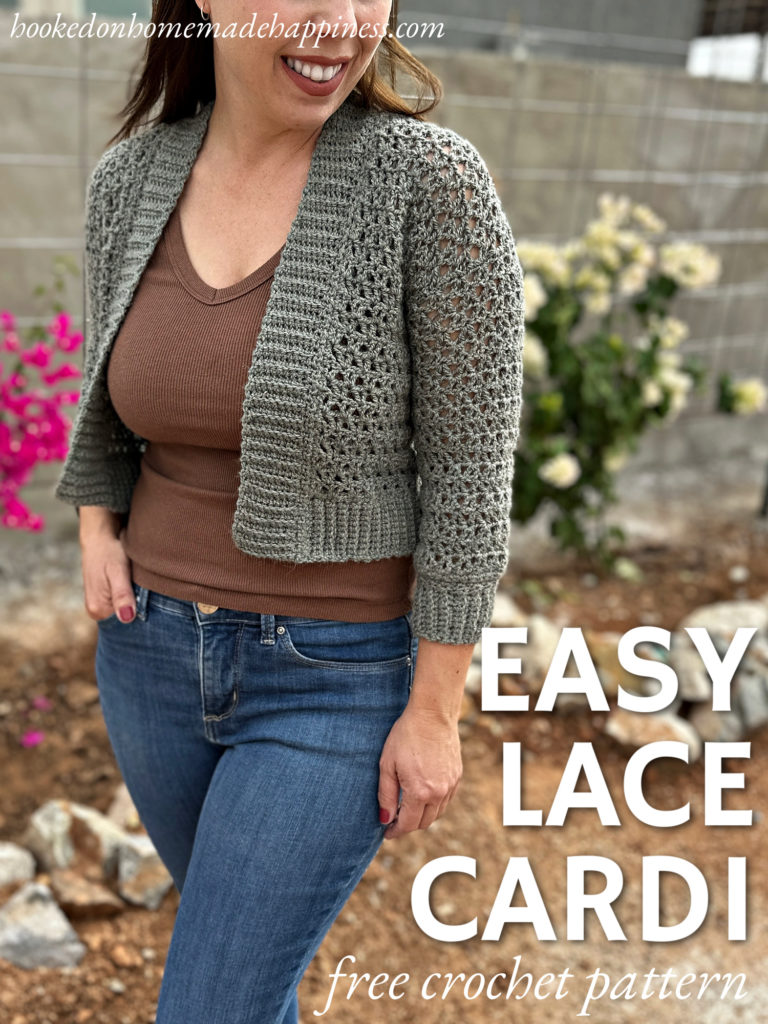
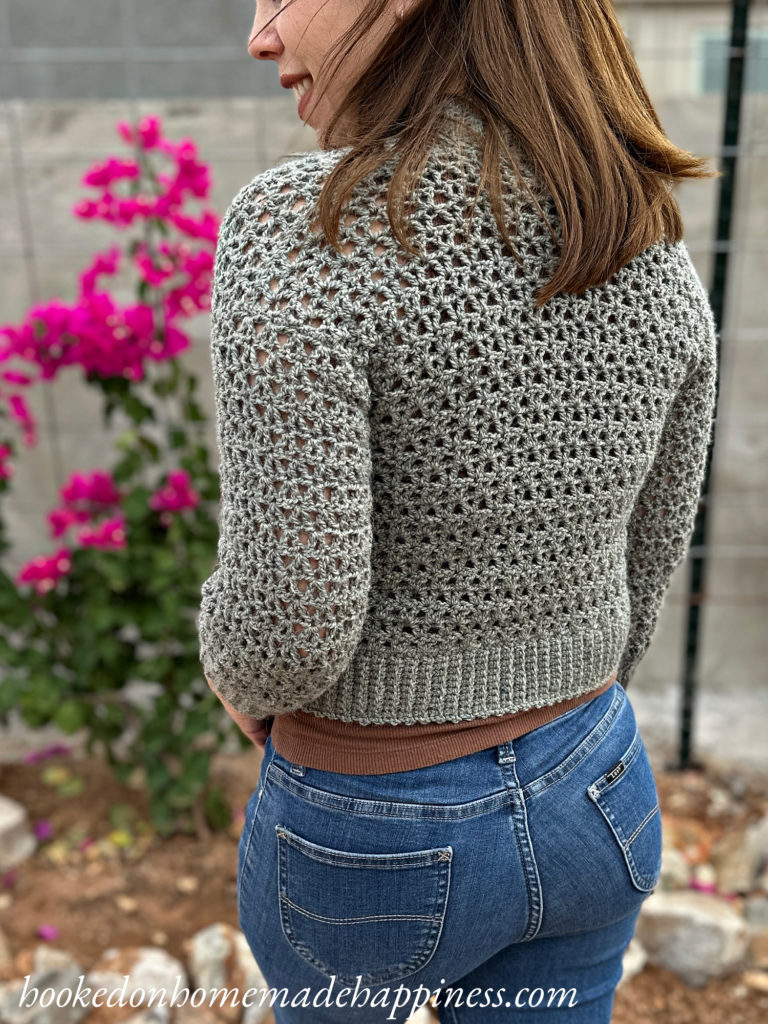
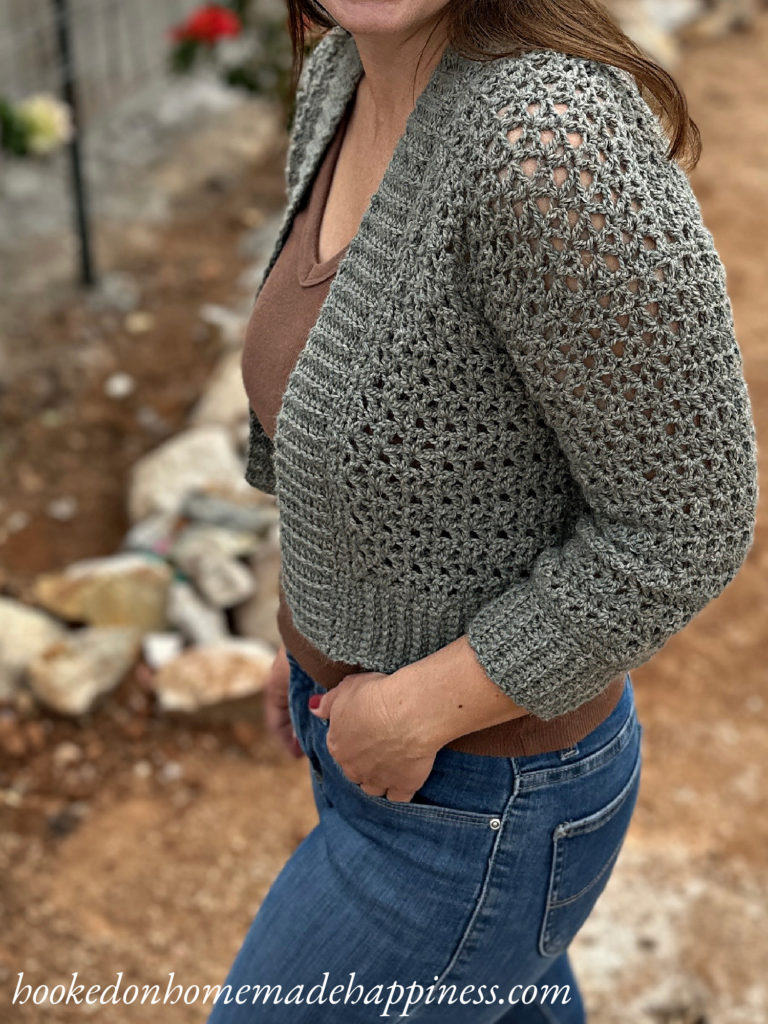
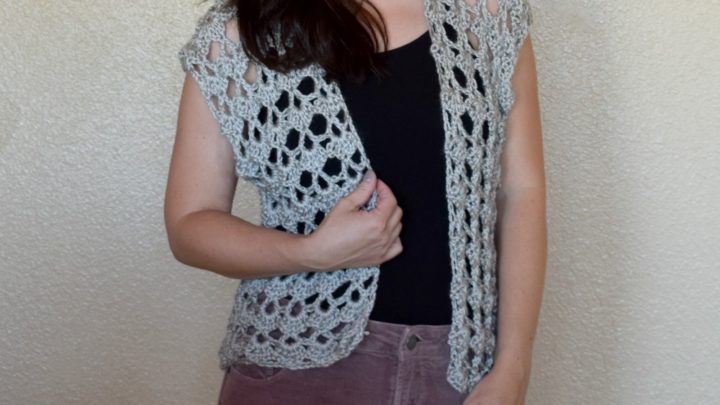
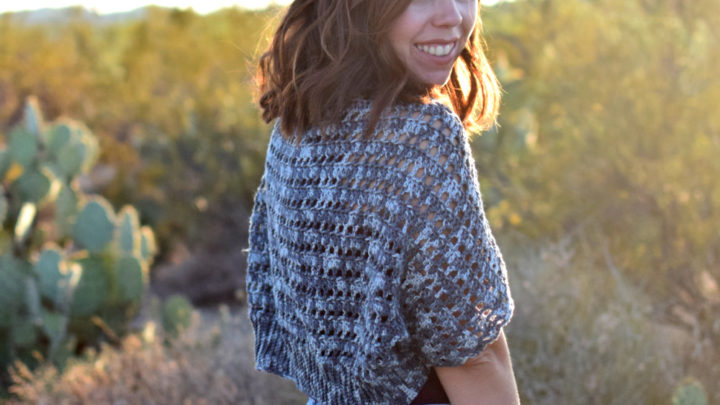
Easy Lace Cardigan Crochet Pattern
If you’ve been looking for a light, airy cardigan that’s as easy to make as it is beautiful, the Easy Lace Cardigan Crochet Pattern is going to be your new favorite project! This design uses the offset V stitch to create a gorgeous lace effect — but here’s the best part — it’s just a one-row repeat! Whether you’re an experienced crocheter looking for a relaxing project or a beginner ready to try a lace look, this cardigan is a breeze to stitch.
Purchase the ad-free, printable PDF for easy printing.
Materials
- Yarn: WeCrochet Alpaca Upcycle (recycled alpaca blend) — soft, warm, and beautifully drapey
- Hook: I/5.5 mm hook
- Notions: Scissors, yarn needle, stitch markers
- Pattern Level: Advanced beginner (just one stitch pattern to master!)
Pattern Details
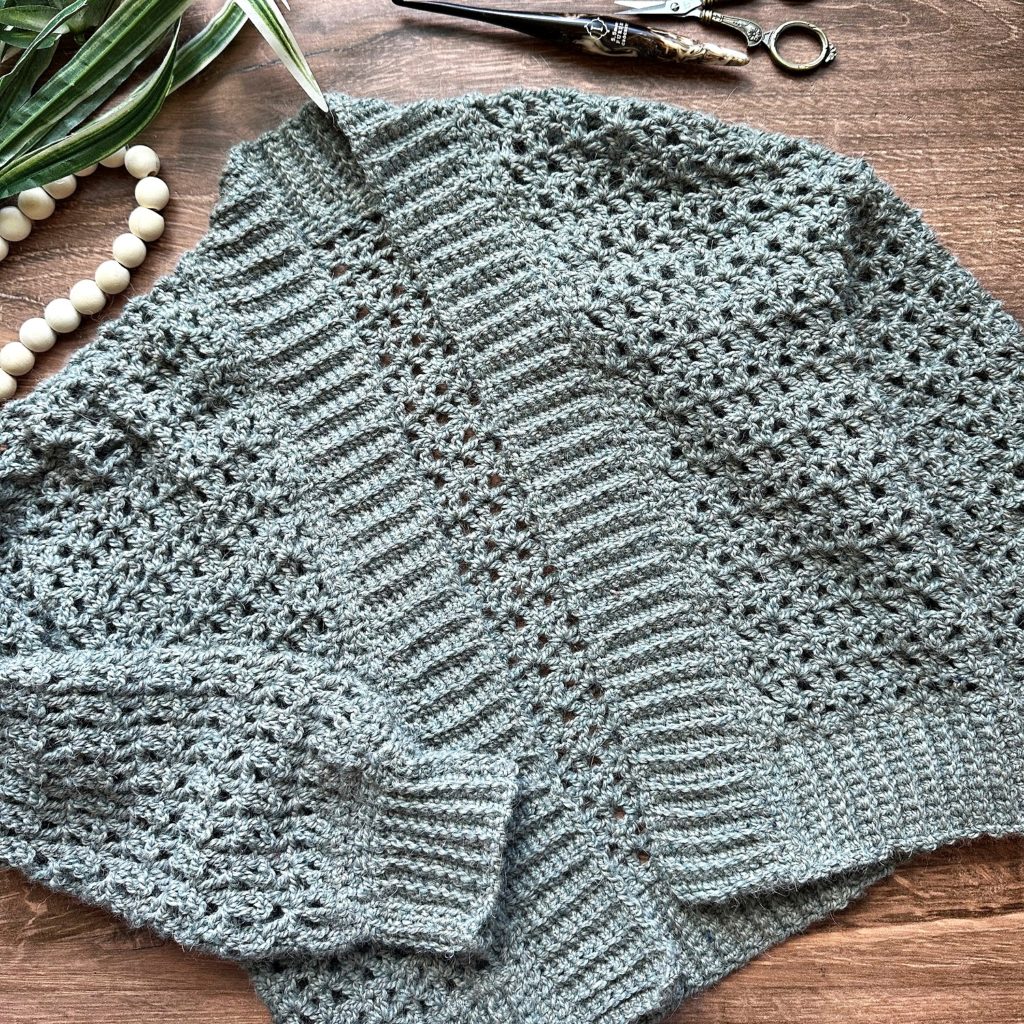
- Construction: Worked in simple panels and seamed
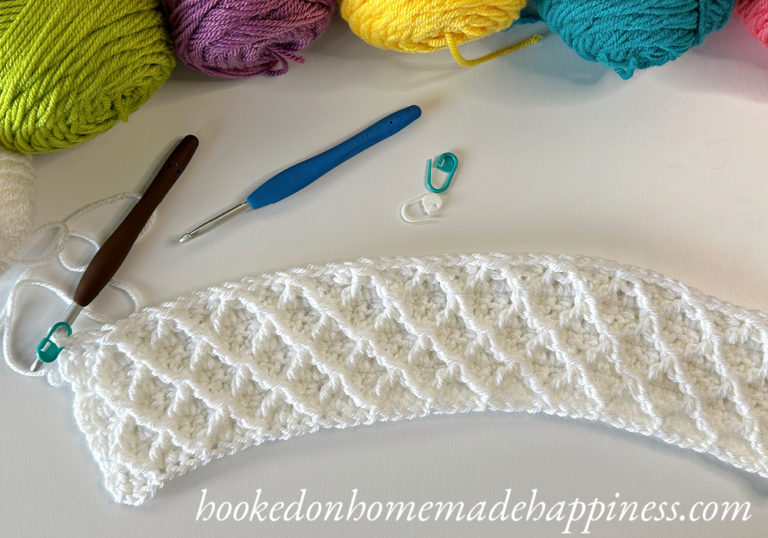
- Stitch Pattern: Offset V stitch (1-row repeat for easy memorization)
- Fit: Cropped sweater length with no ease for a sleek, fitted look
- Sleeves: 3/4 length for a chic, versatile style
- Style: Light and lacy — perfect for layering year-round
- Sizes: Written for multiple sizes with adjustable length and sleeve options
Why You’ll Love This Cardigan
- Simple, Lacy Texture: The offset V stitch gives you an intricate-looking design without complicated stitch patterns.
- No Guesswork: With only a one-row repeat, you can crochet on autopilot while watching your favorite show.
- Beautiful Drape: Alpaca Upcycle yarn adds softness, warmth, and just the right amount of flow to the finished piece.
This cardigan is a quick, satisfying make that pairs beautifully with dresses, high-waisted skirts, or jeans. The fitted, cropped style and 3/4 sleeves give it a polished look, while the lace stitch keeps it light and breathable.
Making the Easy Lace Cardigan Crochet Pattern
Get the full free pattern below or purchase the ad-free, printable PDF
Materials
Upcycle Alpaca Blend 3 skeins for S, 4 skeins for M/L, 5 skeins for XL/2X, 6 skeins for 3X)
I/5.5mm hook
Yarn needle
Scissors
Level
advanced beginner/intermediate
Pattern notes & stitches to know
ch – chain
sc – single crochet
blo – back loop only
dc – double crochet
V st – V Stitch (dc, ch 1, dc) in same stitch
· written in US terms
· ch 1 does not count as sc
· ch 3 counts as dc
· This cardigan is made with one back panel and 2 front panels sewed together. Then the sleeves are made with joined, turned round.
· Each panel starts at the bottom with the ribbing.
· Gauge (blocked): 6 V st x 8 rows = 4” x 4”
Sizes:
(S, M, L) (XL, 2X, 3X) – The pattern is written in these sizes consecutively. Example, when the pattern gives the end of row count ((25, 31, 37) (40, 46, 49) sc) the 25 is for S, 31 is M, 37 is L, 40 is XL, 46 is 2X, 49 is 3X.
This top is close fitting with zero ease.
Approx Finished Size:
Bust: S (34”) M (38”) L (42”) XL (46”) 2X (50”) 3X (54”)
Length: S (16.5”) M (17”) L (17.5”) XL (18”) 2X (18.5”) 3X (19”)
Armhole: S (6”) M (6.5”) L (7”) XL (7.5”) 2X (8”) 3X (8.5”)
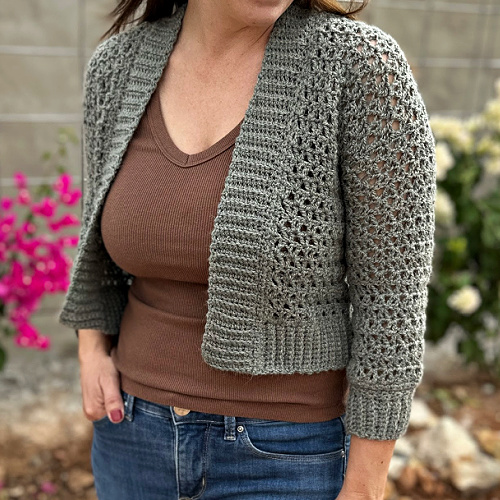
Size Small pictured. I am 5’0” with 34” bust
CROCHET PATTERN WRITTEN INSTRUCTIONS
BACK
Ch 11 (leave a long end for sewing)
Row 1: sc in 2nd ch from the hook and in each ch across (10 sc)
Row 2: ch 1, turn, sc in first stitch, sc blo in next 8, sc in last (10)
Repeat Row 2 to Row (58, 67, 76) (85, 94, 103) – or until desired width
The ribbing is the width of the sweater, easily adjust the width by adding or taking out rows – must be a mult of 3 + 1.
Now you will turn and work across the long edge of the ribbed band
Row 1: ch 1, sc evenly across working 1 sc in the end of each row ((58, 67, 76) (85, 94, 103) sc)
Row 2: ch 4, turn, dc in same stitch, skip 2 stitches, *V st in next, skip 2 stitches* repeat from * to * across, dc in last stitch ((19, 22, 25) (28, 31, 34) V st)
Row 3: ch 4, turn, dc in same stitch, *skip next dc and ch, V St in next dc* repeat from * to * across to last stitch, dc in last stitch ((19, 22, 25) (28, 31, 34) V st)
Row 4 – (28, 29, 30) (31, 32, 33): repeat row 3
Or until desired length
Fasten off. Leave a long end for sewing.
FRONT (make 2)
Ch 11 (leave a long end for sewing)
Row 1: sc in 2nd ch from the hook and in each ch across (10 sc)
Row 2: ch 1, turn, sc in first stitch, sc blo in next 8, sc in last (10)
Repeat Row 2 to Row (25, 31, 37) (40, 46, 49)
Now you will turn and work across the long edge of the ribbed band
Row 1: ch 1, sc evenly across working 1 sc in the end of each row ((25, 31, 37) (40, 46, 49) sc)
Row 2: ch 4, turn, dc in same stitch, skip 2 stitches, *V st in next, skip 2 stitches* repeat from * to * across, dc in last stitch ((8, 10, 12) (13, 15, 16) V st)
Row 3: ch 4, turn, dc in same stitch, *skip next dc and ch, V St in next dc* repeat from * to * across to last stitch, dc in last stitch ((8, 10, 12) (13, 15, 16) V st)
Row 4 – (28, 29, 30) (31, 32, 33): repeat row 3
Or until same length as back
Fasten off. Leave a long end for sewing.
SEWING
Lay the two front pieces on top of the back. Use stitch markers to keep the shoulder sections in place. Whip stitch the shoulders closed using the long end and yarn needle.
Sew the sides closed leaving a ((6”, 6.5”, 7”) (7.5”, 8”, 8.5”)) space at the top for the armholes – or desired armhole width
Weave in all the ends. Turn right side out.
SLEEVES
Join yarn to the bottom of an armhole
Round 1: ch 1, sc evenly around placing approx. 2 stitches in the edge of each row, (the amount needs to be a miltuple of 3), join to first sc with sl st
Round 2: ch 4, turn, dc in same stitch, skip 2 stitches, *V St in next, skip 2 stitches* repeat from * to * around, join to first ch 3 with sl st
Round 3: ch 4, turn, dc in same stitch, *skip dc and ch, V st in next dc* repeat from * to * around, join to first ch 3 with sl st
Round 4 – (20, 21, 22) (23. 24, 25): repeat row 3 – or until desired sleeve length before cuff
Round (21, 22, 23) (24, 25, 26): ch 1, turn, sc in each stitch and ch-1 space around, join to first sc with sl st
Round (22, 23, 24) (25, 26, 27): ch 1, turn, *sc, sc2tog* repeat from * to * around, join to first sc with sl st
Round (23, 24, 25) (26, 27, 28): ch 1, turn, sc in each stitch around, join to first sc with sl st
CUFF
For the cuff, use the applied ribbing method
ch 11
Row 1: sc in 2nd ch from the hook and across, sl st to the last round of the sleeve (10 sc)
Row 2: sl st to the next stitch in the last round of the sleeve, turn, sc in first stitch, sc blo in next 8, sc in last stitch (10)
Row 3: ch 1, turn, sc in first stitch, sc blo in next 8, sc in last, sl st to next stitch in the last round of the sleeve (10)
Repeat row 2 & 3 until you work all the way around the sleeve. Sew the cuff closed with a whip stitch
Fasten off, weave in the ends.
Repeat for other sleeve
COLLAR
Join yarn to bottom left corner of the collar, sc evenly around the collar to the opposite corner (placing approx. 2 sc in the edge of each row)
Use the applied ribbing method for the ribbed collar
ch 11
Row 1: sc in 2nd ch from the hook and across, sl st to the collar (10 sc)
Row 2: sl st to the next stitch of the collar, turn, sc in first stitch, sc blo in next 8, sc in last stitch (10)
Row 3: ch 1, turn, sc in first stitch, sc blo in next 8, sc in last, sl st to next stitch of the collar (10)
Repeat row 2 & 3 until you work all the way around to the opposite corner.
Fasten off, weave in the ends.
Repeat for other sleeve
Looking for more patterns? Follow me on Facebook, Instagram, and Pinterest! Please share a pic of your finished product with me. I’d love to see it!