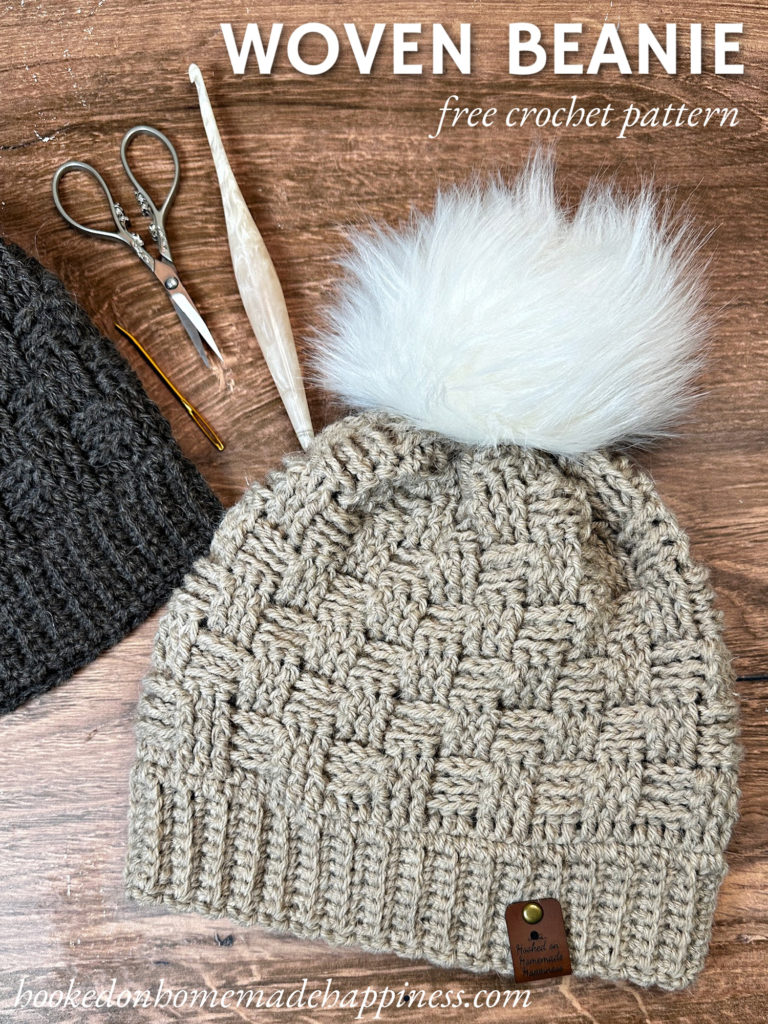
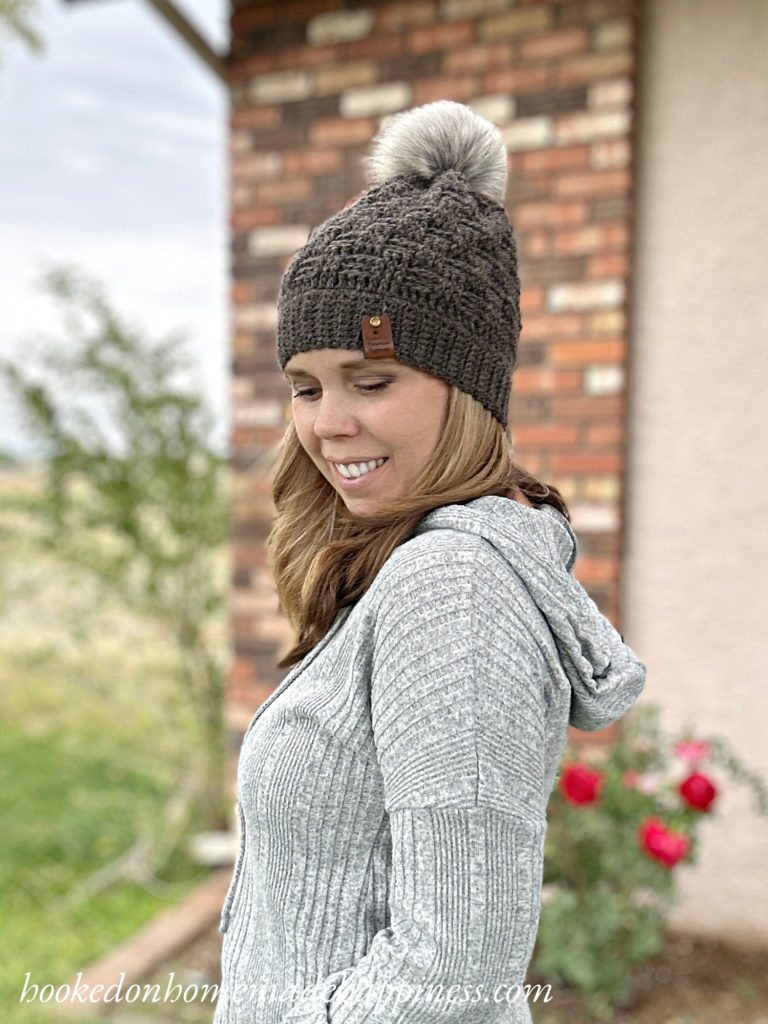
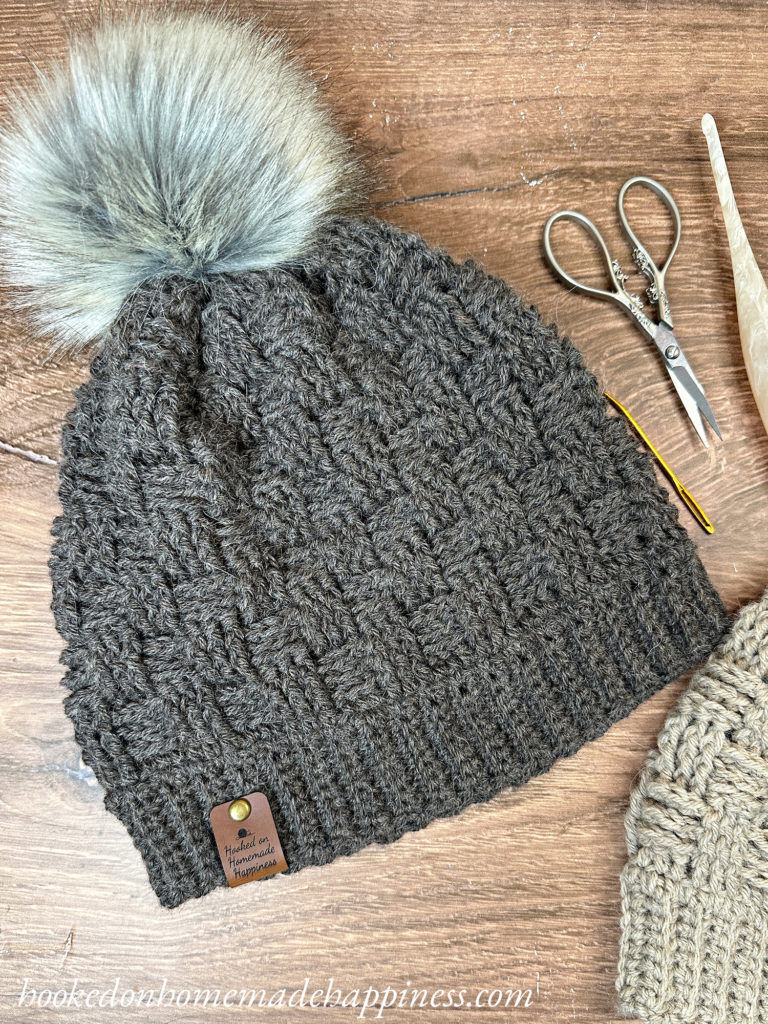
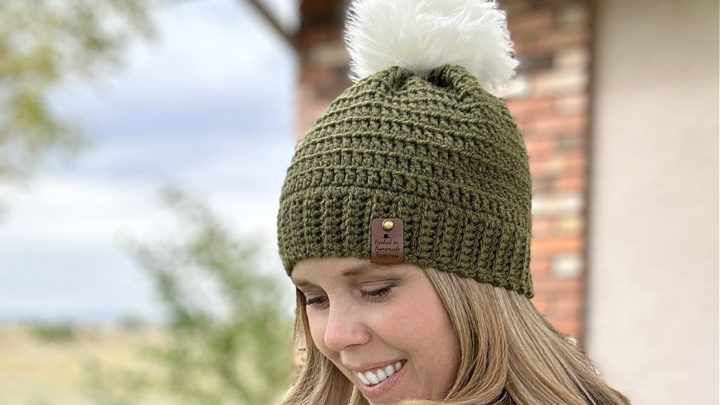
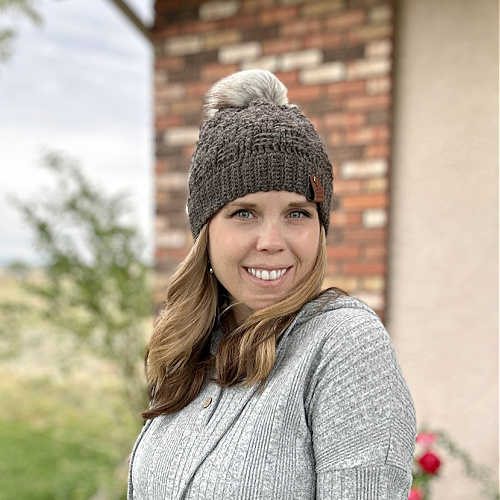
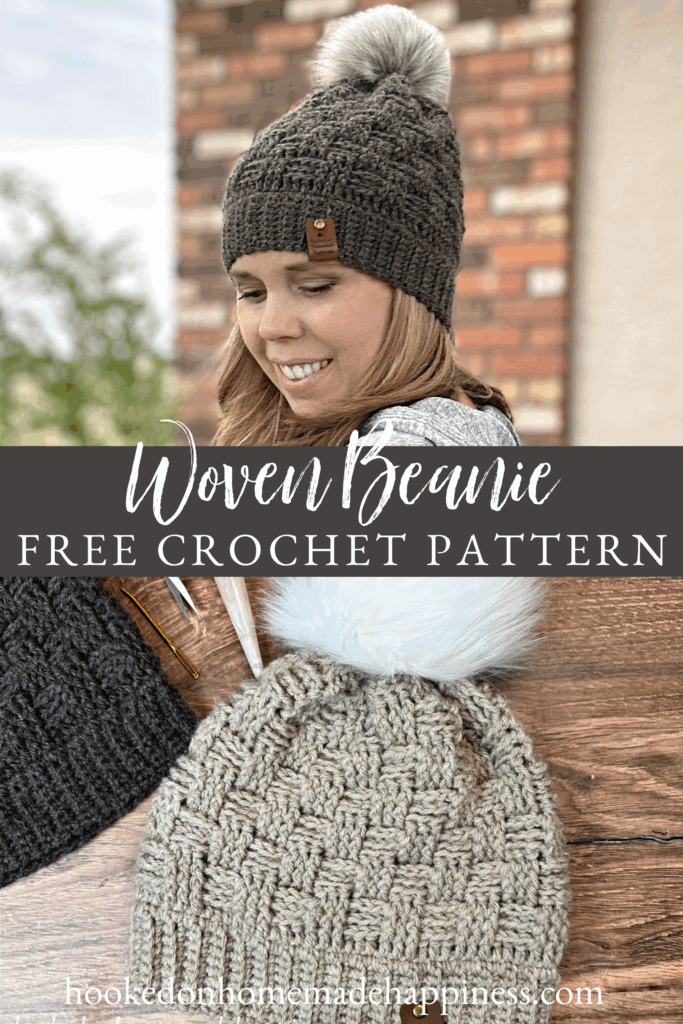
Woven Beanie Crochet Pattern
Stay cozy all season long with the Woven Beanie Crochet Pattern! This textured design features a beautiful basketweave stitch that gives the hat a woven look—perfect for both men and women. The pattern begins with a snug single crochet ribbing brim and transitions into a richly textured body before finishing with gentle decreases around the crown for a clean, fitted shape.
Purchase the ad-free, printable PDF for easy printing.
Pattern Details
- Skill Level: Intermediate (familiarity with front and back post stitches recommended)
- Yarn: Worsted weight yarn
- Hook Size: 5.0 mm (H)
- Sizes: Small & Large Adult (easily adjustable)
- Construction: Worked from the brim up
About the Stitch
The basketweave stitch is what gives this hat its woven appearance and incredible texture. It’s created by alternating front post double crochets (fpdc) and back post double crochets (bpdc) in sets—making the design both visually striking and warm.
If you’ve never tried this stitch before, don’t worry! Once you get into the rhythm of alternating posts, it’s a fun and relaxing repeat.
Making the Woven Beanie Crochet Pattern
Get the full free pattern below or purchase the ad-free, printable PDF
Materials
worsted weight yarn (75g, 100g, 125g) – I used Hobbii Upcycled Alpaca Blend
H/5.0 mm hook
Yarn needle
Scissors
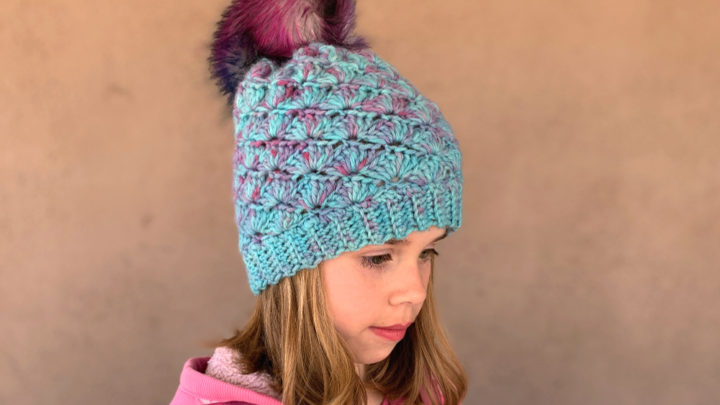
(optional) pom pom
Level
intermediate
Pattern notes & stitches to know
sl st – slip stich
ch – chain
sc – single crochets
sc blo – single crochet back loop only
dc – double crochet
fpdc – front post double crochet
bpdc – back post double crochet
fpdc2tog – front post double crochet 2 together
bpdc2tog – back post double crochet 2 together
· Written in US terms
· ch 1 does not count as sc
· ch 2 does not count as dc
· This beanie is worked from the bottom up. The pattern starts with the ribbing around the bottom
· Sizes: Pattern is written in 3 sizes, Child, Small Adult and Large Adult consecutively. Example, when the pattern gives the end of the row count as (66, 72, 78), the 66 is the child the 72 is the small and the 78 is the large.
Approximate Finished Size:
Circumference: Child (18”) Small (20”) Large (22”)
Length: Child (7”) Small (8”) Large (9’)
Pattern Support
Looking for pattern support or want to share your progress? Join our Crochet Community Facebook Group! It’s the perfect place to ask questions, get help, and connect with fellow makers.
CROCHET PATTERN WRITTEN INSTRUCTIONS
HOW TO CROCHET SINGLE CROCHET RIBBING VIDEO TUTORIAL
ch 10
Row 1: sc in 2nd ch from the hook and across (9)
Row 2: ch 1, turn, sc in first stitch, sc blo in next 7, sc in last (9)
Repeat row 2 to Row (66, 72, 78)
Bring both ends of the ribbing together to create a circle. Sc both short ends together. Now you will work around the long edge of the ribbing to start the body of the beanie.
Round 1: ch 1, sc evenly around working 1 sc in the end of each row, join to first sc with sl st ((66, 72, 78) sc)
HOW TO CROCHET THE BASKETWEAVE STITCH VIDEO TUTORIAL
Round 2: ch 2, dc in each stitch around, join to first dc with sl st ((66, 72, 78) dc)
Round 3: ch 2, *fpdc in 3 stitches, bpdc in 3 stitches* repeat from * to * around, join to first fpdc with sl st ((66, 72, 78) dc)
Round 4: repeat round 3
Round 5: repeat round 3
Round 6: ch 2, *bpdc in 3 stitches, fpdc in 3 stitches* repeat from * to * around, join to first bpdc with sl st ((66, 72, 78) dc)
Round 7: repeat round 6
Round 8: repeat round 6
Repeat rounds 3 – 8 to Round (17, 20, 23)
Decreasing starts in next round
For Child Size:
Round 18: ch 2, *bpdc, bpdc2tog, fpdc, fpdc2tog* repeat from * to * around, join to first fpdc with sl st (44 dc)
Round 19: ch 2, *bpdc2tog, fpdc2tog* repeat from * to * around, join to first stitch with sl st (22 dc)
Fasten off, leave a long end for sewing.
For Teen/SmAdult
Round 21: ch 2, *fpdc, fpdc2tog, bpdc, bpdc2tog* repeat from * to * around, join to first fpdc with sl st (48 dc)
Round 22: ch 2, *fpdc2tog, bpdc2tog* repeat from * to * around, join to first stitch with sl st (24 dc)
Fasten off, leave a long end for sewing.
For LgAdult
Round 24: ch 2, *fpdc, fpdc2tog, bpdc, bpdc2tog* repeat from * to * around, join to first fpdc with sl st (52)
Round 25: ch 2, *fpdc2tog, bpdc2tog* repeat from * to * around, join to first stitch with sl st (26)
Fasten off, leave a long end for sewing.
FINISHING FOR ALL SIZES
With yarn needle, weave the long end in a out of the top loops of the last round. Pull end tight to cinch the top closed. Sew the top closed. Weave in the ends.
Looking for more patterns? Follow me on Facebook, Instagram, and Pinterest! Please share a pic of your finished product with me. I’d love to see it!


Love this pattern! I’m newer to crochet… Will this fit a male or female? Thanks.
Female (or small male) 🙂
Thank you. I’m gonna try to convert it for a male lol. Merry Christmas to you
Ok 🙂 When you make the ribbed brim, I would add just 6 more rows making it 84 rows for the bottom. Then when you work around the long end of the band you’ll have 84 stitches around and the pattern should work the same
Thank you so much for your help!!
I have a question about this pattern. It says that it is the Waffle stitch, but as of round 8 it still doesn’t look like the picture of the grey hat you are showing. What am I doing wrong? Please help me.
Hi! This pattern uses the basketweave stitch 🙂 Here’s a video tutorial for the stitch (the video is for rows, this hat is done in rounds): https://www.youtube.com/watch?v=mCGdSPMi5m4&t=149s
Love your
Do you have this pattern for toddler or small child?
Not at the moment. Sorry!
Hi Breann,
I’m new to crocheting, and I was wondering do you do any video tutorials of your work? Which by the way, I love all your patterns. I learn easier by watching than reading, I’m dyslexic and have a real hard time. Thank you for sharing your beautiful work with us ?
Hi! No, I’m sorry I don’t have any videos.
Hi Rachel what I did was make the ribbing 2 in. smaller than the child’s head circumference and stitched around the rim in a multiple of 6…( the multiple of 6 is the key )…approx. 7-8 in. for the height and continued with Breann’s pattern and it worked out just fine.
It turned out awesome! I made it for my mother in law.
Yay!! Thank you 🙂
How many stitches do you decrease by?
Hi! The ribbed band needs to be a multiple of 6.
How does one decrease stitches? And by how many?
Hi! Do you mean how to make the hat smaller? Or how to do a double crochet decrease?
How to do a double crochet decrease. I asked my sister (who also crochets) and she said that you basically skip a stitch.
Yarn over, insert your hook into next stitch, yarn over, pull up a loop, yarn over, pull through 2 loops. Yarn over, insert your hook into the next stitch, yarn over, pull up a loop, yarn over, pull through 2 loops. Yarn over, pull through all loops on hook.
Hope this helps!
Thanks!!! That does help a lot!!!
Only one decrease per row then correct?
If you chose not to close the hole, would it be a decent Messy bun toque?
You would probably want to take out a couple rows 🙂
I’ve never worked with 100% merino wool before. I live 2 hrs from the city so I rarely go to a craft store. I like to use yarn that feels soft to the touch. Does Sugarbush Bold yarn feel soft?
It is SO soft! I love their wool.
Very pretty hat but I had to stop the brim at 66 rows and the hat at 12 then do the decrease because it was going to be way to big if I didnt. I made this for my husband without the pom pom. I used redheart yarn and the 5mm H hook.
Hi there. Beautiful pattern! Where do you get your fur poms?
I get them from Maria’s Blue Crayon on Etsy 🙂
Love this pattern! Making this once I get to the store! What size pom pom is this? I like that it isn’t one of the huge ones. Thank you!!
Hi! I’m not sure. Sorry! I buy mine from Maria’s Blue Crayon on Etsy 🙂
Do you have a mitten pattern that matches the hat?
No, I don’t. Sorry!
Hi Beann I am hooked on your beanie projects. I love them all!!! How can I get these funky Pom poms you have on this beanie?
Hi ! Love this! but i do not see the place where you down load from the 12 days of free patterns.
Hi! I love this pattern and am going to try it out for my teenage son. He likes to have a brim that he can fold up. Should I just double the initial chain from 10 to 20? Or do you have any alternate suggestions? Thank you!
Hi! Yes, that would work great 🙂
As I look at the pattern I think I am missing something. After the brim doing the second row it say to double crochet in each stitch around is that correct? It doesn’t look like it. I could easily be seeing things but did I miss something? I love the look of this pattern! I don’t crochet much anymore because of arthritis but wanted to give this a try for my granddaughter!
Thanks so much,
Bonnie
Hi! There is a round of dc for round 2. Then the next round is the basket weave stitch 🙂 You can’t tell it’s a solid round of dc because of the fpdc & bpdc.
thanks!!!! I figure that was probably it!
B
I made this for my grandson but it fit his mother. How do I make a child size? Please
Hi! You can reduce the number if rows in the ribbing. Make sure the number of rows is a multiple of 6
Hello! I’m currently making the rim. When I’m doing the zig back and forth how do I prevent the ends from being pointy? The edge of the ribbed brim on mine just looks jagged versus smooth like yours. Just wondering if you had any tips? Thanks!
Hi! Are you using a regular single crochet in the last stitch?
When you single crochet the brim short edges together do you just do the loops that are next to each other or all 4 loops?
Hi! I usually just do the loops that are next to each other.