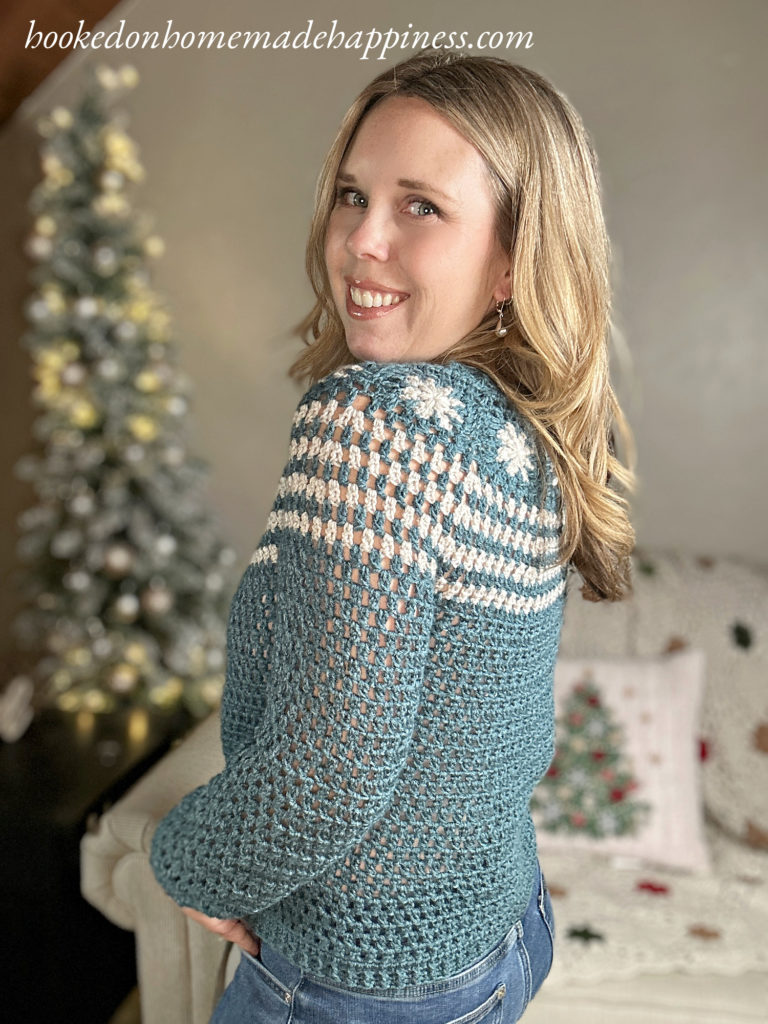
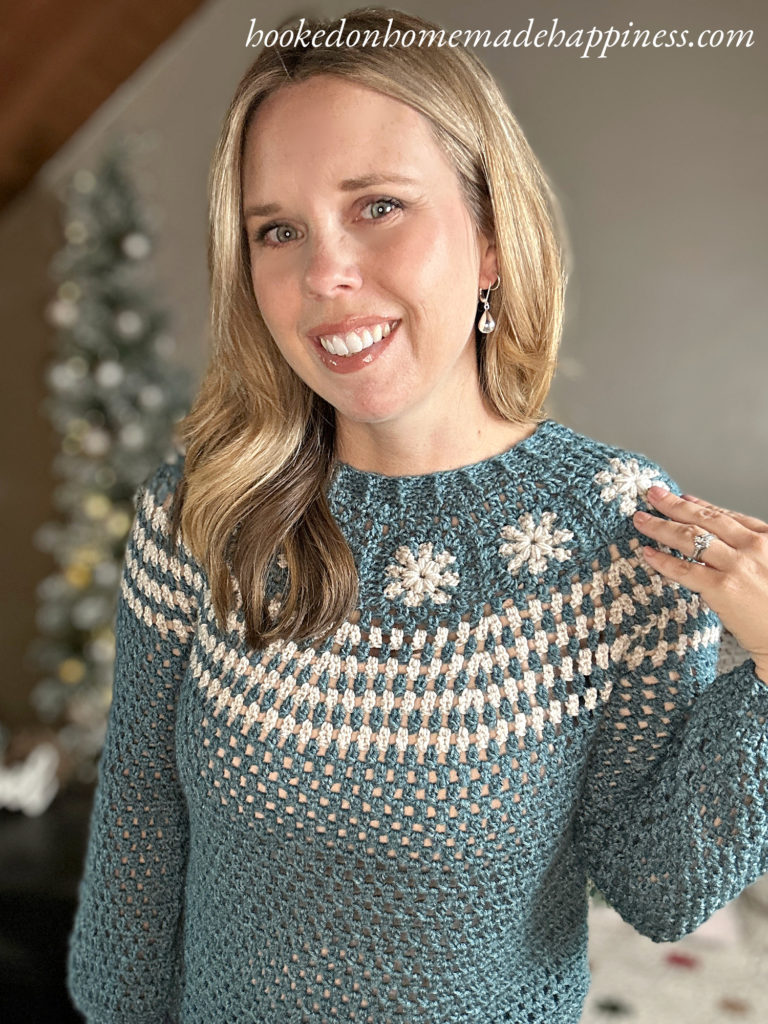
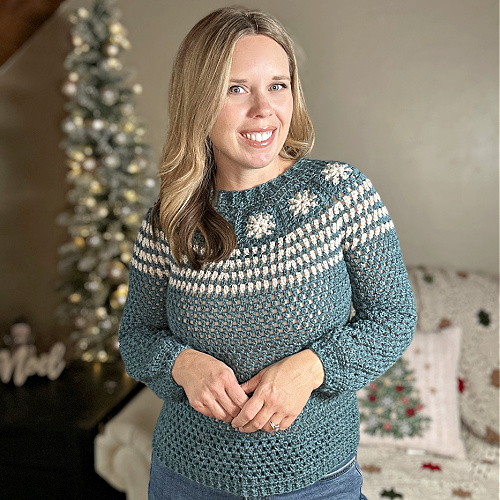
Winter Snowflake Crochet Sweater Pattern
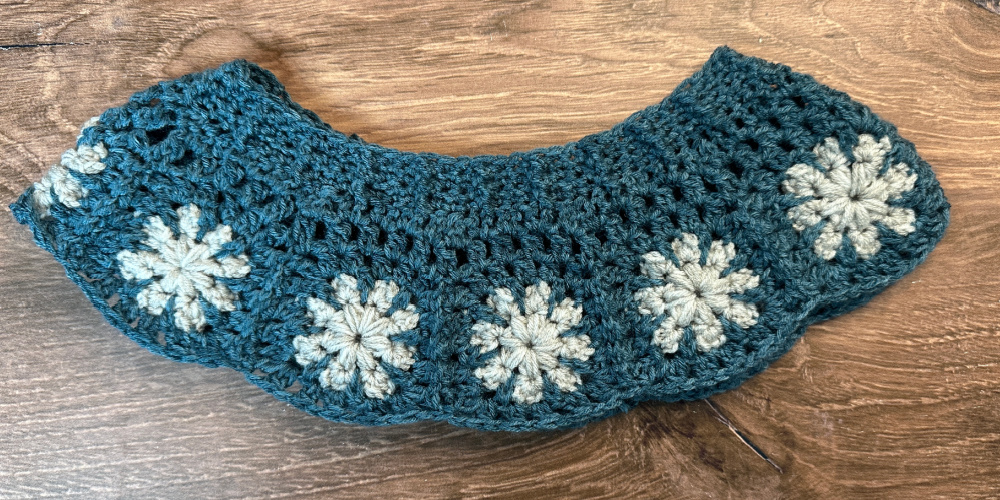
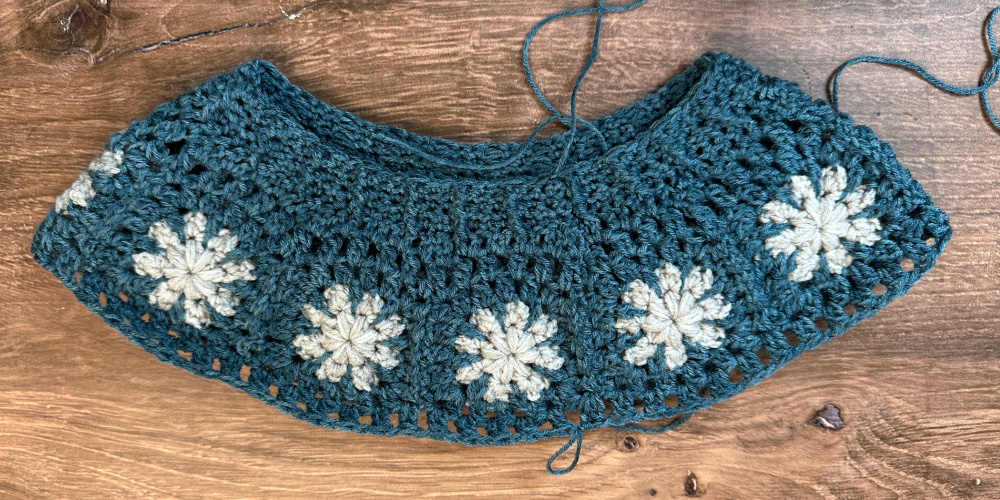
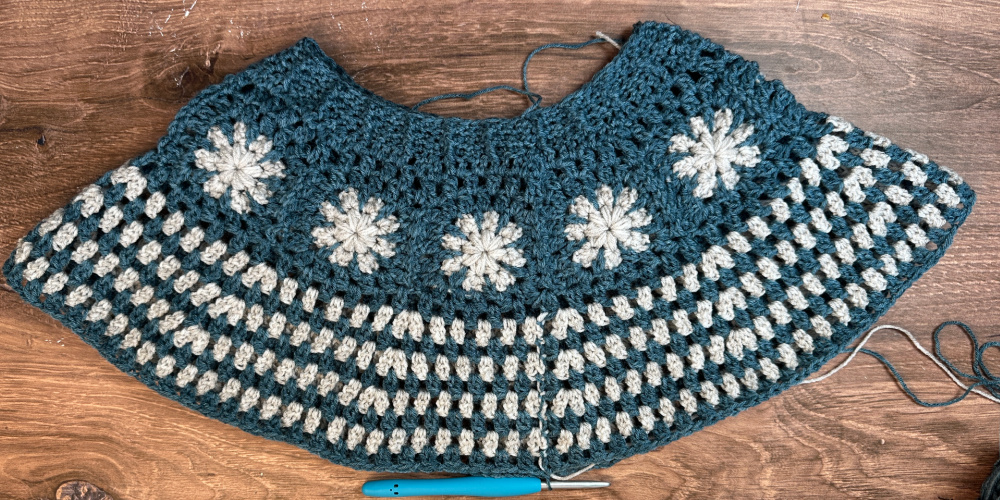
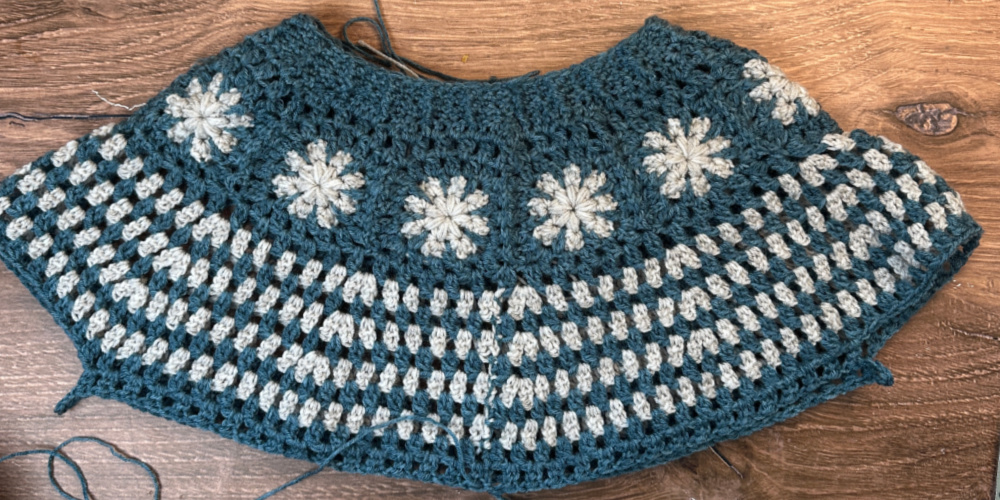
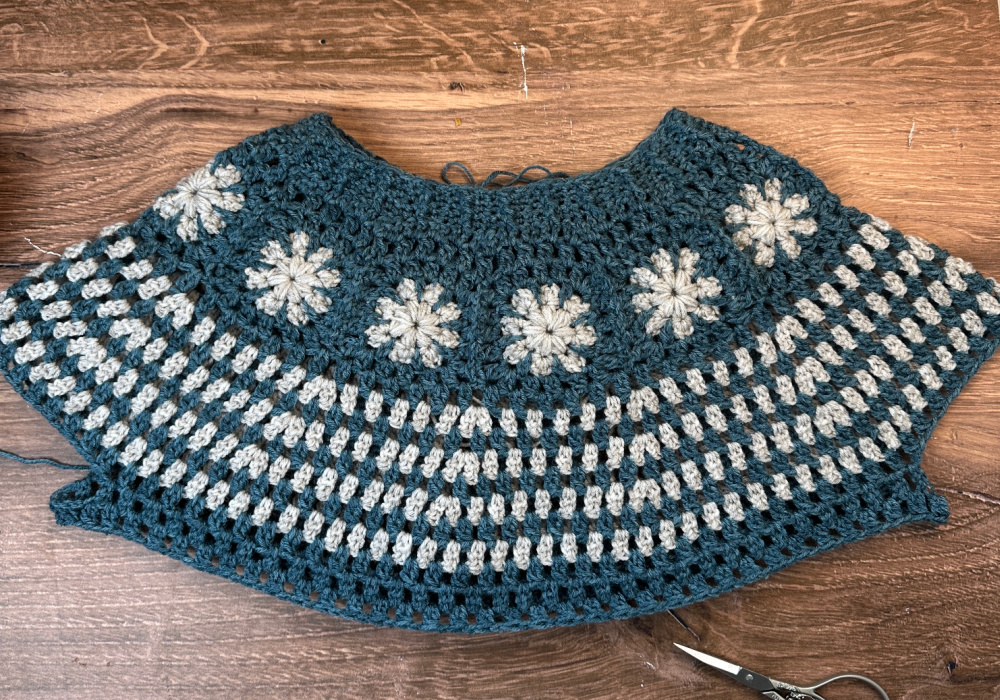
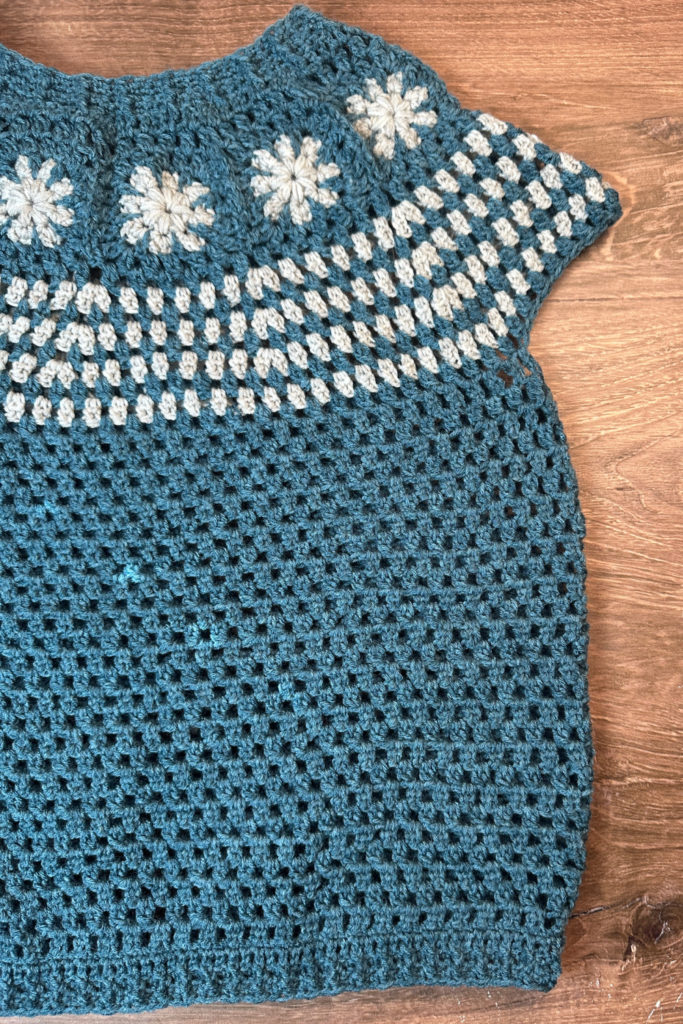
This Winter Snowflake Sweater Crochet Pattern is a cozy and festive project perfect for the winter season! The design starts with beautiful snowflake granny squares that are joined in a circle to create the yoke. From there, it’s worked top down, allowing for easy customization of length and sleeve fit.

Purchase the ad-free, printable PDF for easy printing.
Construction Overview
- Snowflake Granny Squares: Start by crocheting each intricate snowflake square.
- Join the Squares: Sew them together to form a circle — this will be the yoke.
- Top and Collar: Crochet around the top edge to form the neckline and collar.
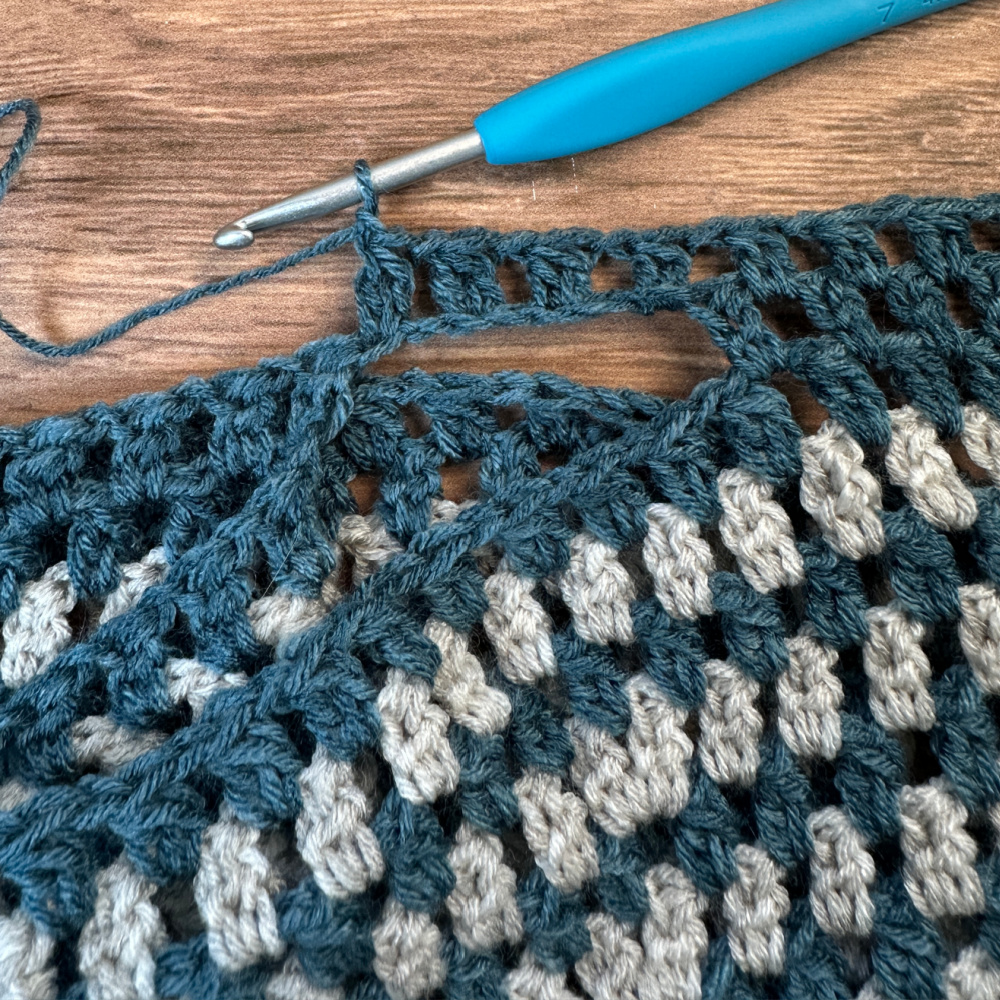
- Yoke and Body: Join yarn to the bottom of the snowflake circle and work the rest of the yoke in rounds.
- Sleeve Split: When the yoke is complete, create the arm openings.
- Body & Sleeves: Finish the body and sleeves using cluster stitches for a cozy texture.
This crochet yoke sweater pattern is worked seamlessly from the top down, which makes it easy to try on as you go and adjust the fit.

Pattern Details
- Yarn: DK weight yarn
- Hook: 4.5 mm crochet hook
- Construction: Top down, circle yoke
- Skill Level: Intermediate (familiar with granny squares and cluster stitches)
- Sizes: Multiple (customizable using the top-down method)
Why You’ll Love This Pattern
- Elegant snowflake motif perfect for the holidays
- Lightweight DK yarn makes it comfortable and wearable all season
- Top-down construction for easy adjustments
- Beautiful granny square sweater design with a modern twist
Making the Winter Snowflake Sweater Crochet Pattern
Get the full free pattern below or purchase the ad-free, printable PDF
Materials
Yarn Bee Soft & Sleek DK in 2 colors – any DK weight yarn will work ((260, 310, 360)(410, 460, 510)g)
4.5 mm hook
yarn needle
scissors
Level
intermediate
Pattern notes & stitches to know
ch – chain
sl st – slip stitch
PS – puff stitch (*yarn over, insert hook into stitch, pull up a loop* repeat from * to * 1 more time, yarn over, pull through all 5 loops)
sc – single crochet
dc – double crochet
ldc – long double crochet (insert hook into row below, work dc)
(sc, ldc, sc)3tog – single crochet, long double crochet, single crochet together
CL – cluster (*yarn over, insert hook into stitch, pull up a loop, yarn over, pull through 2 loops* repeat from * to * 1 more time, yarn over, pull through all 3 loops)
dc2tog – double crochet 2 together
dc3tog – double crochet 3 together
fpdc – front post double crochet
sc2tog – single crochet 2 together
rs – right side
ws – wrong side
· Written in US terms
· ch 1 does not count as sc
· ch 2 does not count as dc
· This sweater is made from the top down with a circle yolk. It starts with the granny squares sewn together in a circle for the yolk. Then the neckline is made, the body of the sweater, and the sleeves last.
Gauge: 8 CL + ch 1 x 10 rows = 4” x 4”
Sizes:
(S, M, L) (XL, 2X, 3X) – The pattern is written in these sizes consecutively. Example, when the pattern gives the end of row count ((88, 96, 104)(112, 120, 128) dc) the 88 is for S, 96 is M, 104 is L, 112 is XL, 120 is 2X, 128 is 3X.
This sweater is a classic fit with 1-2” positive ease.
Approx Finished Size
Bust: S (36”) M (40”) L (44”) XL (48”) 2X (52”) 3X (56”)
Length: S (18.5”) M (19.25”) L (20”) XL (20.75”) 2X (21.5”) 3X (22.25”)
Armhole Width: S (6.5”) M (7”) L (7.5”) XL (8”) 2X (8.5”) 3X (9”)
Sleeve Length (from neckline): S (23.5”) M (24.25”) L (25.75”) XL (26.5”) 2X (28”) 3X (28.75”)
Size Small pictured. I am 5’0” with 34” bust
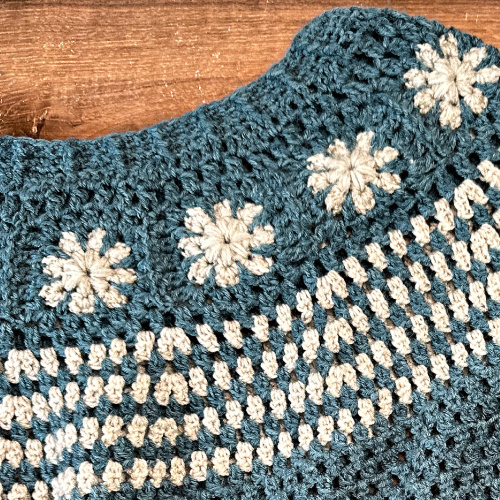
Watch the Granny Square Tutorial
See how it’s done! This easy-to-follow video tutorial will walk you through each step of the granny square.
Pattern Support
Looking for pattern support or want to share your progress? Join our Crochet Community Facebook Group! It’s the perfect place to ask questions, get help, and connect with fellow makers.
CROCHET PATTERN WRITTEN INSTRUCTIONS
SNOWFLAKE GRANNY SQUARES (make (11, 12, 13)(14, 15, 16))
With snowflake color, ch 4, sl st to first chain to make a circle
Round 1 (rs): ch 2, (PS, ch 2)x8 in circle, join to first PS with sl st (8 PS)
Round 2 (rs): ch 1, (2 sc, dc, 2 sc) in each PS around, join to first sc with sl st (8 dc, 32 sc)
Fasten off first color.
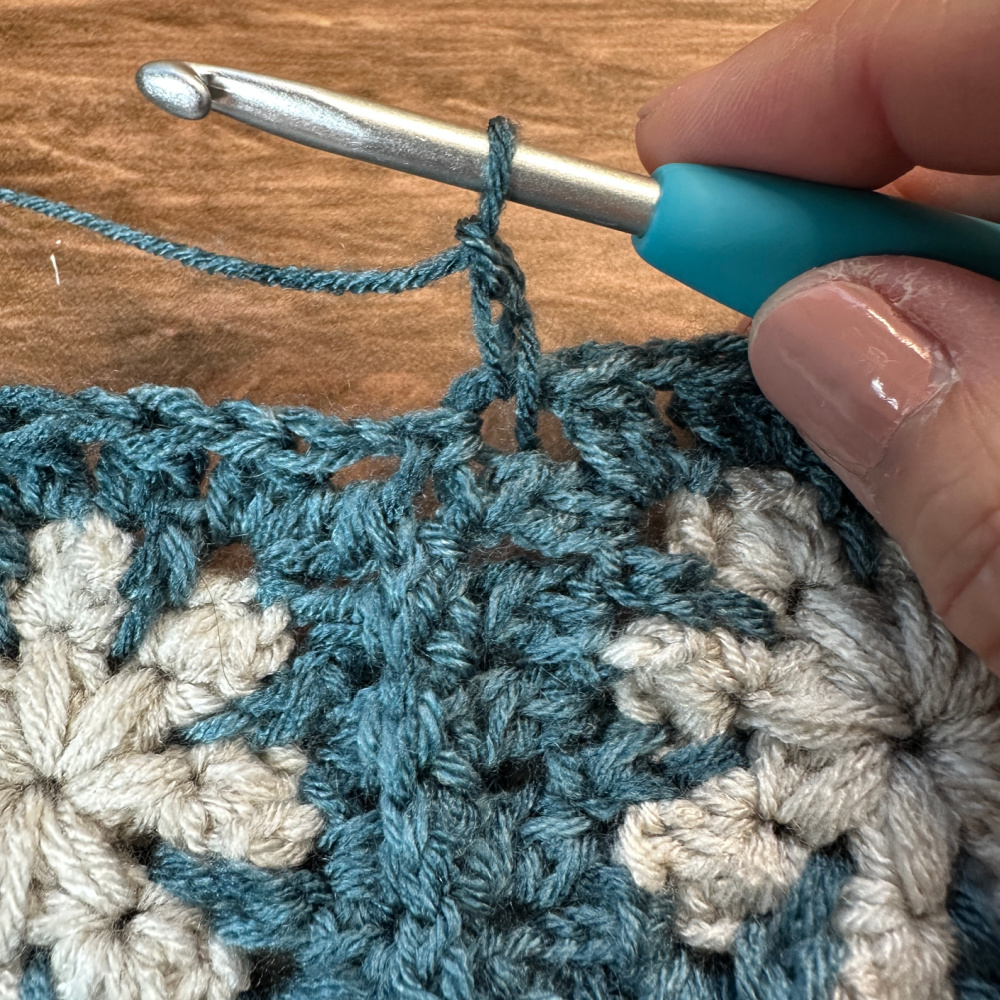
Join main sweater color to a dc
Round 3 (rs): ch 1, *sl st in dc, ch 2, skip next sc, (sc, ldc, sc)3tog (place the sc in the sc, ldc in ch-2 space of row 1, sc in next sc), skip sc, ch 2* repeat from * to * around, join to first st with sl st (8 sl st, 8 3tog)
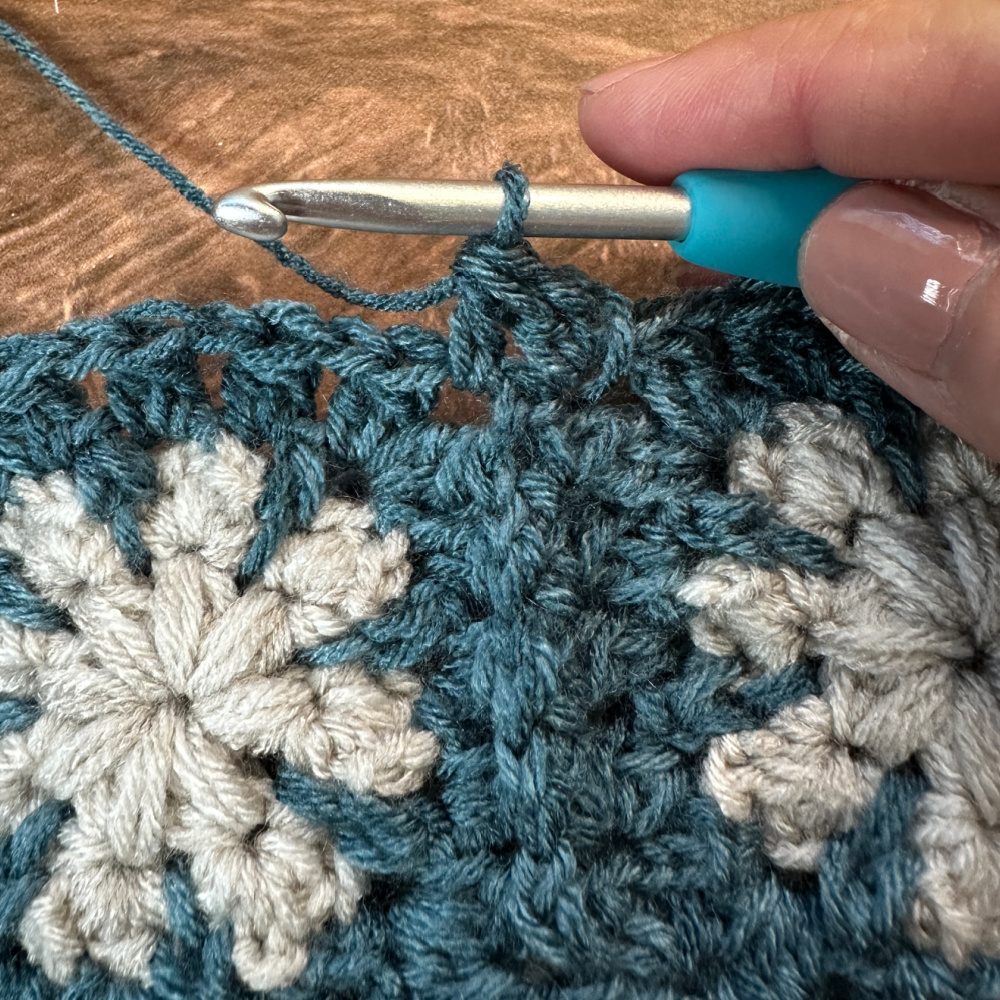
Round 4 (rs): sl st to ch-2 space, ch 2, *(CL, ch 2, CL) in ch-2 space, ch 1, [CL in next ch-2 space, ch 1] x3* repeat from * to * around, join to first CL with sl st (20 CL)
Fasten off.
Weave in the ends.
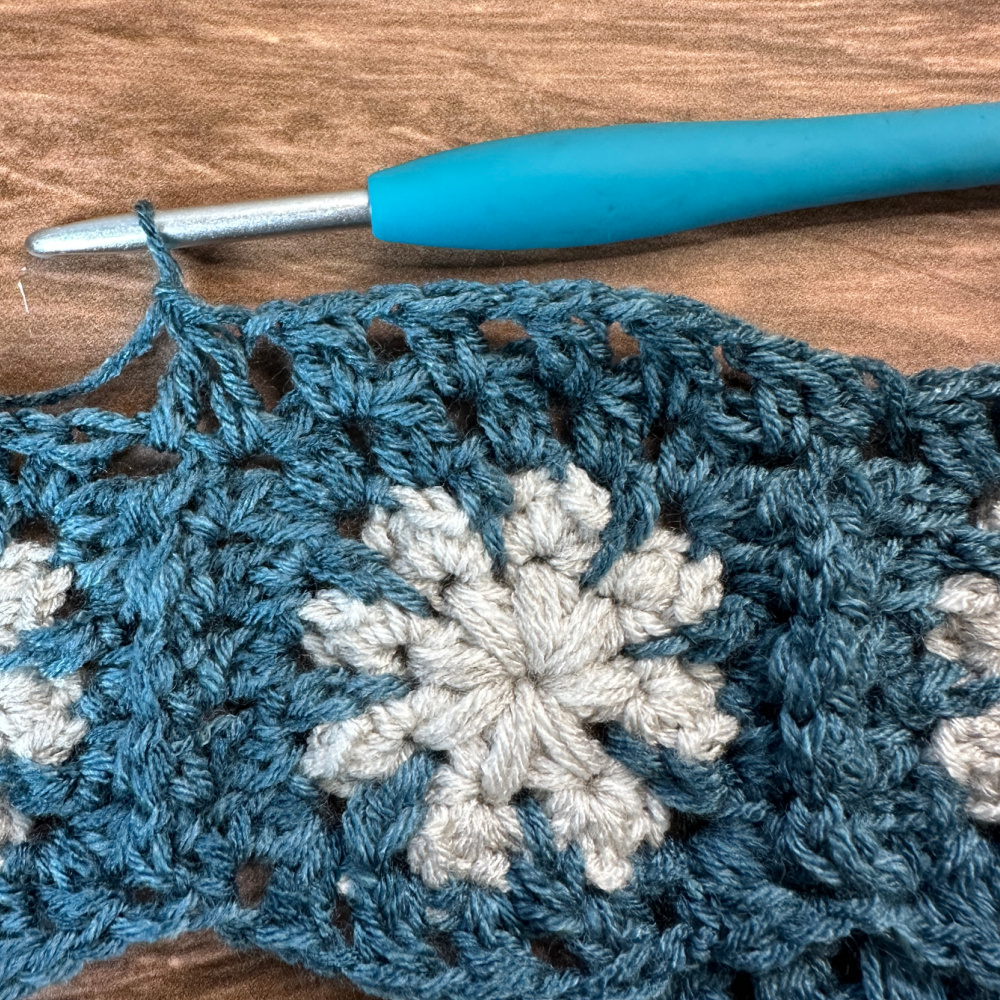
Sew the squares together in a circle.
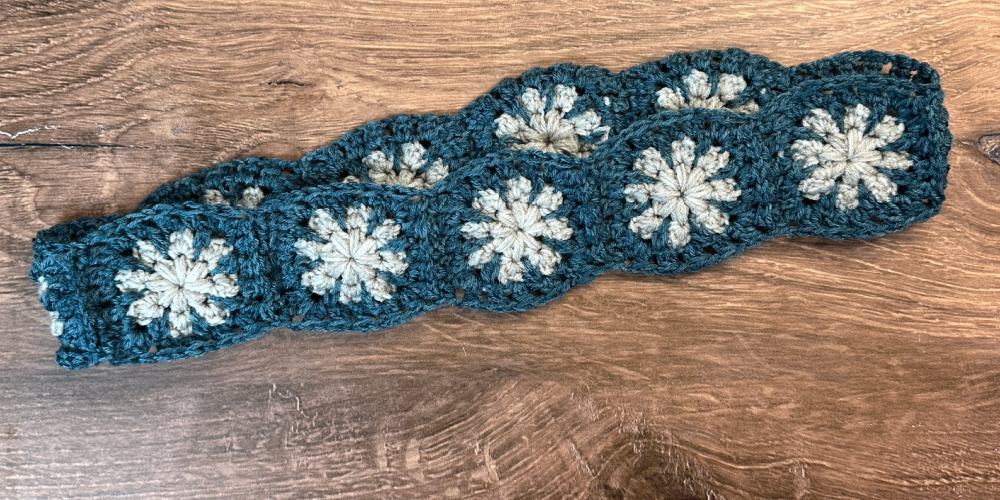
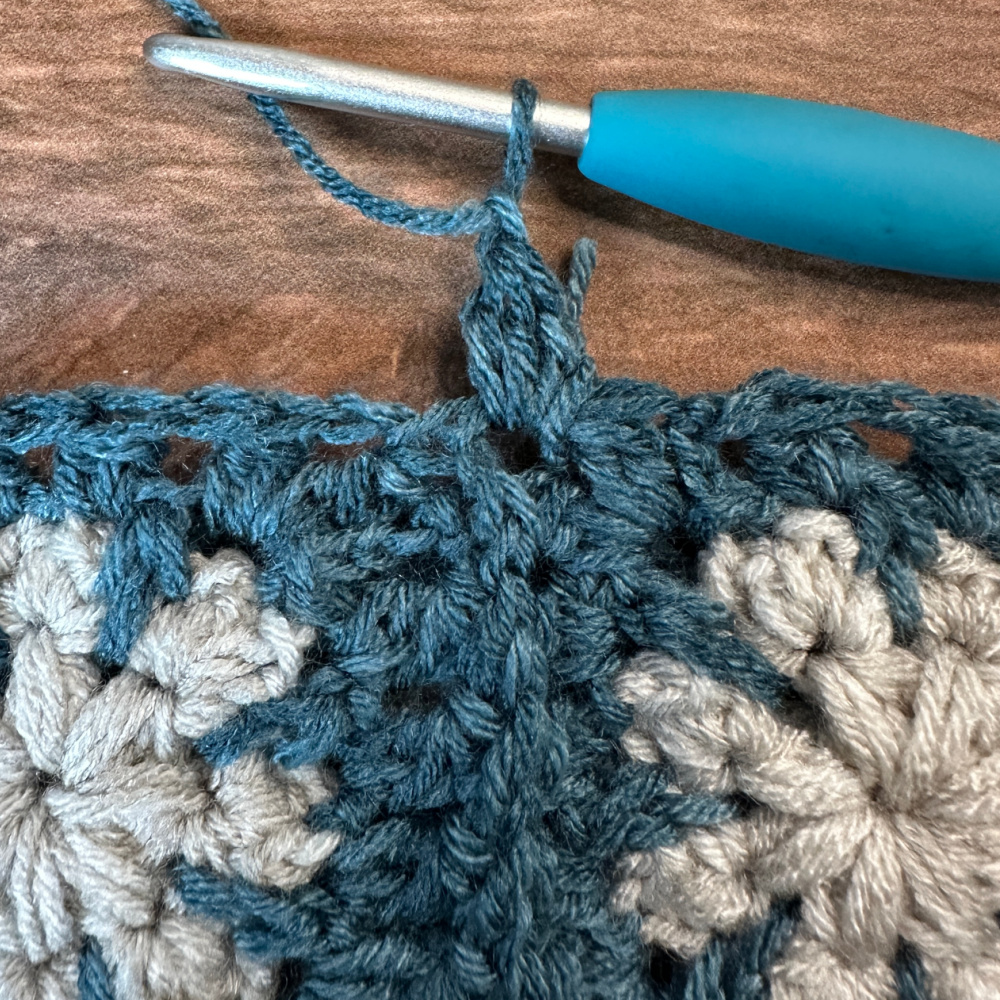
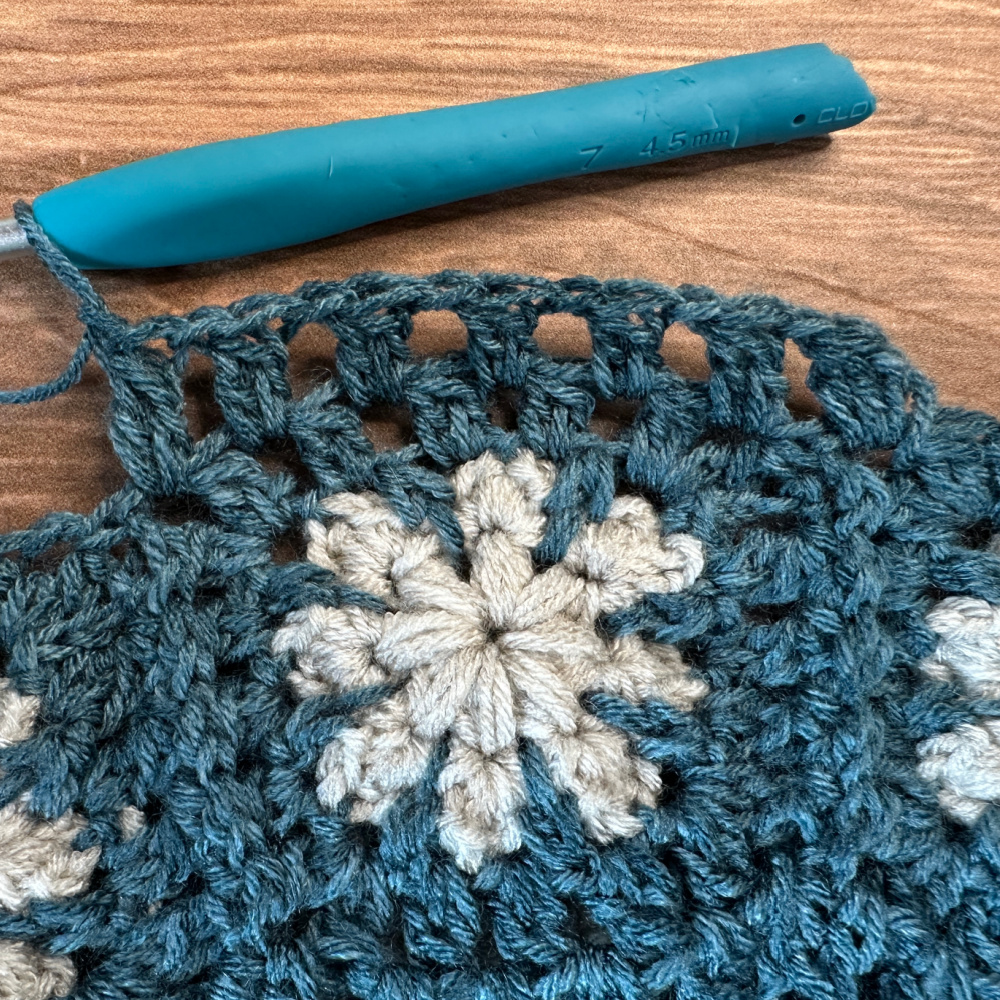
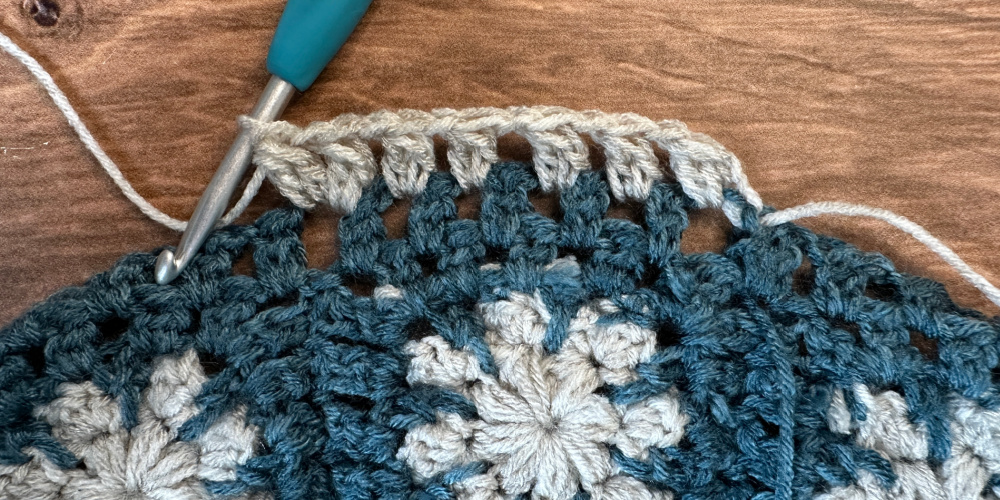
NECKLINE
With main sweater color, join yarn to a ch-2 corner space on the left of a granny square (rs out)
Round 1 (rs): ch 2, *dc2tog (across the ch-2 spaces), CL in each ch-1 space across to the next ch-2 space*
repeat from * to * around, join to first dc2tog with sl st ((44, 48, 52)(56, 60, 64) CL), ((11, 12, 13)(14, 15, 16) dc)
Round 2 (ws): ch 2, turn, skip ch-1, *dc in next 7 stitches (CL & ch-1 spaces), dc3tog* repeat from * to * around to last 2, dc2tog, join to first dc with sl st ((88, 96, 104)(112, 120, 128) dc)
Round 3 (rs): ch 1, turn, *sc in 3 stitches, fpdc* repeat from * to * around, ((22, 24, 26)(28, 30, 32) fpdc), ((66, 72, 78)(84, 90, 96) sc)
Round 4 (ws): ch 1, turn, *bpdc, sc2tog, sc* repeat from * to * around, join to first bpdc with sl st ((22, 24, 26)(28, 30, 32) fpdc), ((44, 48, 52)(56, 60, 64) sc)
Round 5 (rs): ch 1, turn, *sc in 2 stitches, fpdc* repeat from * to * around, join to first sc with sl st ((22, 24, 26)(28, 30, 32) fpdc), ((44, 48, 52)(56, 60, 64) sc)
Round 6 (ws): ch 1, turn, *bpdc, sc in 2 stitches* repeat from * to * around, join to first bpdc with sl st ((22, 24, 26)(28, 30, 32) fpdc), ((44, 48, 52)(56, 60, 64) sc)
Fasten off. Weave in the ends, Add or take out rounds of the collar as needed to adjust the neckline.
BODY
With main sweater color, join yarn to a ch-2 corner space on the left of a granny square (rs out) across the bottom
Round 1 (rs): ch 2, (CL, ch 1) in each ch space around ((66, 72, 78)(84, 90, 96) CL)
Change to secondary color
Round 2 (ws): ch 2, turn, *(CL, ch 1) in 5 ch-1 spaces, (CL, ch 1, CL) in next* repeat from * to * around, join to first CL with sl st ((77, 84, 91)(98, 105, 112) CL)
Change color every other round
Round 3 (rs): ch 2, turn, (CL, ch 1) in each ch-1 space around, join to first CL with sl st ((77, 84, 91)(98, 105, 112) CL)
Round 4 (ws): ch 2, turn, ch 2, turn, *(CL, ch 1) in 6 ch-1 spaces, (CL, ch 1, CL) in next* repeat from * to * around, join to first CL with sl st ((88, 96, 104)(112, 120, 128) CL)
Round 5 (rs): ch 2, turn, (CL, ch 1) in each ch-1 space around, join to first CL with sl st ((88, 96, 104)(112, 120, 128) CL)
Round 6 (ws): ch 2, turn, ch 2, turn, *(CL, ch 1) in 7 ch-1 spaces, (CL, ch 1, CL) in next* repeat from * to * around, join to first CL with sl st ((99, 108, 117)(126, 135, 144) CL)
Round 7 – Round (9, 11, 13) (15, 17, 19) (rs): ch 2, turn, (CL, ch 1) in each ch-1 space around, join to first CL with sl st ((99, 108, 117)(126, 135, 144) CL)
Split for the sleeves is in the next round. Add or take out the repeat rounds as needed before sleeves (end on a rs row)
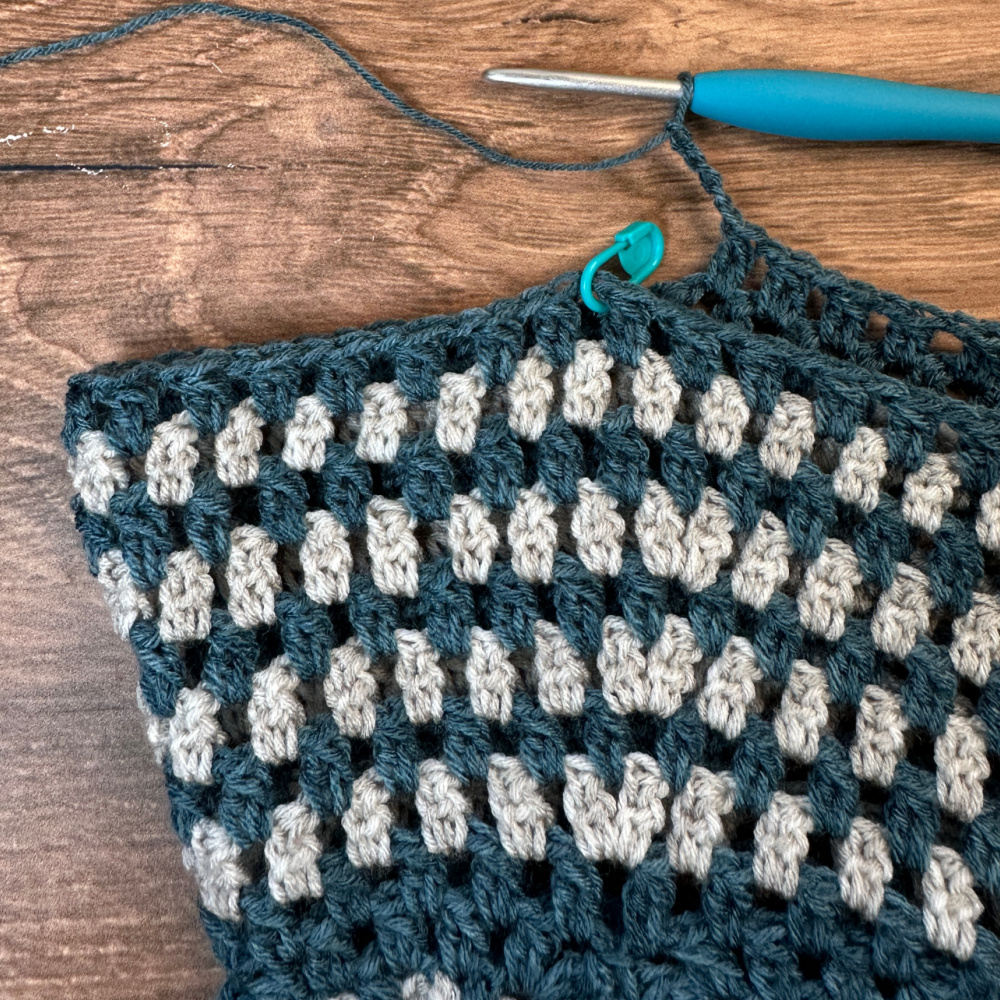
SPLIT FOR SLEEVES
Fasten off secondary color. Work only with main color for the remainder of the sweater.
Round (10, 12, 14)(16, 18, 20) (ws): ch 2, turn, [(CL, ch 1) in each ch-1 space] x(17, 19, 20)(22, 24, 26), ch (7, 9, 11)(13, 15, 17), skip (16, 17, 18)(19, 20, 21) ch-1, [(CL, ch 1) in each ch-1 space] x(34, 37, 41)(44, 48, 51), ch (7, 9, 11)(13, 15, 17), skip (16, 17, 18)(19, 20, 21) ch-1, (CL, ch 1) in remaining ch-1 spaces around, join to first CL with sl st ((67, 74, 81)(88, 95, 102) CL)
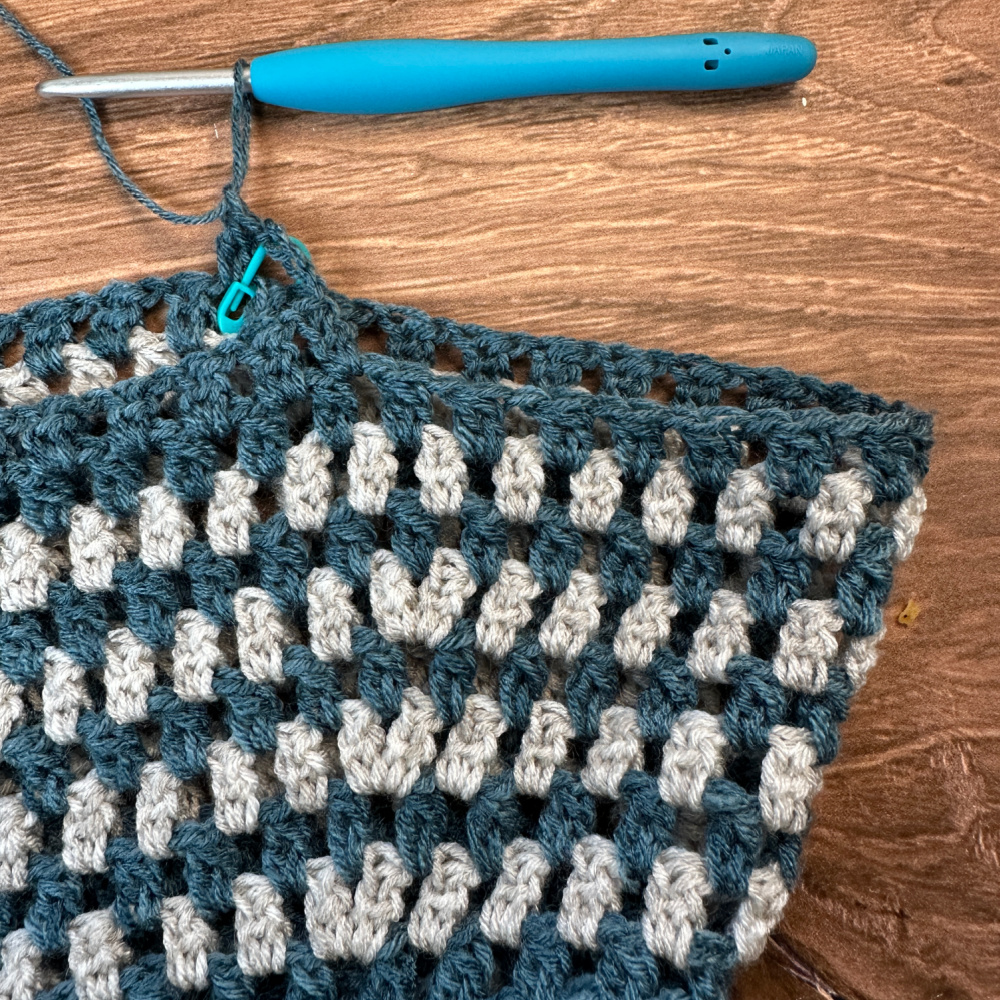
Round (11, 13, 15)(17, 19, 21) (rs): ch 2, turn, (CL, ch 1) in each ch-1 space around to the chain spaces at the sleeve split, *CL in next ch, ch 1, skip 1 ch* repeat from * to * across the chain, (CL, ch 1) in each ch-1 space around to the next chain spaces at the sleeve split, repeat from * to * across the chain, (CL, ch 1) in each ch-1 space around the remaining stitches, join to first CL with sl st ((73, 82, 91)(100, 109, 118) CL)
Round (12, 14, 16)(18, 20, 22) (ws): ch 2, turn, (CL, ch 1) in each ch-1 space around, join to first CL with sl st ((73, 82, 91)(100, 109, 118) CL)
Repeat previous round to Round (36, 38, 40)(42, 44, 46) (ws)
Or until desired length before ribbing (end on ws)
BOTTOM EDGING
Round 1 (rs): ch 1 turn, sc in each stitch and ch-1 around, join to first sc with sl st ((146, 164, 182)(200, 218, 236) sc)
Round 2 (ws): ch 2, turn, dc in each stitch around, join to first dc with sl st ((146, 164, 182)(200, 218, 236) dc)
Round 3 (rs): ch, 1 turn, *sc, fpdc* repeat from * to * around, join to first sc with sl st ((73, 82, 91)(100, 109, 118) sc) ((73, 82, 91)(100, 109, 118) dc)
Round 4 (ws): ch 1, turn, *bpdc, sc* repeat from * to * around, join to first dc with sl st ((73, 82, 91)(100, 109, 118) sc) ((73, 82, 91)(100, 109, 118) dc)
Round 5 (rs): ch 1, turn, *sc, fpdc* repeat from * to * around, join to first sc with sl st ((73, 82, 91)(100, 109, 118) sc) ((73, 82, 91)(100, 109, 118) dc)
Fasten off. Weave in the ends.
SLEEVES
Join yarn to the bottom ch space of an armhole. Place a stitch marker at round 1 of the sleeve.

Round 1 (rs): ch 2, (CL, ch 1) in each space around, join to first CL with sl st
Round 2 (ws): ch 2, turn, (CL, ch 1) in each ch-1 space around, join to first CL with sl st
Repeat round 2 to Round (32, 32, 34)(34, 36, 36)
Or until desired length before the cuff (end on ws)
CUFF
Round 1 (rs): ch 1, turn, sc2tog around, join to first sc with sl st
Round 2 (ws): ch 2, turn, dc in each stitch around, join to first dc with sl st
Round 3 (rs): ch, 1 turn, *sc, fpdc* repeat from * to * around, join to first sc with sl st
Round 4 (ws): ch 1, turn, *bpdc, sc* repeat from * to * around, join to first dc with sl st
Round 5 (rs): ch 1, turn, *sc, fpdc* repeat from * to * around, join to first sc with sl st
Fasten off. Weave in the ends. Repeat for other sleeve.

Looking for more patterns? Follow me on Facebook, Instagram, and Pinterest! Please share a pic of your finished product with me. I’d love to see it!


This is an amazing design. Thank you for sharing your talent and for you generosity
Thank you so much!
This is beautiful! I have a quick question. How much of each color of yarn would you need? I see the total weight in the pattern notes, but I can’t figure out how many skeins of white to buy and how many blue.
Hi! You don’t need much of the secondary color. Probably just one skein.