Mandala Blanket Crochet Along – Part 4
Welcome back for Part 4 of the Mandala Blanket Crochet Along! This week we will be adding triangle sections to 2 sides (the last 2 sides will be for part 5) to change the direction of our square.
You can find all the details for this crochet along HERE.
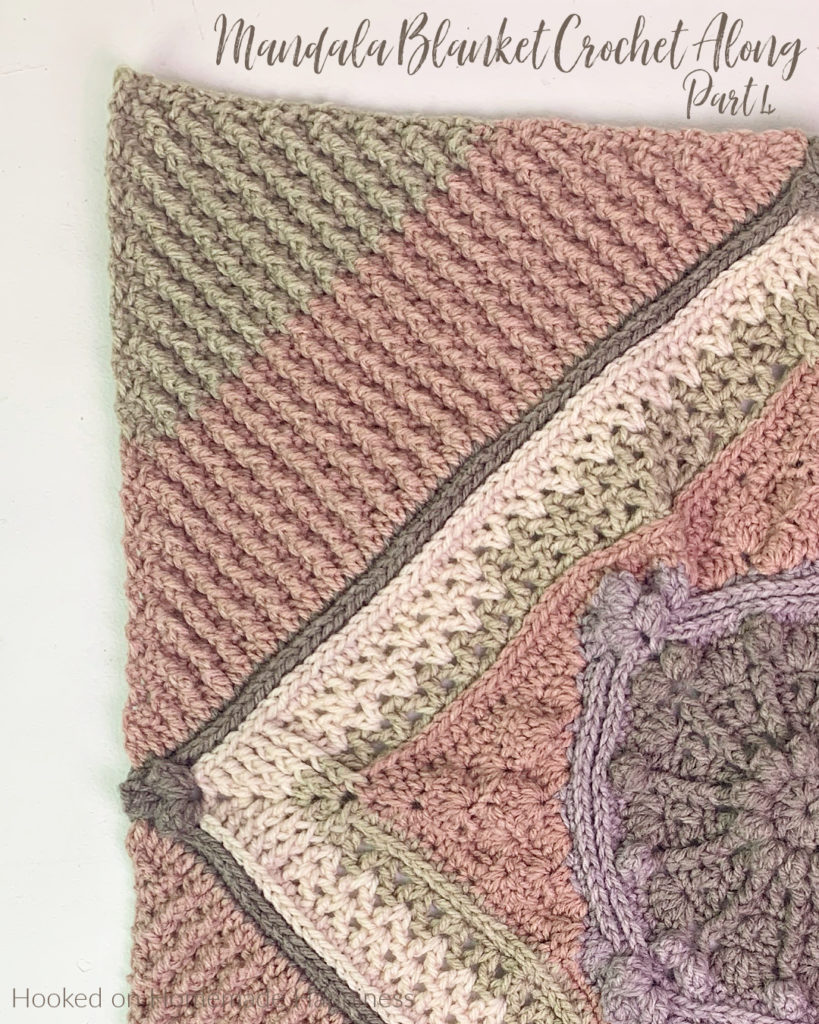
Pictured below is the full blanket.
Mandala Crochet Blanket ~ Part 4
Get Part 4 of the pattern below or purchase the entire ad-free, printable PDF in my Etsy Shop or Ravelry Shop
PIN for later HERE
Add to your Ravelry Queue HERE
Get Part 3 HERE
Materials
Worsted weight yarn (I used Caron Cakes)
H/5.0 mm hook
Yarn needle
Scissors
Level
intermediate
Pattern notes & stitches to know
ch – chain
dc – double crochet
sc – single crochet
dc2tog – double crochet 2 together
sc2tog – single crochet 2 together
sc3tog – single crochet 3 together
fpdc – front post double crochet
bpdc – back post double crochet
· written in US terms
· ch 1 does not count as sc
· ch 2 does not count as dc
· Approx finished size: 25” ea side
PART 4
Watch the video tutorial for Part 4 below
Join yarn to the rightmost ch-2 space on one side
Row 1: ch 2, dc2tog across ch-2 space and first sc, dc in next 57 sc, dc2tog across last sc and ch-2 space (59 dc)
Row 2: ch 1, turn, sc3tog, bpdc in next, *sc in next, bpdc in next* repeat from * to * across to last 3 stitches, sc3tog (55)
Row 3: ch 1, turn, sc2tog, sc in next, *fpdc in next, sc in next* repeat from * to * across to last 2 stitches, sc2tog (53)
Row 4: ch 1, turn, sc2tog, bpdc in next, *sc in next, bpdc in next* repeat from * to * across to last 2 stitches, sc2tog (51)
Row 5 – 26: repeat rows 3 & 4 (each row will decrease by 2 stitches) ending with a row 4 repeat and 7 stitches
Row 27: ch 1, turn, sc2tog, sc, fpdc, sc, sc2tog (5)
Row 28: ch 1, turn, sc2tog, bpdc, sc2tog (3)
Row 29: ch 1, turn, sc3tog (1)
Fasten off.
Join to next side and repeat pattern on one other side (the next 2 sides will be part 5)
Note: I did color control these 4 sections.
See you next week for Part 5!
Looking for more patterns? Follow me on Facebook, Instagram, and Pinterest! Please share a pic of your finished product with me. I’d love to see it!


Hi! I’m really enjoying this CAL. I struggled with the corners in part 2 because I’m left handed and so crochet clockwise or to the right. I made some modifications but realized the wrong side looks better than right side for those sections. Now more corners! Can you give any suggestions for us left handers when the patterns has us attach from the right most stitch on a side? This doesn’t work for us as our next stitch would be the corner. I suspect part 4 may work out ok if we just started in the left most chain 2 instead of right most. This section is not as complicated, at first glance, as the shell crochet corners.
Hi! I think it should work if you join to the left instead 🙂
Are we supposed to have 57or 59 stitches per side at the end of week 3? Video for week 4 says 59, printed pattern says 57?
Hi! You should have 59 per side. The printed pattern says to dc in next 57 (not that there are 57 total)
Thank you! Loving this pattern!!
Gosh I’m really struggling with these corners. I’m missing something as I’m off count every time 🤦🏻♀️ I think I need to rewatch the video again. Ugh !! Glad I got 2 weeks to figure it out
I am left handed also just attach to opposite. end.
These CAL anticipations are well worth the wait with such beautiful and easy to use patterns, Thank you for sharing and keep up the great work for us.
Thank you so much!
Do you pull the thread from the top or bottom of the cake.
Hi! I like to pull from the middle 🙂
I’m enjoying my Friday night homework immensely !! Thank you so much Breann !
Are you posting Part 6 on February 11 or February 18th? Just wondering if we get new part now or if we have to wait another week. Love the pattern and having so much fun. Thsnk you so much for sharing your creation!
I was looking forward to Part 6 today. Haven’t seen it yet…
It published this morning at 6AM MST https://www.hookedonhomemadehappiness.com/mandala-blanket-crochet-along-part-6/
Hi Breann,
I’m using the same the same colorway as you used in the video and was wondering how many rows did you do in the pink color before switching to green?
Sandy
Hi! I just let the yarn flow 🙂