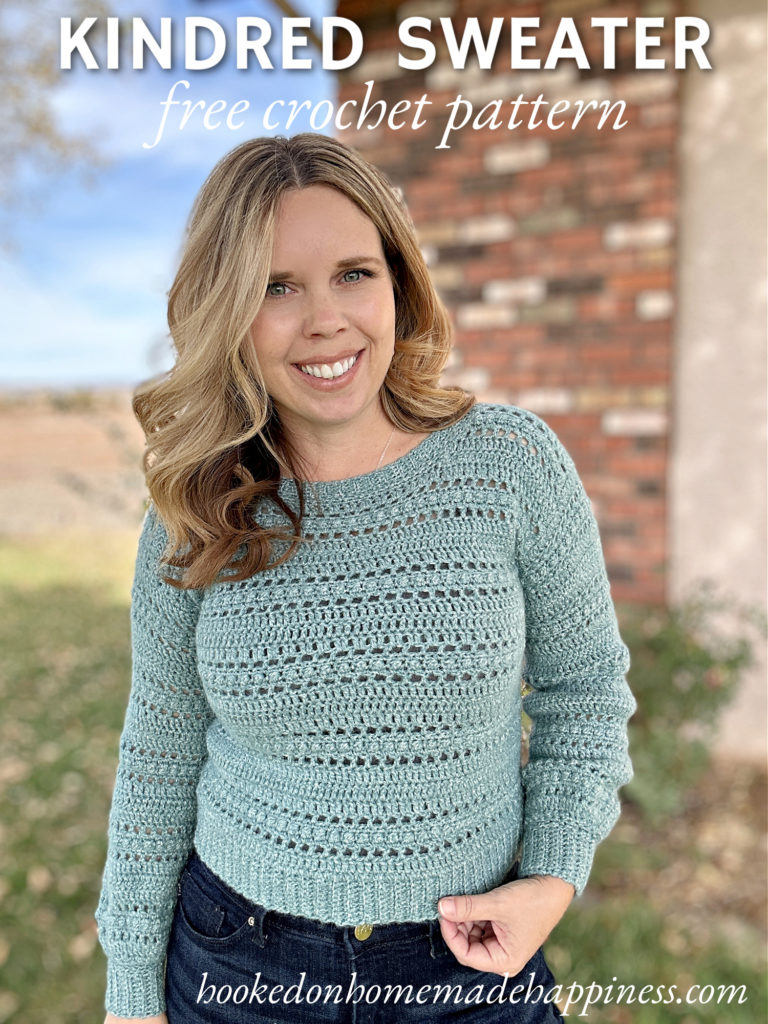
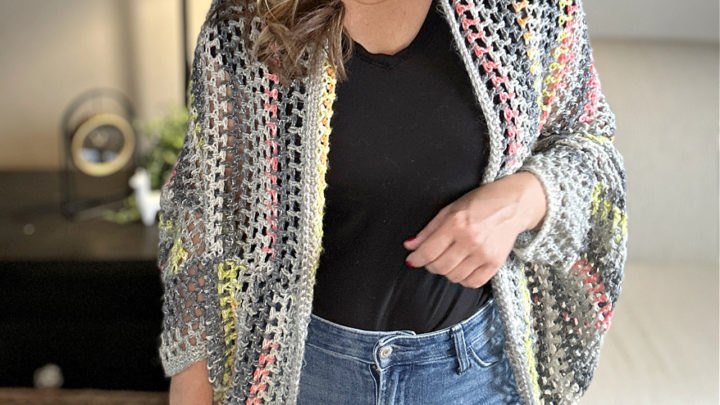
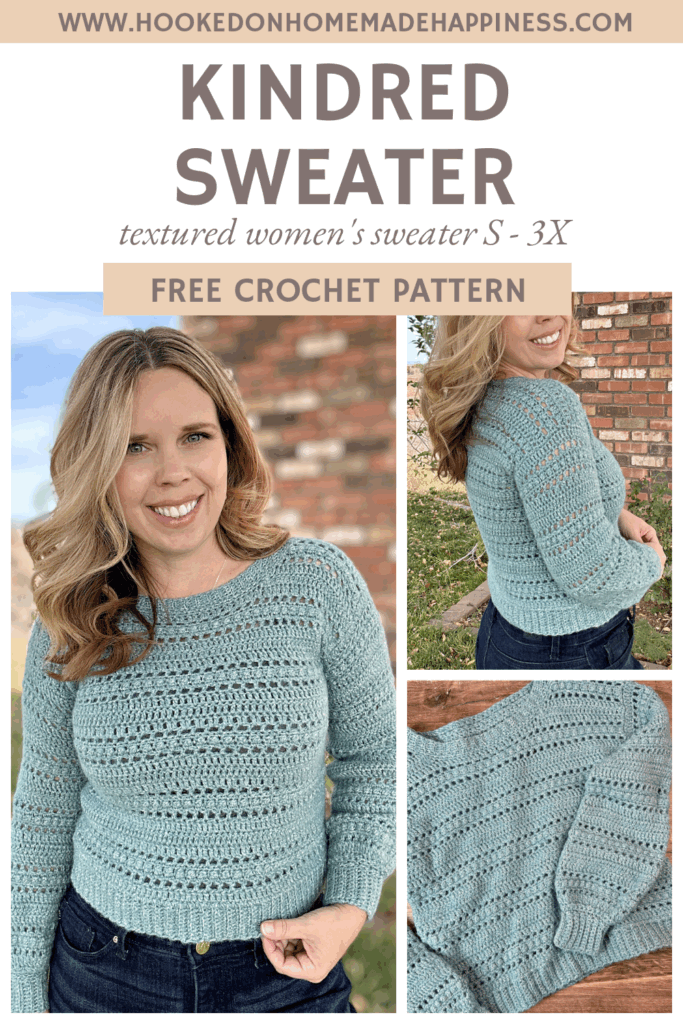
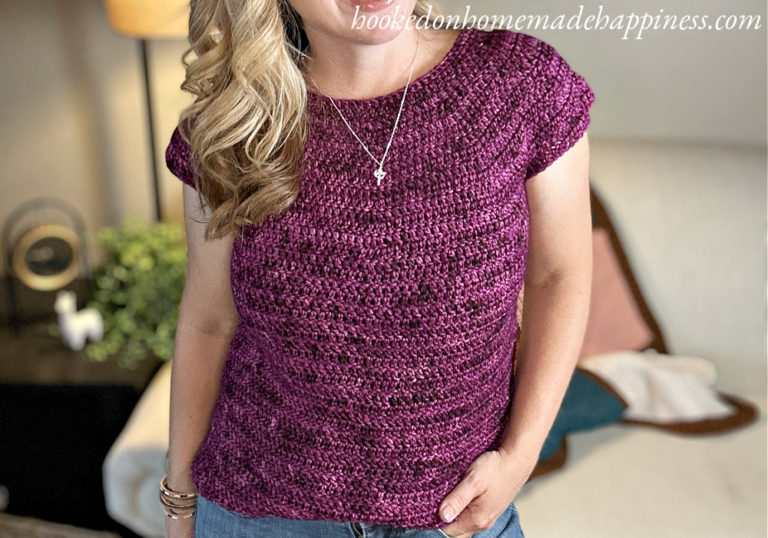
Kindred Sweater Crochet Pattern
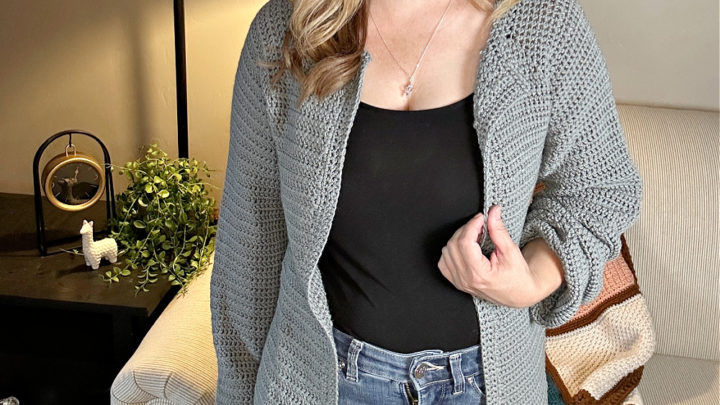
If you love cozy textures and classic details, the Kindred Sweater Crochet Pattern is one you’ll truly enjoy making. This sweater blends beautiful stitch work with timeless construction—perfect for creating a handmade piece you’ll reach for again and again.
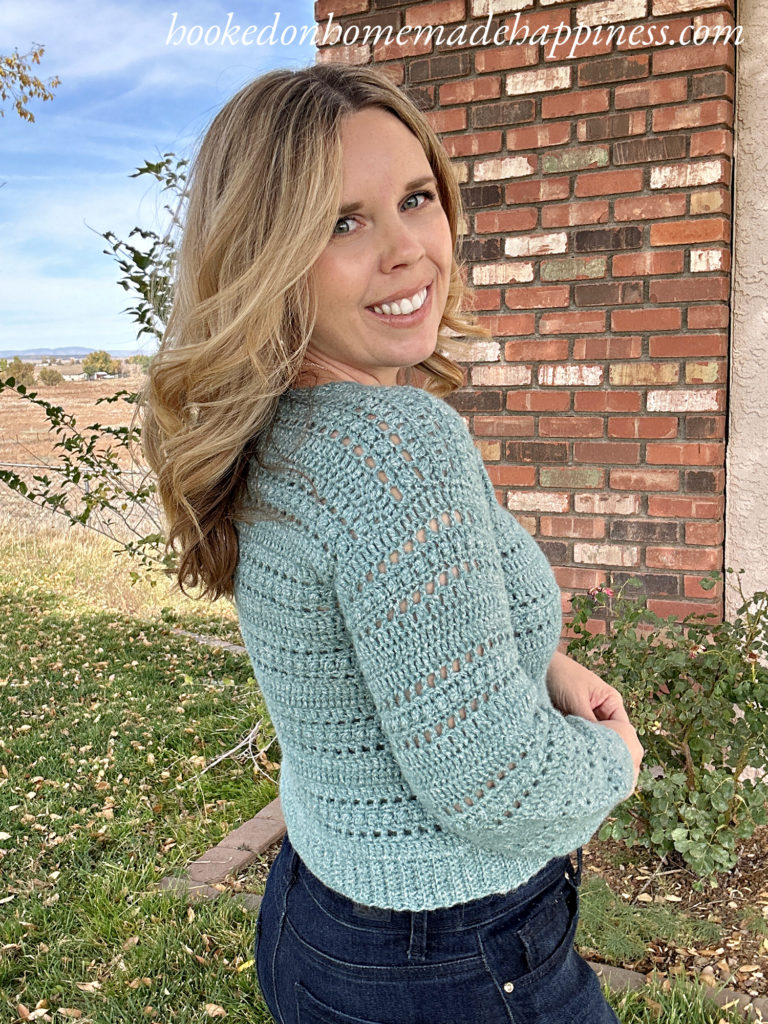
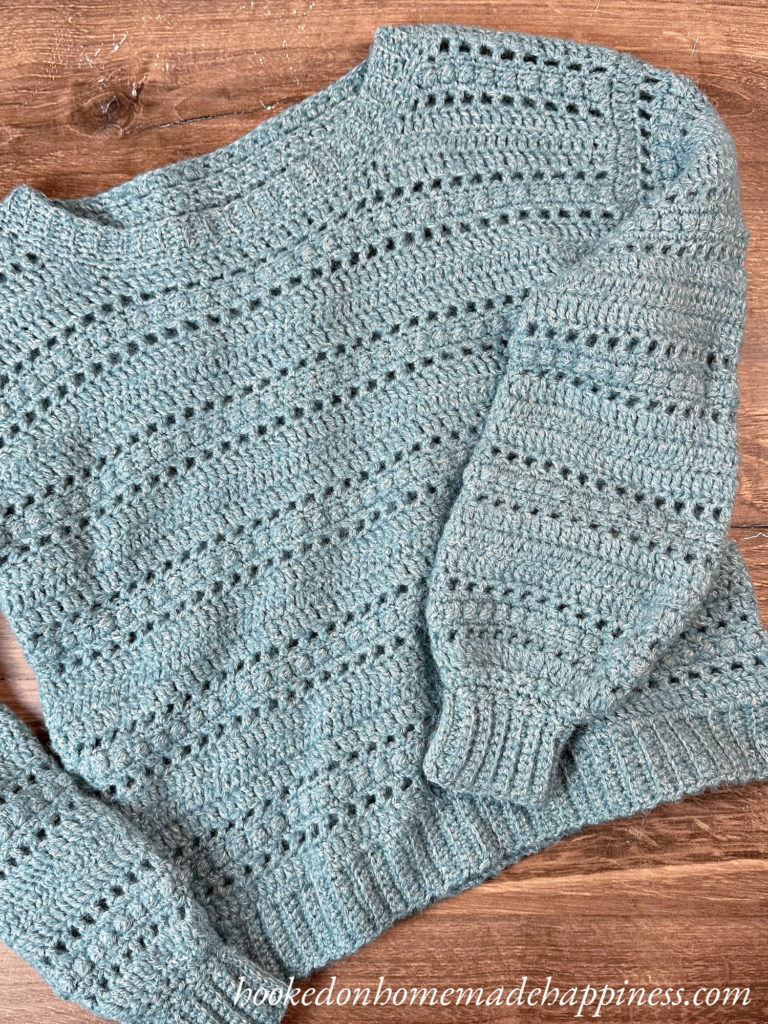
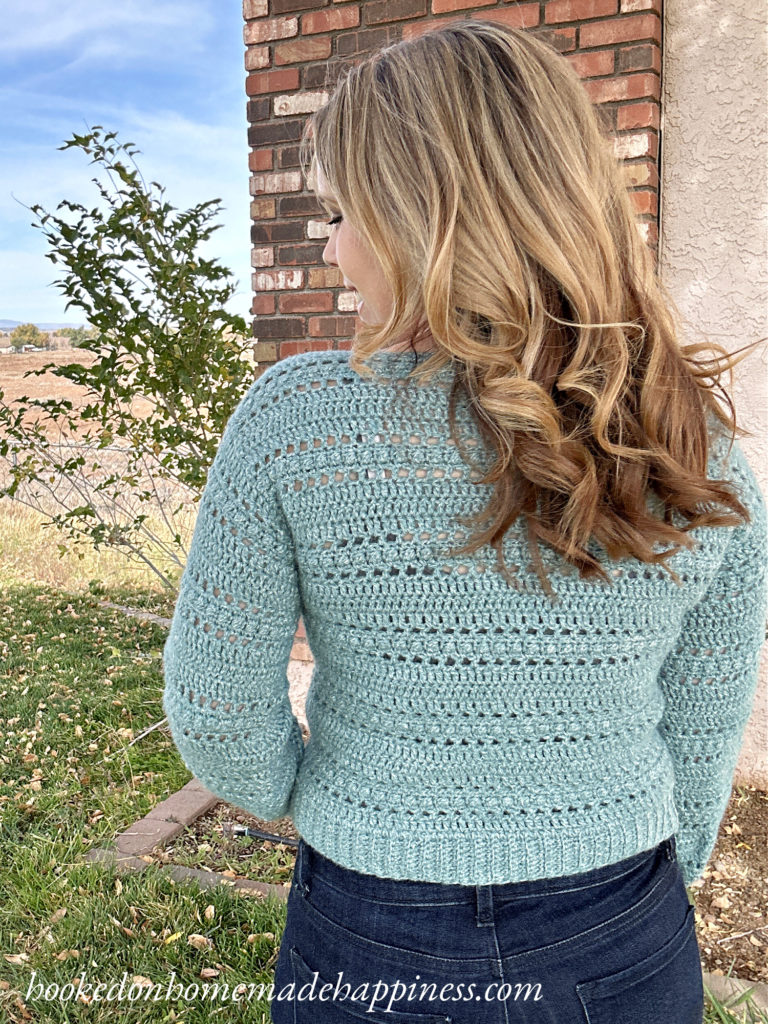
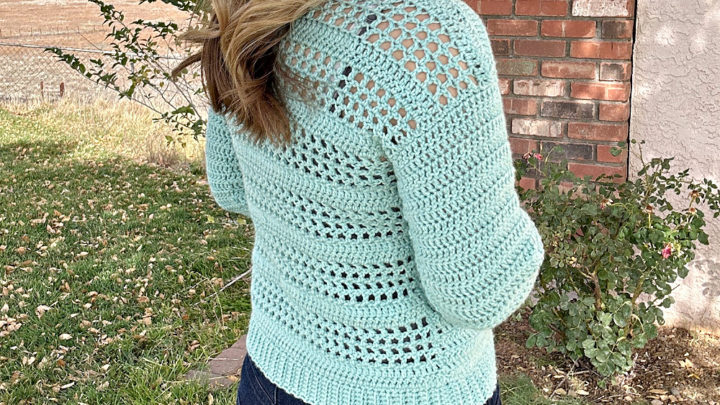
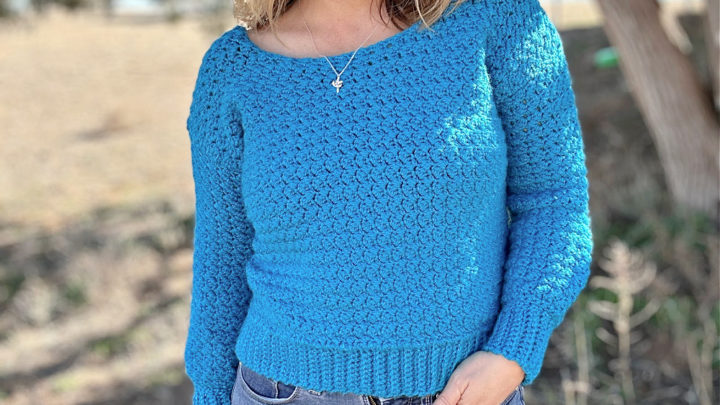
Designed with a ribbed hem, collar, and cuffs, the Kindred Sweater has a polished finish while still feeling warm and relaxed. The body features a lovely mix of filet stitches and berry stitches, adding visual interest and soft texture without being overwhelming. It’s a great project if you’re ready to explore texture while still keeping things approachable and enjoyable.
Purchase the ad-free, printable PDF for easy printing.
Why You’ll Love the Kindred Sweater
- Cozy, wearable design with timeless appeal
- Textured stitches that look impressive but are easy to follow
- Ribbed hem, collar, and cuffs for a finished, professional look
- Uses DK weight yarn—easy to substitute with what you already have
- Perfect for fall, winter, and layering in early spring
This sweater is all about slowing down, enjoying the process, and creating something meaningful—just like its name suggests.
Yarn + Materials
Originally, this sweater was designed using Kindred Yarn, which has since been discontinued. The good news? This pattern works beautifully with any DK weight yarn, making it easy to customize with your favorite fibers and colors.
You’ll Need:
- DK weight yarn (yardage listed in the pattern by size)
- Crochet hook (size listed in the pattern)
- Stitch markers
- Yarn needle
- Scissors
✨ Tip: Choose a smooth DK yarn to really let the filet and berry stitches shine.
Stitch Details
The Kindred Sweater stands out thanks to its thoughtful texture:
- Filet stitches create an airy, balanced fabric that keeps the sweater comfortable and wearable.
- Berry stitches add pops of texture and dimension, giving the sweater its signature look.
- Ribbing at the hem, collar, and cuffs frames the design and helps the sweater hold its shape beautifully.
The stitch pattern is rhythmic and relaxing once you get going—perfect for cozy evenings with your favorite show or podcast.
Construction Overview
This sweater is thoughtfully constructed to keep things clear and manageable:
- Ribbed hem worked for structure and comfort
- Textured main body using filet and berry stitches
- Sleeves finished with ribbed cuffs
- Ribbed collar added for a cozy, pulled-together neckline
The pattern is written in a clear, step-by-step format so you always know what comes next.
Skill Level
Advanced Beginner / Confident Beginner
If you’re comfortable with basic crochet stitches and ready to try light texture work, this pattern is a wonderful next step. Detailed instructions guide you through each section, so you can crochet with confidence.
FAQ
Ready to Crochet?
The Kindred Sweater Crochet Pattern is all about connection—to your craft, your yarn, and the joy of making something by hand. With its beautiful textures and classic ribbed details, this sweater is a piece you’ll be proud to wear and share.
Grab your favorite DK yarn, settle into a cozy spot, and enjoy every stitch.
Kindred Sweater Crochet Pattern
Get the full free pattern below or purchase the ad-free, printable PDF

Materials
WeCrochet Kindred Yarn in Wintergreen ((8, 9, 10) (11, 12, 13) skeins)
G+/4.5 mm hook
Yarn needle
Scissors
Level
intermediate
Pattern notes & stitches to know
ch – chain
sl st – slip stitch
sc – single crochet
sc blo – single crochet back loop only
dc – double crochet
hdc – half double crochet
berry – yarn over, insert hook into stitch, yarn over, pull up a loop, yarn over, pull through one loop on hook, yarn over, insert hook into stitch,
yarn over, pull up a loop, yarn over, pull through all 5 loops on hook
sc2tog – single crochet 2 together
sc3tog – single crochet 3 together
dc2tog – double crochet 2 together
dc3tog – double crochet 3 together
rs – right side
ws – wrong side
· written in US terms
· ch 1 does not count as sc or berry
· ch 2 does not count as dc or hdc
· This sweater is made with the front and back panels being sewn together, and then the sleeves are added.
· The front and back panels both start with the ribbing along the bottom.
· Gauge: 6 dc x 3 rows = 1.5” x 1.5”
Sizes:
(S, M, L) (XL, 2X, 3X) – The pattern is written in these sizes consecutively. Example, when the pattern gives the end of row count ((71, 79, 87) (95, 103, 111) sc) the 71 is for S, 79 is M, 87 is L, 95 is XL, 103 is 2X, 111 is 3X.
This sweater is a classic fit with no positive ease
Approx Finished Size:
Bust: S (33”) M (37”) L (41”) XL (45”) 2X (49”) 3X (53”)
Length: S (17”) M (17”) L (17.75”) XL (17.75”) 2X (18.5”) 3X (18.5”)
Armhole Width: S (6.5”) M (7”) L (7.5”) XL (8”) 2X (8.5”) 3X (9”)
Sleeve Length (from the neckline): S (22”) M (22”) L (22.75”) XL (22.75”) 2X (23.5”) 3X (23.5”)
Size Small pictured. I am 5’0” with 34” bust
Pattern Support
Looking for pattern support or want to share your progress? Join our Crochet Community Facebook Group! It’s the perfect place to ask questions, get help, and connect with fellow makers.
CROCHET PATTERN WRITTEN INSTRUCTIONS
FRONT
ch 11
Row 1: sc in 2nd ch from the hook and across (10 sc)
Row 2: ch 1, turn, sc in first stitch, sc blo in next 8 stitches, sc in last (10)
Row 3 – (71, 79, 87) (95, 103, 111): repeat row 2 (10)
The ribbing is the width of the sweater, easily adjust the width by adding or taking out rows (you need an odd number of ribbing rows)
Now you will turn and work across the long edge of the ribbed band
Row 1 (ws): ch 1, sc evenly across, working 1 sc in the end of each row ((71, 79, 87) (95, 103, 111) sc)
Row 2 (rs): ch 2, turn, dc in each stitch across ((71, 79, 87) (95, 103, 111) dc)
Row 3 (ws): ch 2, turn, hdc in same stitch, *ch 1, skip 1 stitch, hdc in next* repeat from * to * across ((36, 40, 44) (48, 52, 56) hdc)
Row 4 (rs): ch 1, turn, sc in each stitch and ch space across ((71, 79, 87) (95, 103, 111) sc)
Row 5 (ws): ch 1, turn, sc in first stitch, *berry in next, sc in next* repeat from * to * across ((71, 79, 87) (95, 103, 111))
Row 6 (rs): ch 1, turn, sc in each stitch across ((71, 79, 87) (95, 103, 111) sc)
Row 7 (ws): ch 2, turn, hdc in same stitch, *ch 1, skip 1 stitch, hdc in next* repeat from * to * across ((36, 40, 44) (48, 52, 56) hdc)
Row 8 – 10: ch 2, turn, dc in each stitch across ((71, 79, 87) (95, 103, 111) dc)
Row 11 – 40: repeat rows 3 – 10
The neckline begins in the next row. One side of the neckline is made first, then rejoin to make the other side. You will only work partway across the row.
Row 41 (ws): ch 2, turn, dc in (21, 25, 29) (33, 37, 41) stitches, dc3tog ((22, 26, 30) (34, 38, 42) dc)
Row 42 (rs): ch 2, turn, dc2tog, dc in remaining stitches across ((21, 25, 29) (33, 37, 41) dc)
Row 43 (ws): ch 2, turn, hdc in same stitch, *ch 1, skip 1 stitch, hdc in next* repeat from * to * across ((11, 13, 15) (17, 19, 21) hdc)
Row 44 (rs): ch 1, turn, sc3tog, sc in remaining stitches and ch spaces across ((19, 23, 27) (31, 35, 39) sc)
Row 45 (ws): ch 1, turn, sc in first stitch, *berry in next, sc in next* repeat from * to * across ((19, 23, 27) (31, 35, 39))
Row 46 (rs): ch 1, turn, sc3tog, sc in remaining stitches across ((17, 21, 25) (29, 33, 37) sc)
Row 47 (ws) – Row (48, 48, 50) (50, 52, 52): continue with pattern repeat of rows 3 – 10
Or until desired length.
Fasten off. Leave a long end for sewing.
Next the other side of the neckline is made. Lay front with ws facing out. Rejoin yarn on the left side, (24, 28, 32) (36, 40, 44) stitches in from the left on row 41.
Row 41 (ws): ch 2, dc3tog, dc in each stitch across ((22, 26, 30) (34, 38, 42) dc)
Row 42 (rs): ch 2, turn, dc in each stitch across to the last 2, dc2tog ((21, 25, 29) (33, 37, 41) dc)
Row 43 (ws): ch 2, turn, hdc in same stitch, *ch 1, skip 1 stitch, hdc in next* repeat from * to * across ((11, 13, 15) (17, 19, 21) hdc)
Row 44 (rs): ch 1, turn, sc across in each stitch and ch space to last 3 stitches, sc3tog ((19, 23, 27) (31, 35, 39) sc)
Row 45 (ws): ch 1, turn, sc in first stitch, *berry in next, sc in next* repeat from * to * across ((19, 23, 27) (31, 35, 39))
Row 46 (rs): ch 1, turn, sc in each stitch across to the last 3 stitches, sc3tog ((17, 21, 25) (29, 33, 37) sc)
Row 47 (ws) – Row (48, 48, 50) (50, 52, 52): continue with pattern repeat of rows 3 – 10
Or until desired length.
Do not fasten off.
COLLAR
Working along the curved neckline, sc evenly (approx 1 sc in the end of each row) around to the opposite corner of the neckline
ch 6
Row 1: sc in 2nd ch from the hook and across, join to sc in the sc row of the collar with sl st (5 sc)
Row 2: sl st to next stitch in the sc row of the collar, turn, sc in first stitch, sc blo in next 3, sc in last stitch
Row 3: ch 1, turn, sc in the first stitch, sc blo in next 3, sc in the last stitch, sl st to the next sc in the sc row of the collar (5 sc)
Repeat rows 2 & 3 until you work all the way around the collar.
Fasten off. Weave in the ends.
BACK
ch 11
Row 1: sc in 2nd ch from the hook and across (10 sc)
Row 2: ch 1, turn, sc in first stitch, sc blo in next 8 stitches, sc in last (10)
Row 3 – (71, 79, 87) (95, 103, 111): repeat row 2 (10)
Now you will turn and work across the long edge of the ribbed band
Row 1 (ws): ch 1, sc evenly across, working 1 sc in the end of each row ((71, 79, 87) (95, 103, 111) sc)
Row 2 (rs): ch 2, turn, dc in each stitch across ((71, 79, 87) (95, 103, 111) dc)
Row 3 (ws): ch 2, turn, hdc in same stitch, *ch 1, skip 1 stitch, hdc in next* repeat from * to * across ((36, 40, 44) (48, 52, 56) hdc)
Row 4 (rs): ch 1, turn, sc in each stitch and ch space across (71, 79, 87) (95, 103, 111) sc)
Row 5 (ws): ch 1, turn, sc in first stitch, *berry in next, sc in next* repeat from * to * across (71, 79, 87) (95, 103, 111))
Row 6 (rs): ch 1, turn, sc in each stitch across (71, 79, 87) (95, 103, 111) sc)
Row 7 (ws): ch 2, turn, hdc in same stitch, *ch 1, skip 1 stitch, hdc in next* repeat from * to * across ((36, 40, 44) (48, 52, 56) hdc)
Row 8 – 10: ch 2, turn, dc in each stitch across ((71, 79, 87) (95, 103, 111) dc)
Row 11 – Row (48, 48, 50) (50, 52, 52): repeat rows 3 – 10
Or until desired length.
Fasten off. Weave in the ends.
SEWING
With ws facing out, lay the front panel on top of the back. Sew the shoulders closed with whipstitch. Sew the sides closed leaving a (6.5”, 7”, 7.5”) (8”, 8.5”, 9”) space at the top for armholes.
Fasten off. Weave in the ends.
Turn right side out.
SLEEVES
With rs facing out, join to the bottom of an armhole.
Round 1(rs): ch 1, sc evenly around the armhole (this number needs to be an even number)
Round 2 (rs): ch 2, dc in each stitch around, join to first dc with sl st
Round 3 (ws): ch 2, turn, hdc in first stitch, ch 1, skip 1 stitch, *hdc in next, ch 1, skip 1 stitch* repeat from * to * around, join to first hdc with sl st
Round 4 (rs): ch 1, turn, sc in each stitch and ch space around, join to first sc with sl st
Round 5 (ws): ch 1, turn, sc in first stitch, berry in next, *sc in next, berry in next* repeat from * to * around, join to first sc with sl st
Round 6 (rs): ch 1, turn, sc in each stitch around, join to first sc with sl st
Round 7 (ws): ch 2, turn, hdc in first stitch, *ch 1, skip 1 stitch, hdc in next* repeat from * to * across
Round 8 – 10: ch 2, turn, dc in each stitch around
Round 11 – (40, 40, 42) (42, 44, 44): repeat rows 3 – 10
or until 2” short of desired sleeve length
Round (41, 41, 43) (43. 45. 45): ch 1, turn, sc2tog around, join to first sc with sl st
Round (42, 42, 44) (44, 46, 46): ch 1, turn, sc in each stitch around, join to firs sc with sl st
CUFF
ch 11
Row 1: sc in 2nd ch from the hook and in each ch across, join to the last round of the sleeve with sl st (10 sc)
Row 2: sl st to next stitch in the last round of the sleeve, turn, sc in first stitch, sc blo in next 6, sc in last stitch (10 sc)
Row 3: ch 1, turn, sc in the first stitch, sc blo in next 6, sc in the last stitch, sl st to the last round of the sleeve (10 sc)
Repeat rows 2 & 3 until you work all the way around the sleeve. Sew the cuff closed with a whip stitch
Fasten off. Weave in the ends.
Repeat for other sleeve.
And you’re done! I hope you love this sweater!
Looking for more patterns? Follow me on Facebook, Instagram, and Pinterest! Please share a pic of your finished product with me. I’d love to see it!


Hi,
I can’t wear alpaca. I really would like to try this sweater but need a substitute yarn. Do you have a good cotton recommendation? Thanks!
Bobbie Calgaro
CotLin from WeCrochet would be great!
Thanks for the suggestion! I really appreciate it!
Bobbie
On the sleeves, it says attach to bottom of armhole and chain 11, then proceeds to row 1 with sc around the arm with even stitches. Is the chain 11 a typo?
Yes, sorry!! That should only be for the cuff of the sleeve.
Loving this sweater! I’m looking at the pattern and wondering two things 1) Is there ribbing on the back of the sweater and 2) can I substitute a FPDC/BPDC?
Thank you! There is ribbing across the bottom for the back. Yes you could use FPDC/BPDC is you prefer 🙂
Oops! I omitted an important thing.
I was wondering about ribbing along the back neckline.
Apologies.
There is no ribbing on the back along the neckline
I love this jumper I made it with Drops cotton merino and added a rib on the back piece too to finish the collar. It has come up a little snugger than i thought I am 5’2″ and 32″ in the bust so did small. Am definately planning to make it again in another colour so might go a bit bigger next time. And have checked out and brought some of your etsy patterns. Thank you for such lovely crochet designs!!!
Thank you so much!
Apologies… My question was not asked properly. I was wondering about ribbing around the back neckline.
Ok. Thank you very much!
Hi – row 4 says sc in each stitch & chain space across, but row 8 says dc in each stitch across – shouldn’t it be dc in each stitch & chain space across? I think so, just making sure
Hi! Yes you will dc in each across, including the ch spaces 🙂