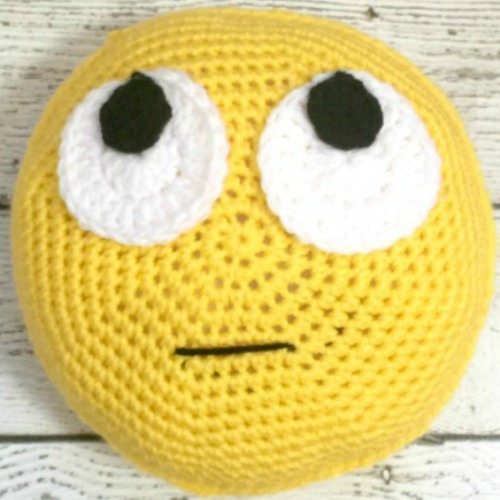
This Emoji Amigurumi Pattern is an easy pattern for a beginner level amigurumi. I am by no means an expert or even seasoned amigurumi crocheter and I found this emoji very doable. I ended up making three of these little stuffies! It was a fun weekend project.

This pattern is available as an inexpensive, clearly formatted, PDF instant download HERE in my Etsy shop.
PATTERN
Materials:
Worsted weight yarn in yellow, white and black (I can’t tell you what brand since I just used what I had on hand)
5.0 mm hook
Yarn needle
Fiberfill
Stitch marker
Level: Intermediate
Pattern Notes & Stitches to Know:
sl st – slip stitch
ch – chain
sc – single crochet
hdc – half double crochet
dc – double crochet
Magic ring
Finished emoji measures approximately 8 inches in diameter.
You will be crocheting in the round for this pattern. Do not join at the end of each round, just continue crocheting around. Be sure to use your stitch marker for the beginning of each round.
EMOJI (make 2 panels)
In yellow start with a magic ring
Round 1: ch 1, sc 8 into ring (8 sc), tighten the ring
NOTE: Remember not to join. Place your stitch marker in the first stitch of next round
Round 2: 2 sc in each stitch around (16 sc)
NOTE: continue moving your stitch marker to the first stitch in each round
Round 3: *sc, 2 sc in next* repeat from * to * around (24 sc)
Round 4: *sc in next 2 stitches, 2 sc in next* repeat from * to * around (32 sc)
Round 5: *sc in next 3 stitches, 2 sc in next* repeat from * to * around (40 sc)
Round 6: *sc in next 4 stitches, 2 sc in next* repeat from * to * around (48 sc)
Round 7: *sc in next 5 stitches, 2 sc in next* repeat from * to * around (56 sc)
Round 8: *sc in next 6 stitches, 2 sc in next* repeat from * to * around (64 sc)
Round 9: *sc in next 7 stitches, 2 sc in next* repeat from * to * around (72 sc)
Round 10: *sc in next 8 stitches, 2 sc in next* repeat from * to * around (80 sc)
Round 11: *sc in next 9 stitches, 2 sc in next* repeat from * to * around (88 sc)
Round 12: *sc in next 10 stitches, 2 sc in next* repeat from * to * around (96 sc)
Round 13: sc in each stitch around (96 sc)
Round 14: sc in each stitch around (96 sc)
Round 15: sc in each stitch around (96 sc)
Fasten off and weave in the ends.

EYES (make 2)
In white start with a magic ring
Round 1: Ch 3, 12 dc into ring, join to the top of first dc, tighten the ring (12 dc)
Round 2: Ch 3, 2 dc in each stitch around, join to the top of the first dc (24 dc)
Leave a long tail for sewing, weave in the other end.
In black start with a magic ring
Round 1: Ch 2, 8 hdc into ring, join to the top of first hdc, tighten the ring (8 hdc)
Round 2: Ch 2, 2 hdc in each stitch around, join to the top of the first hdc (16 hdc)
Leave a long tail for sewing, weave in the other end

Sew the black circles to the top edge of the with circle for the rolling eyes.

Sew the eyes on to one of the panels. Then using your yarn needle and black yarn, sew the straight line for the mouth.
Put panels together, right side facing out, and sew both sides together using a slip stitch. I had the back facing me so the slip stitches would be on the back of the stuffy. When you’re about halfway around, start stuffing with fiberfill.

As you continue to sew around, continue to stuff, stuff, stuff!

Until it’s nice a firm and all sewn up!

Looking for more patterns? Follow me on Facebook, Instagram, and Pinterest! Please share a pic of your finished product with me. I’d love to see it!

NEVER MISS A PATTERN!
Sign up for my newsletter and receive a FREE ebook with 3 of my favorite patterns PLUS patterns straight to your inbox. You’ll also get a heads up about upcoming giveaways, events, and crochet alongs.


lovely little guys my greatgrand kids will love these thank you