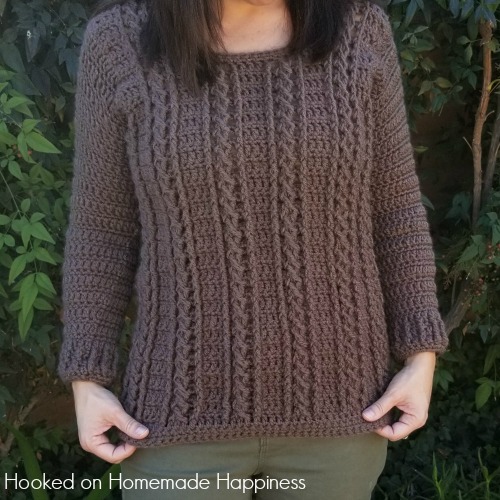
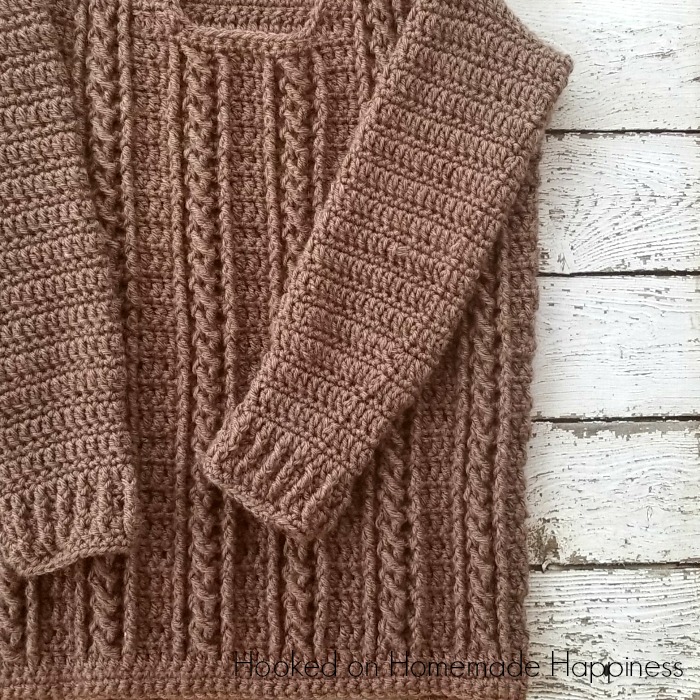
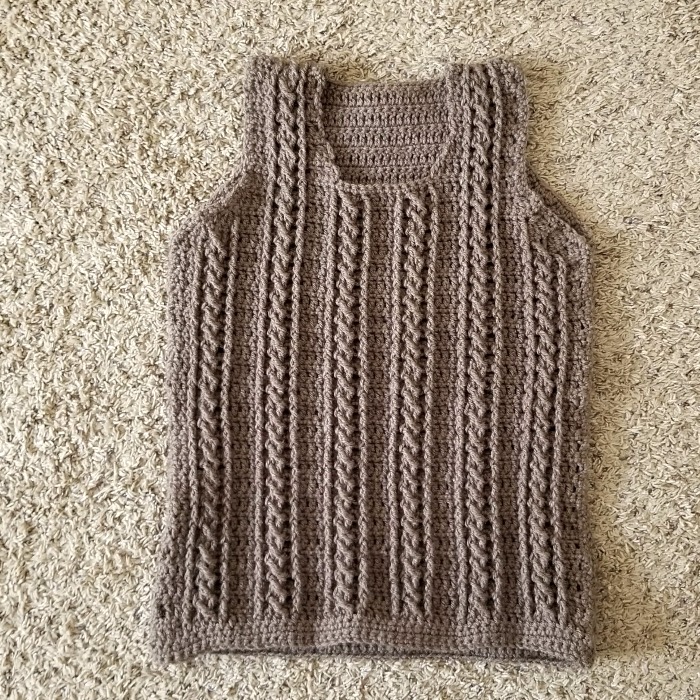
First and foremost, this Cable Crochet Sweater Pattern is a yarn eater!! I had to go back to the store to buy more yarn… TWICE! It’s bad enough that I never estimate enough yarn for a sweater project, but I did it twice with this one!
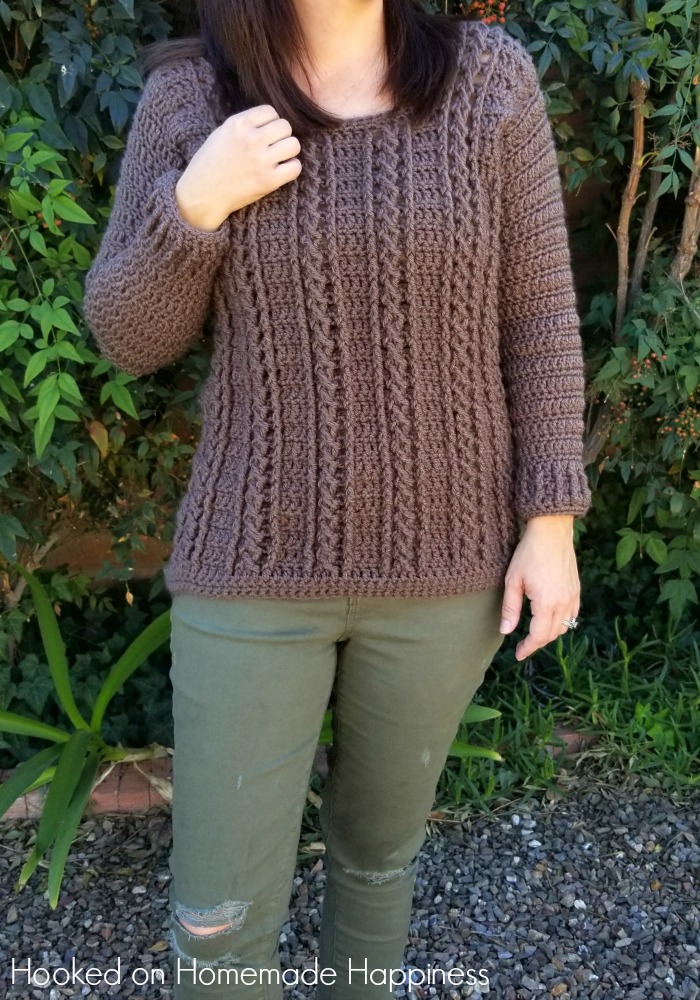
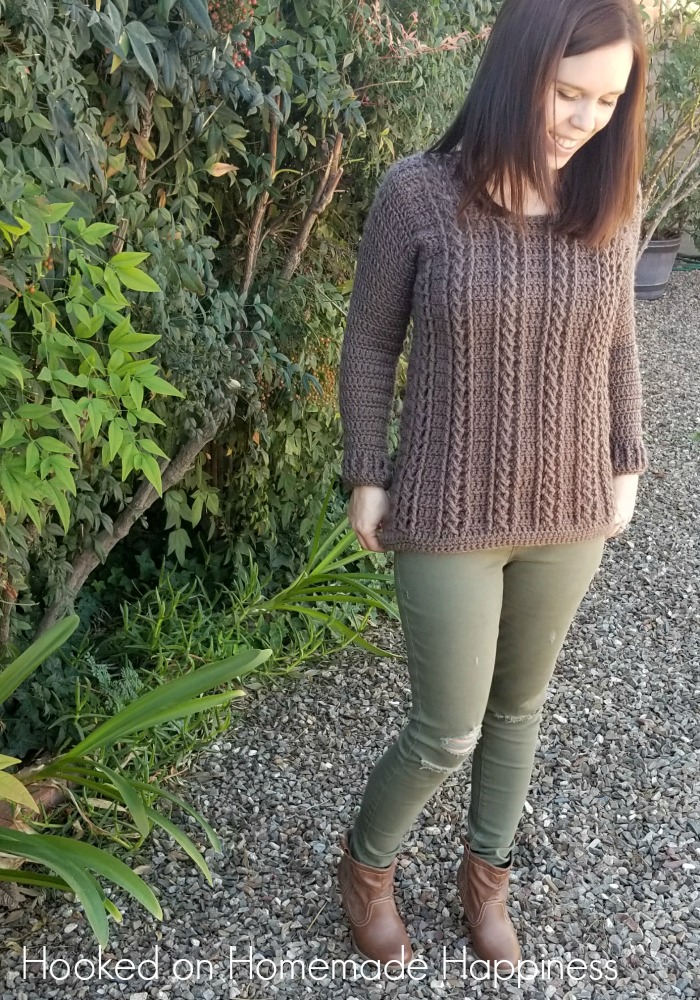
But it was totally worth it because I am absolutely in love with the result. I love the shape and the fit. The pattern is written for approximate sizes in S, M and L. But I’m going to add tips on how to customize the sweater in a different size.
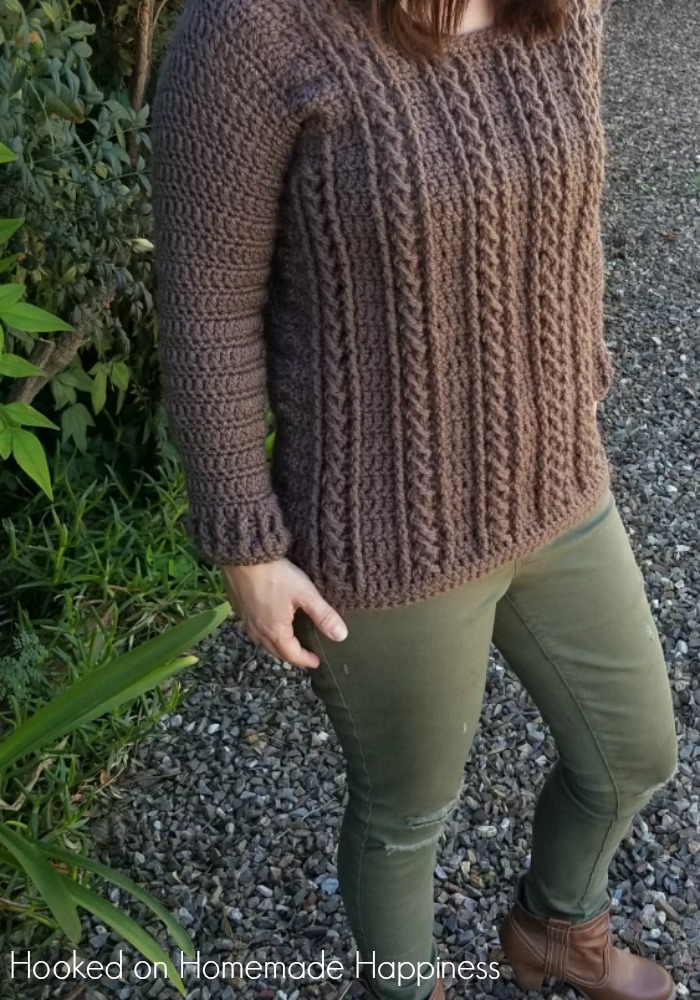
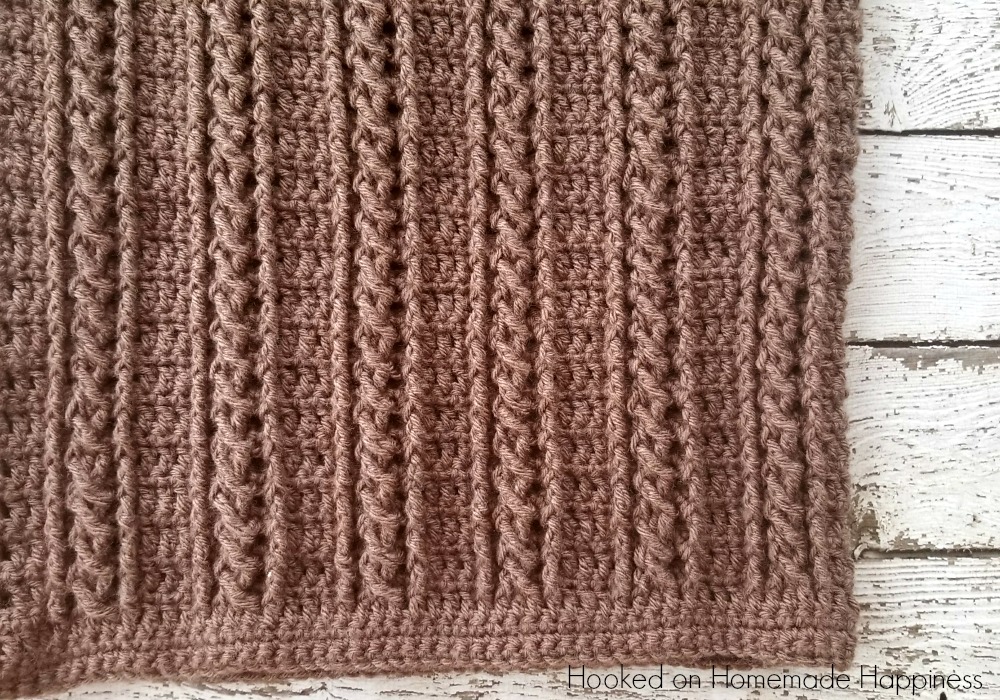
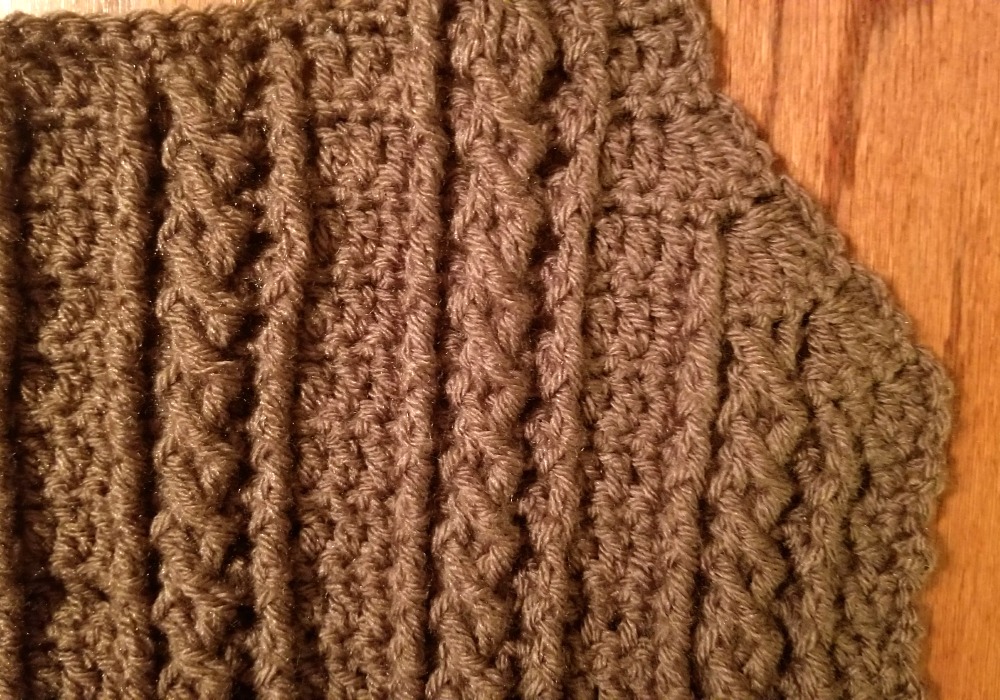
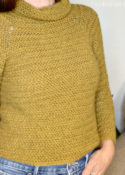
Besides the fit being perfection, would ya look at those cables?!
They give me all the heart eyes!
I admit this pattern was a tricky one to write! So if there are any problems, please let me know 🙂
PATTERN
Materials
6 – 7 skeins Vanna’s Choice in Taupe
5.0 mm hook
Yarn needle
Scissors
Level
Intermediate – Advanced
Pattern Notes & Stitches to Know
sl st – slip stitch
ch – chain
sc – single crochet
dc – double crochet
fptr – front post treble crochet
dc2tog – double crochet 2 together
dc3tog – double crochet 3 together
dc4tog – double crochet 4 together
Chs at the beginning of each round do not count as stitch
Approximate Finished Sizes:
Small (pictured – I’m 5’0″)
Length: 24″
Width: 17.5″
Medium
Length: 26″
Width: 20.5″
Large
Length: 28″
Width: 23.5″
Gauge:
12 dc = 4″
7 rows = 4″
FRONT PANEL
Ch 52 (60) [68]
NOTE: This will be the width of the sweater and can be made in any length that is a multiple of 8 + 4 more ch. Test is across your hips to make the width the size you want (remember it has to be a multiple of 8 + 4 more ch)
Row 1: sc in 2nd ch from the hook and across (51 (59) [67])
Row 2: ch 1, turn, sc in each stitch across (51 (59) [67])
Row 3: ch 1, turn, sc in each stitch across (51 (59) [67])
Row 4: ch 3, turn, dc in each stitch across (51 (59) [67])
Row 5: ch 1, turn, sc in each stitch across (51 (59) [67])
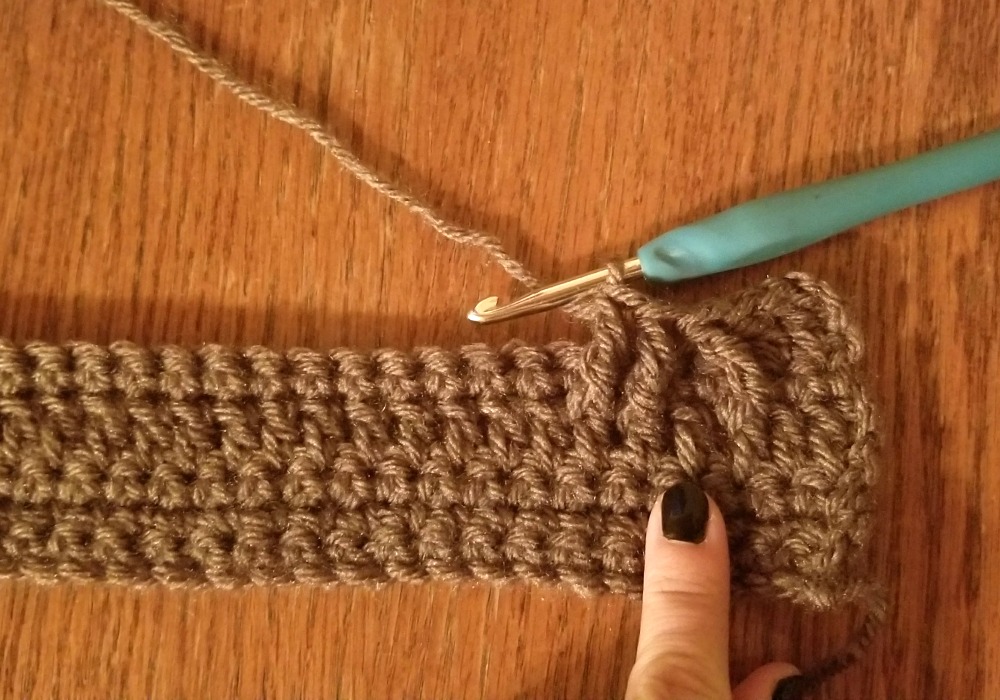
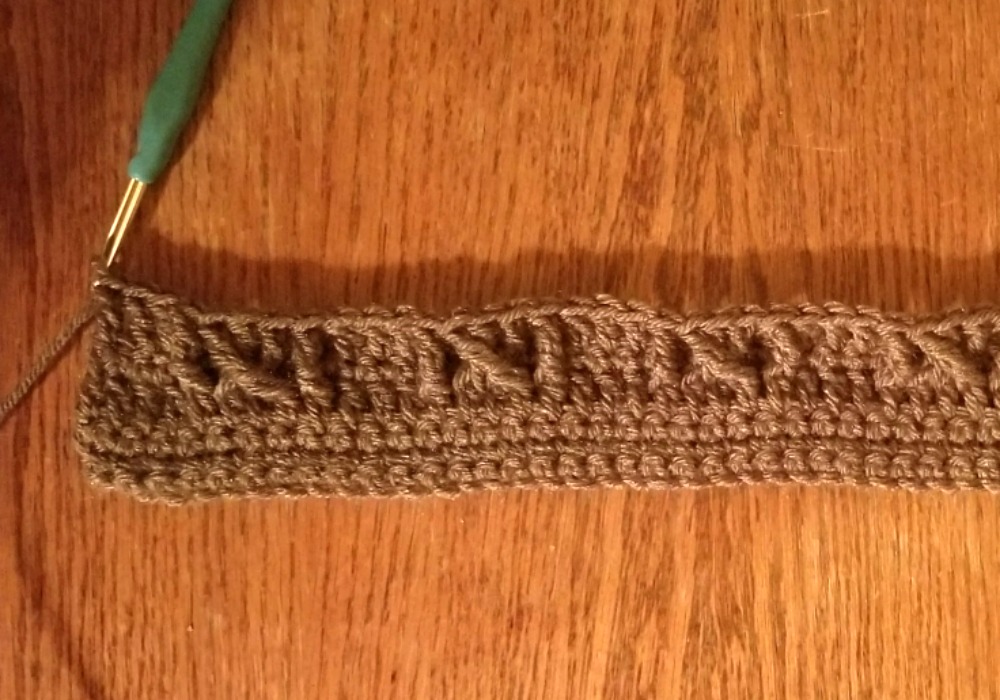
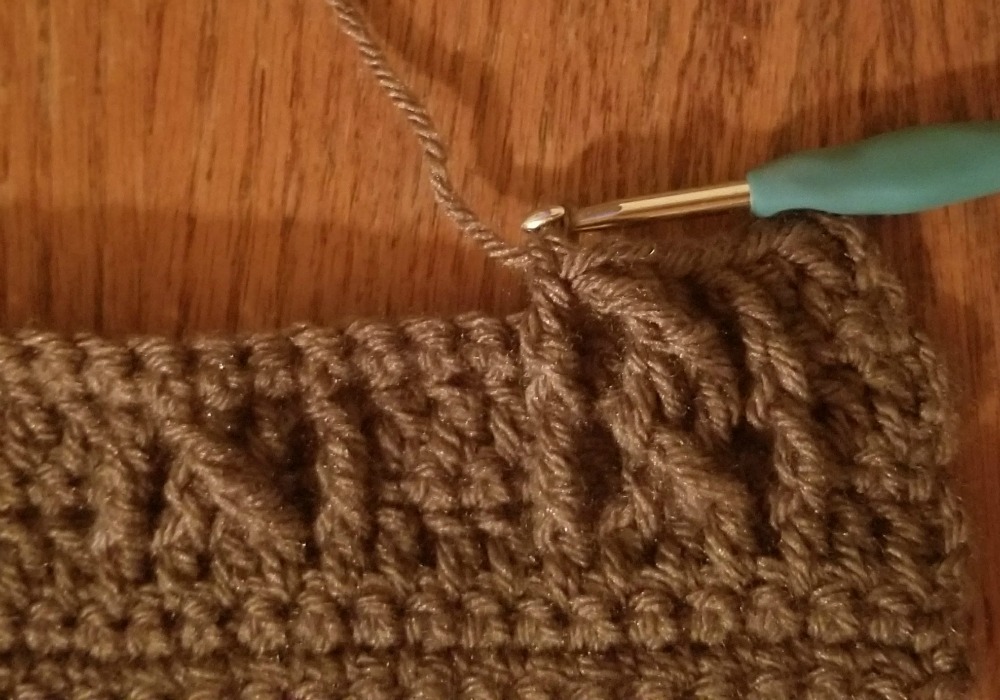
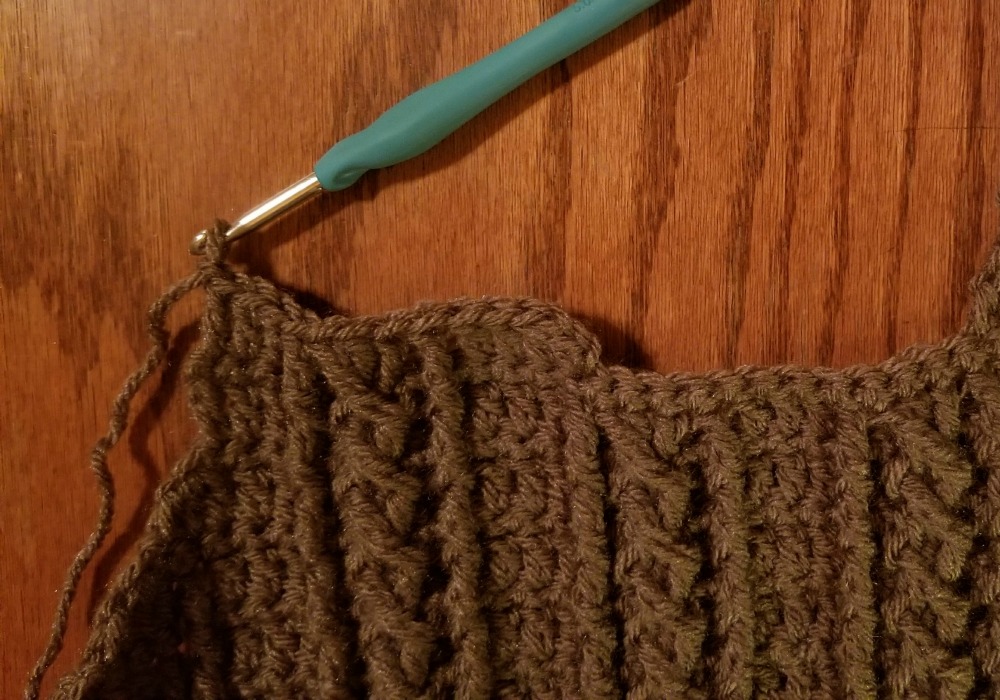
Row 6: ch 3, turn, dc in first 3 stitches, *fptr around next dc in the dc round below (skipping over the sc), skip one stitch, fptr around next 2 dc’s, working in front of the last 2 stitches, fptr over the skipped dc, fptr in next dc, dc in next 3 stitches* repeat from * to * across (6 cables (7 cables) [8 cables])
PHOTO TUTORIAL FOR THE CABLES
fptr around dc from dc row below (not in the sc row)
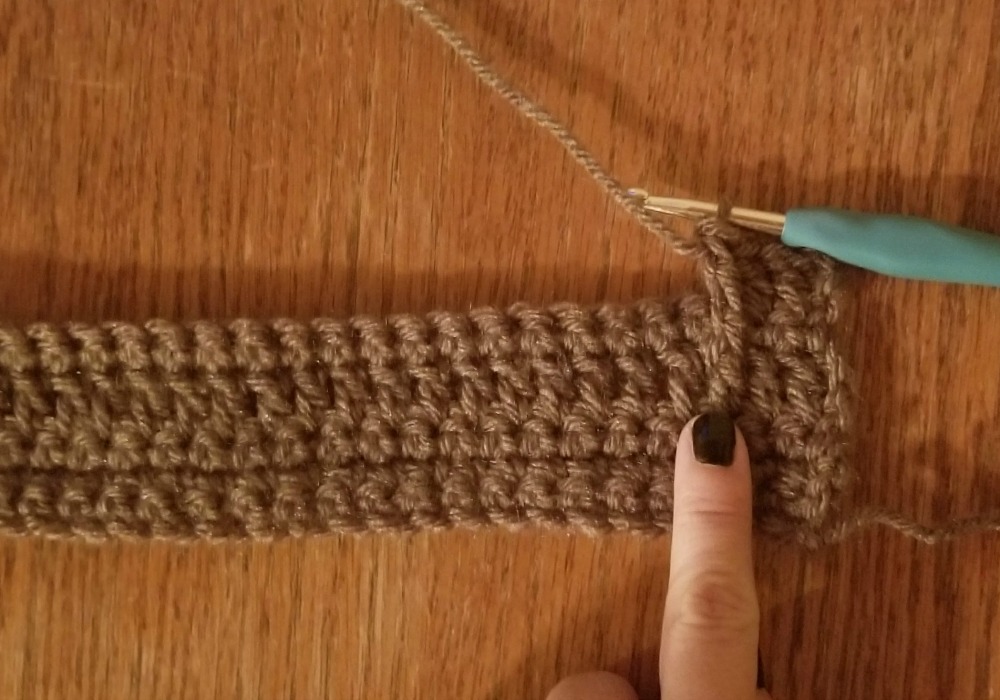
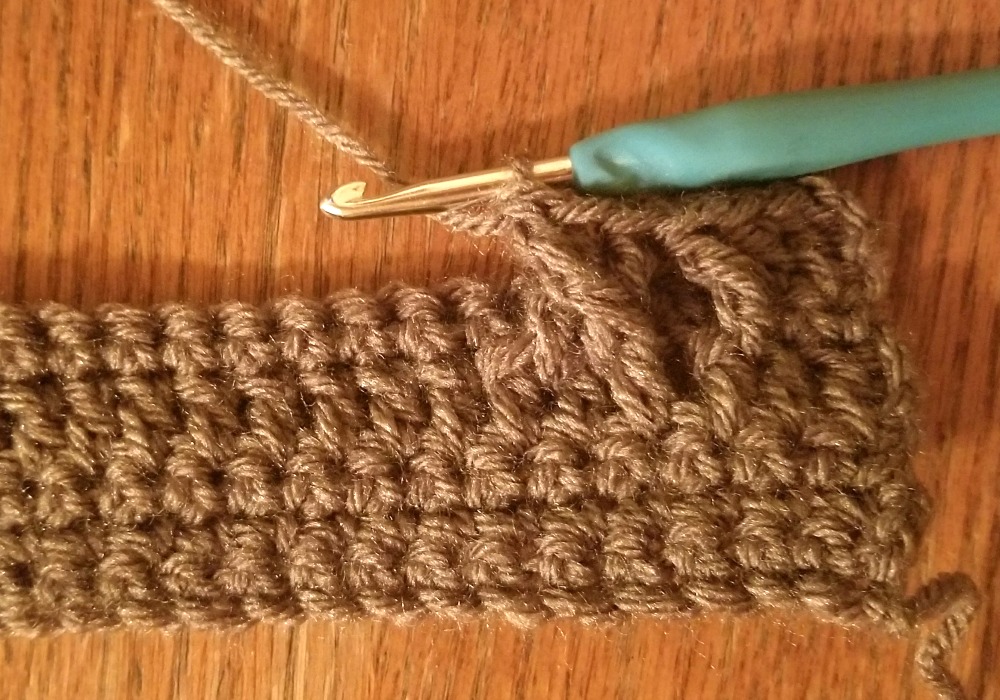
Skip one stitch, fptr in next 2 dc
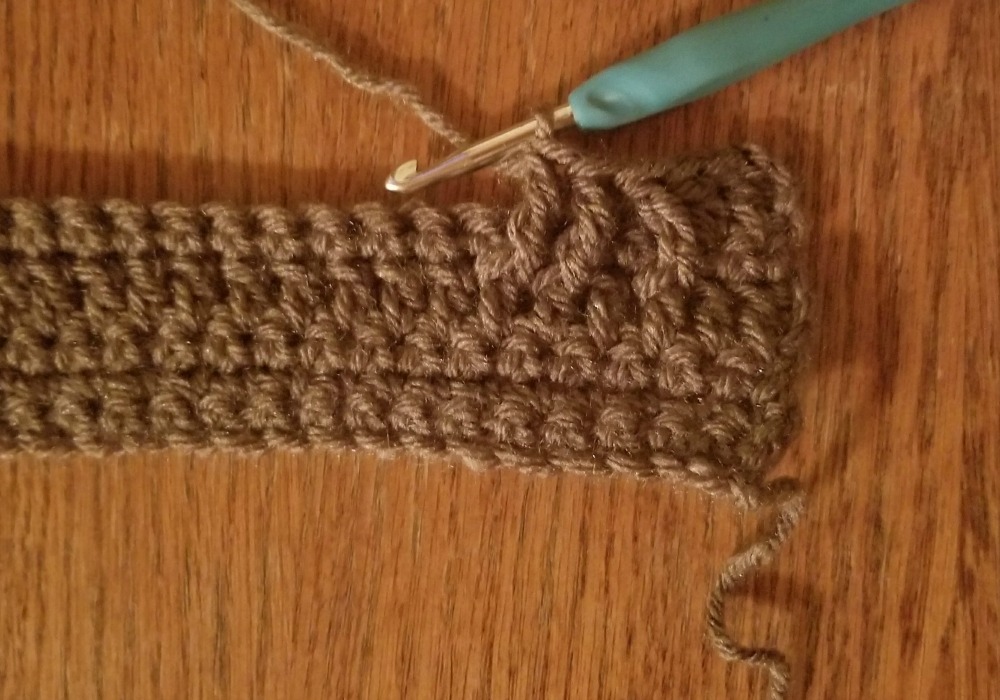
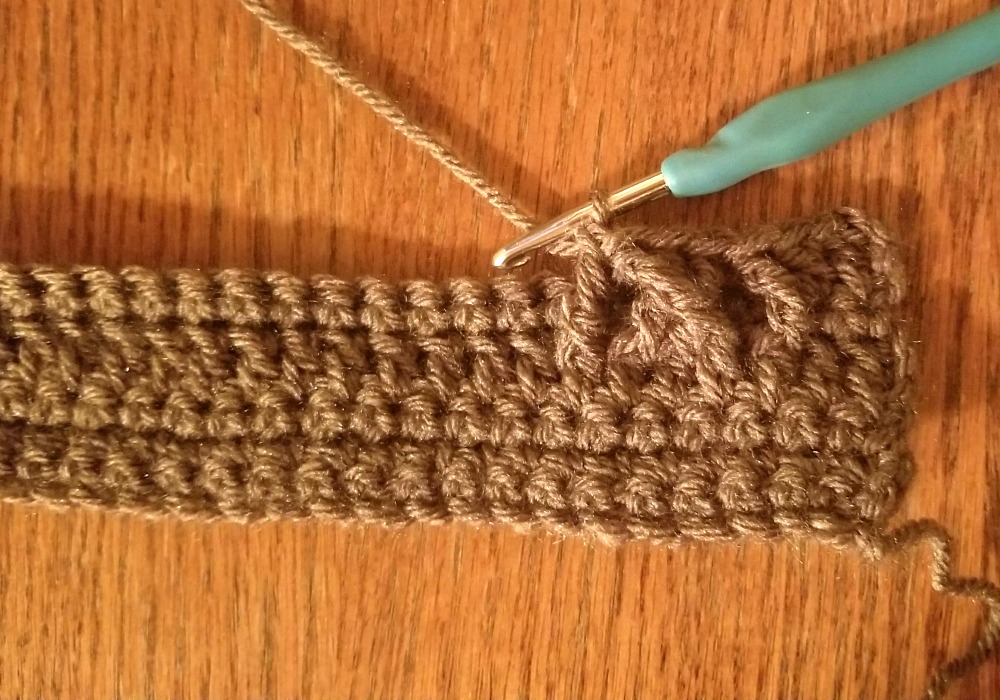
Working in front of the last 2 stitches, fptr in skipped dc
fptr in next
Row 7: ch 1, turn, sc in each stitch across (51 (59) [67])
Row 8: repeat row 6 (6 cables (7 cables) [8 cables])
When working the fptrs, work them around the fptr from the previous dc row
Repeat rows 6 & 7 to row 41 (43) [45}
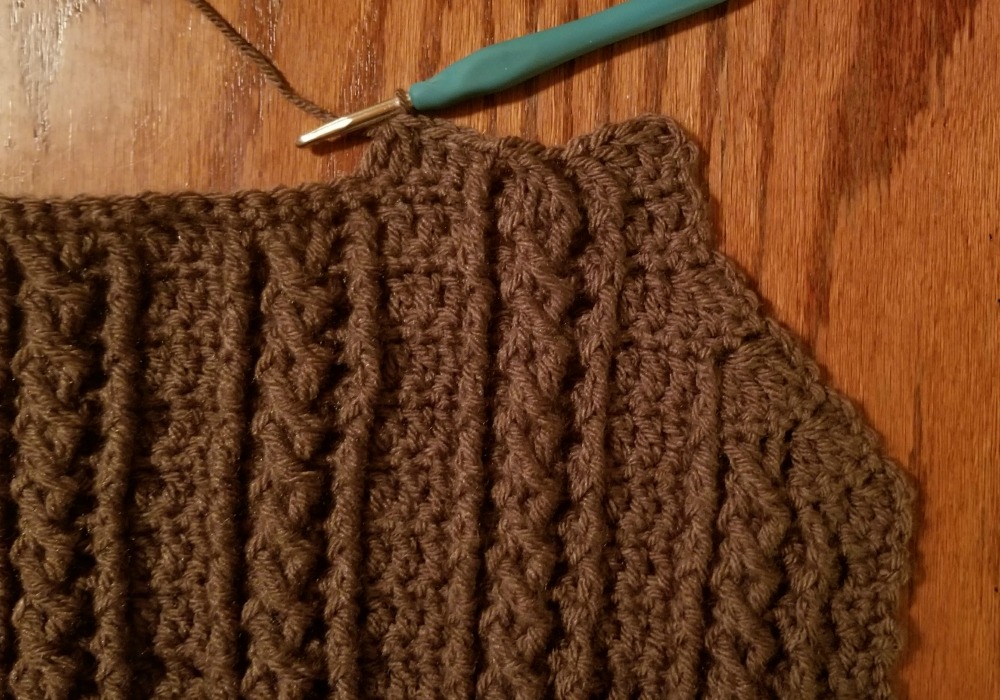
In the next rows you will start decreasing on the side for the shaping around the arm
NOTE: To test the length of the sweater so far hold it up to yourself, the top should be right under your arm and the bottom across the hips. If you want it longer continue repeating rows 6 & 7 until it’s the length you want
Row 42 (44) [46]: ch 3, turn, dc2tog, dc in next, *fptr around next dc, skip one stitch, fptr around next 2 dc’s, working in front of the last 2 stitches, fptr over the skipped dc, fptr in next dc, dc in next 3 stitches* repeat from * to * across to last 2 stitches, dc2tog
Row 43 (45) [47]: ch 1, turn, sc in each stitch across (49 (57) [65])
Row 44 (46) [48]: Ch 3, turn, dc3tog, skip one stitch, fptr around next 2 dc’s, working in front of the last 2 stitches, fptr over the skipped dc, fptr in next dc, dc in next 3 stitches, *fptr around next dc, skip one stitch, fptr around next 2 dc’s, working in front of the last 2 stitches, fptr over the skipped dc, fptr in next dc, dc in next 3 stitches* repeat from * to * across to the last 3 stitches, dc3tog
Row 45 (47) [49]: ch 1, turn, sc in each stitch across (45 (53) [61])
Row 46 (48) [50]: ch 3, turn, dc4tog, fptr around next dc, dc in next 3 stitches, *fptr around next dc, skip one stitch, fptr around next dc’s, working in front of the last 2 stitches, fptr over the skipped dc, fptr in next dc, dc in next 3 stitches* repeat from * to * to the last 4 stitches, dc4tog
Row 47 (49) [51]: ch 1, turn, sc in each stitch across (39 (47) [55])
Row 48 (50) [52]: ch 3, dc3tog, dc in next 2 stitches, *fptr around next dc, skip one stitch, fptr around next 2 dc’s, working in front of the last 2 stitches, fptr over the skipped dc, fptr in next dc, dc in next 3 stitches* repeat from * to * to last 3 stitches, dc3tog
Row 49 (51) [53]: ch 1, turn, sc in each stitch across (35 (43) [51])
Row 50 (52) [54]: ch 3, turn, dc in first 3 stitches, *fptr around next dc, skip one stitch, fptr around next 2 dc’s, working in front of the last 2 stitches, fptr over the skipped dc, fptr in next dc, dc in next 3 stitches* repeat from * to * across
Row 51 (53) [55]: ch 1, turn, sc in each stitch across (35 (43) [51])
In the next rows you will be starting one side of the neck (you will not be working all the way across the row)
Row 52 (54) [56]: ch 3, turn, dc in first 3 stitches, fptr around next dc, skip one stitch, fptr around next 2 dc’s, working in front of the last 2 stitches, fptr over the skipped dc, fptr in next dc, dc in next 2 stitches, dc2tog (11)
Row 53 (55) [57]: ch 1, turn, sc in each stitch across (11)
Row 54 (56) [58]: ch 3, turn, dc in first 3 stitches, fptr around next dc in the dc round below (skipping over the sc), skip one stitch, fptr around next 2 dc’s, working in front of the last 2 stitches, fptr over the skipped dc, fptr in next dc, dc in next stitch, dc2tog (10)
Row 55 (57) [59]: ch 1, turn, sc in each stitch across (10)
Row 56 (58) [60]: ch 3, turn, dc in first 3 stitches, fptr around next dc, skip one stitch, fptr around next 2 dc’s, working in front of the last 2 stitches, fptr over the skipped dc, fptr in next dc, dc in last 2 stitches (10)
Row 57 (59) [61]: ch 1, turn, sc in each stitch across (10)
Row 58 (60) [62]: repeat row 56 (58) [60] (10)
Row 59 (61) [63]: ch 1, turn, sc in each stitch across (10)
Row 60 (62) [64]: repeat row 56 (58) [60] (10)
Row 61 (63) [65]: ch 1, turn, sc in each stitch across (10)
Row 62 (64) [66]: repeat row 56 (58) [60] (10)
Row 63 (65) [67]: ch 1, turn, sc in each stitch across (10)
Stop here for size S
Continue for M & L
Row (66) [68]: repeat row (58) [60] (10)
Row (67) [69]: ch 1, turn, sc in each stitch across (10)
Stop here for size M
Continue for size L
Row [70]: repeat row [60] (10)
Row [71]: ch 1, turn, sc in each stitch across (10)
Continue for all sizes
Do not fasten off
sc down the side of the front panel
Fasten off, weave in the ends.
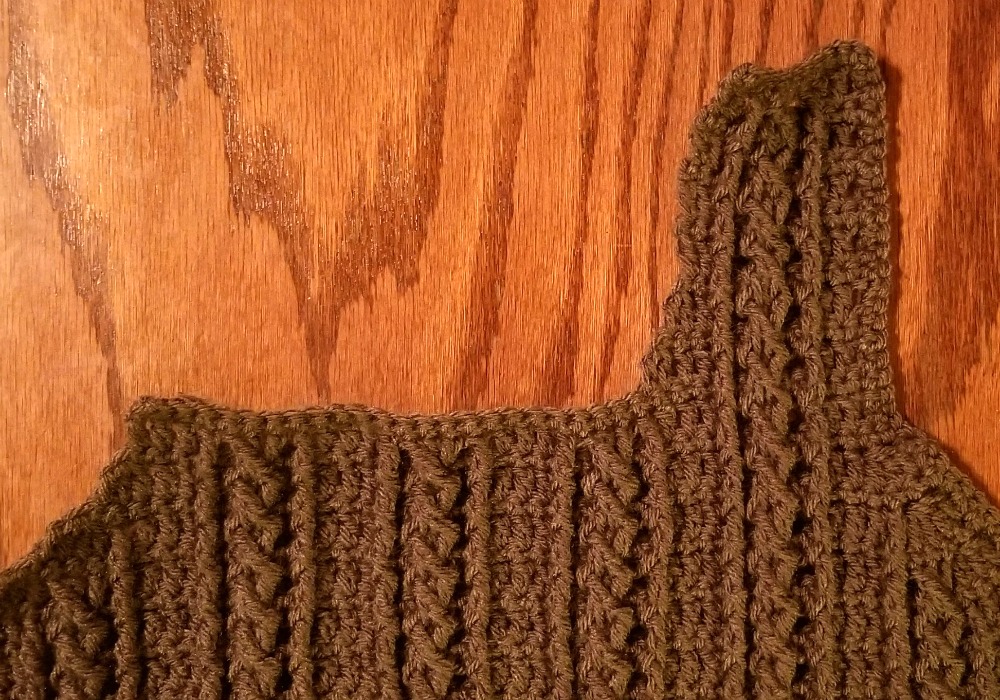
Join to row 52 (54) [56], 12 stitches in from the left
Row 52 (54) [56]: ch 3, dc2tog, dc in next 2, fptr around next dc, skip one stitch, fptr around next 2 dc’s, working in front of the last 2 stitches, fptr over the skipped dc, fptr in next dc, dc in last 3 stitches (11)
Row 53 (55) [57]: ch 1, turn, sc in each stitch across (11)
Row 54 (56) [58]: ch 3, turn, dc2tog, dc in next stitch, fptr around next dc, skip one stitch, fptr around next 2 dc’s, working in front of the last 2 stitches, fptr over the skipped dc, fptr in next dc, dc in last 3 stitches (10)
Row 55 (57) [59]: ch 1, turn, sc in each stitch across (10)
Row 56 (58) [60]: ch 3, dc in first 2 stitches, fptr around next dc, skip one stitch, fptr around next 2 dc’s, working in front of the last 2 stitches, fptr over the skipped dc, fptr in next dc, dc in last 3 stitches (10)
Row 57 (59) [61]: ch 1, turn, sc in each stitch across (10)
Row 58 (60) [62]: repeat row 56 (58) [60] (10)
Row 59 (61) [63]: ch 1, turn, sc in each stitch across (10)
Row 60 (62) [64]: repeat row 56 (58) [60] (10)
Row 61 (63) [65]: ch 1, turn, sc in each stitch across (10)
Row 62 (64) [66]: repeat row 56 (58) [60] (10)
Row 63 (65) [67]: ch 1, turn, sc in each stitch across (10)
Stop here for size S
Continue for M & L
Row (66) [68]: repeat row (58) [60] (10)
Row (67) [69]: ch 1, turn, sc in each stitch across (10)
Stop here for size M
Continue for size L
Row [70]: repeat row [60] (10)
Row [71]: ch 1, turn, sc in each stitch across (10)
Continue for all sizes
Do not fasten off
sc down the side of the front panel
Fasten off, weave in the ends.
BACK PANEL
Ch 52 (60) [68] (or however many was used for the front panel)
Row 1: sc in 2nd ch from the hook and across (51 (59) [67])
Row 2: ch 1, turn, sc in each stitch across (51 (59) [67])
Row 3: ch 1, turn, sc in each stitch across (51 (59) [67])
Row 4: ch 3, turn, dc in each stitch across (51 (59) [67])
Row 5: ch 2, turn, sc in each stitch across (51 (59) [67])
Repeat rows 4 & 5 to row 41 (43) [45] (51 (59) [67])
Row 42 (44) [46]: ch 3, turn, dc2tog, dc in each stitch across to last 2 stitches, dc2tog
Row 43 (45) [47]: ch 1, turn, sc in each stitch across (49 (57) [65])
Row 44 (46) [48]: ch 3 turn, dc3tog, dc in each stitch across to last 3 stitches, dc3tog
Row 45 (47) [49]: ch 1, turn, sc in each stitch across (45 (53) [61])
Row 46 (48) [50]: ch 3, turn, dc4tog, dc in each stitch across to last 4 stitches, dc4tog
Row 47 (49) [51]: ch 1, turn, sc in each stitch across (39 (47) [55])
Row 48 (50) [52]: ch 3, turn, dc3tog, dc in each stitch across to the last 3 stitches, dc3tog
Row 49 (51) [53]: ch 1, turn, sc in each stitch across (35 (43) [51])
Row 50 (52) [54]: ch 3, turn, dc in each stitch across (35 (43) [51])
Repeat rows 49 (51) [53] & 50 (52) [54] to row 57 (61) [65] (35 (43) [51])
Do not fasten off
sc down the side of the back panel
Fasten off, weave in the ends
Join yarn to the other side of the panel and sc down the side
Fasten off, weave in the ends
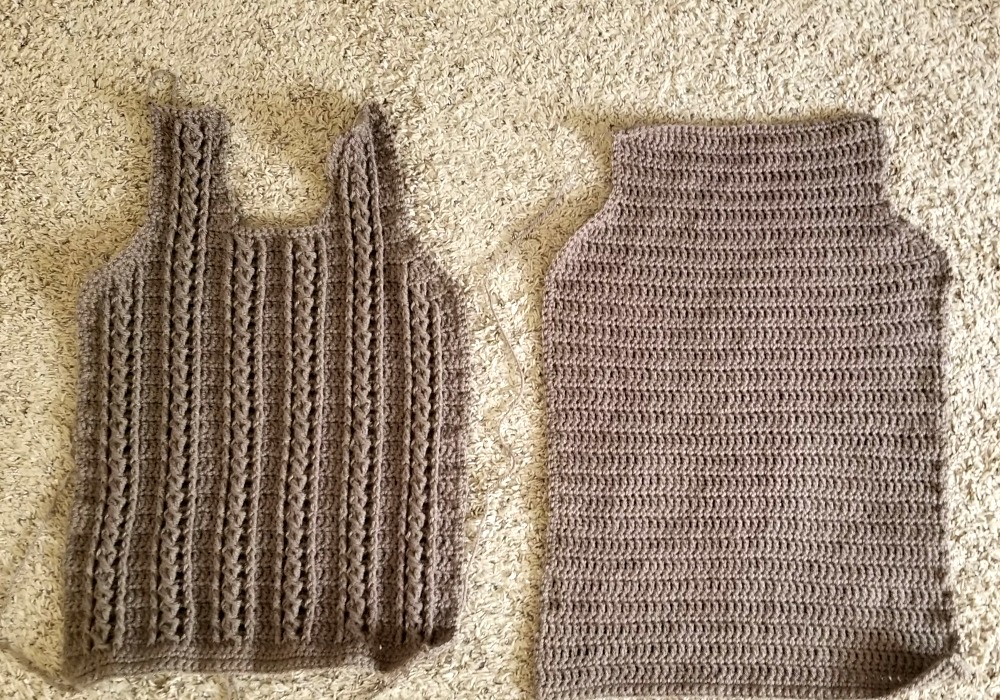
Lay both pieces together, wrong side out. Use stitch markers to line the pieces up evenly. Leave openings for the armholes and the neck
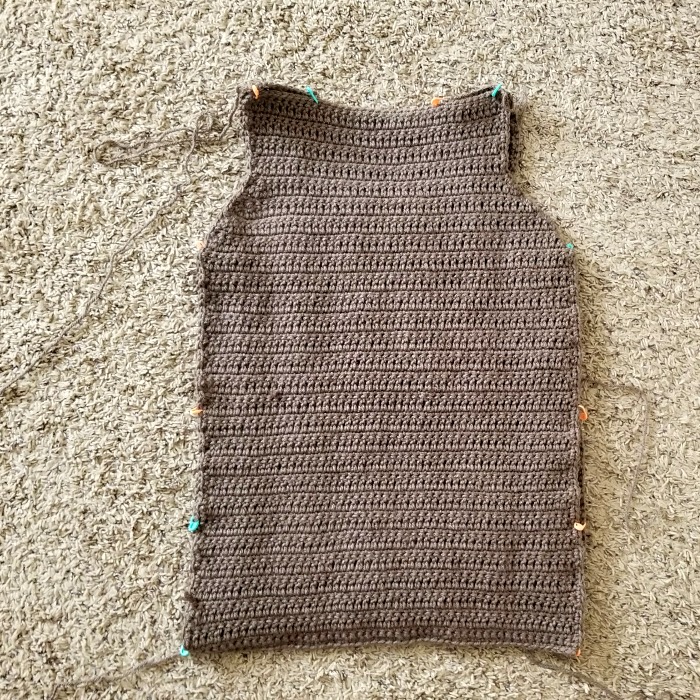
Sew the pieces together with a whipstitch, weave in all your ends. Turn right side out.
Join yarn to the neck hole, ch 1, sc evenly around the neck, fasten off and weave in the ends
SLEEVES
Join yarn to the bottom of the armhole
Round 1: ch 3, *dc, dc2tog* repeat from * to * around, join to first dc with sl st
Round 2: ch 1, sc in each stitch across, join to first sc with sl st
In the next round there will be further shaping in the arms, if you don’t want the sleeves longer skip round 3 and go to round 5
Round 3: ch 3, *dc in 2 stitches, dc2tog* repeat from * to * around, join to first dc with sl st
Round 4: ch 1, sc in each stitch around, join to first sc with sl st
Round 5: ch 3, dc in each stitch around, join to first dc with sl st
Repeat rounds 4 & 5 to round 28
Round 29: ch 3, *dc in 3 stitches, dc2tog* repeat from * to * around, join to first dc with sl st
Repeat rounds 4 & 5 to round 36 (38) [40]
Round 37 (39) [41]: ch 3, *fptr around dc from previous dc row, dc in next* repeat from * to * around, join to first dc with sl st
Round 38 (40) [42]: ch 1, sc in each stitch around, join to first sc with sl st
Round 39 (41) [43]: ch 3, *fptr around fptr from previous dc row, dc in next* repeat from * to * around, join to first dc with sl st
Round 40 (42) [44]: ch 1, sc in each stitch around, join to first sc with sl st
Fasten off, weave in the ends.
Repeat pattern for other sleeve.

Looking for more patterns? Follow me on Facebook, Instagram, and Pinterest! Please share a pic of your finished product with me. I’d love to see it!

NEVER MISS A PATTERN!
Sign up for my newsletter and receive a FREE ebook with 3 of my favorite patterns PLUS patterns straight to your inbox. You’ll also get a heads up about upcoming giveaways, events, and crochet alongs.


Very beautiful pattern, thank you! I am thinking of making this year a year of sweaters, so I’ll pin it to have it in mind!:)))
Thank you!
Beautiful! Beautiful! … And yes, it fits you oh-so-perfectly! Thank you for making it free.
Am sure you can sell it in Ravelry. Plan on making it but when? I make most all my gifts and I am constantly deluged with projects. I did store it in a file. So cool!!
Thank you!
Hey, thanks for a great pattern, I have just made it for my best friend. I made it longer and baggier, the pattern worked well!
Awesome! Thank you!
Question: line 6 written instruction do not match the pictorial written instructions. When do we use fpdc stitch or is it all fptr stitch?
Thank you for fixing row 6 and pictorial pics; howevever, straying at row 42 of Front panel the use of fpdc is used again. Is the fpdc used at all in this pattern.
Gah! No, it was a typo I made in row 6, and then I think I copy and pasted for each row that had cables. It’s fixed! SORRY!! 😀
I have searched the Internet high and low for a crochet cable sweater and your pattern is my favourite plus the easiest to follow. Good job. I just started the sweater I will let you know if I have any more questions.
Can you give the gauge for this pattern? I started making a medium with a 5.00 mm hook and it was about 16” wide (I crochet on the tight side).
Hi! The gauge is 12 dc = 4″, 7 rows = 4″
Just curious about the back panel, which I just started, it has less rows than the front panel. Are the front and back supposed to be different lengths?
Yes, just a couple rows. Sew the sides together evenly. Then when you sew the shoulders closed the front will fold down just a little bit. I hope that makes sense? 🙂
I love this sweater! I have a question though. I just started working on it and am making the size small with a starting chain of 52. When I get into the cable making row, (row 6) how many cable rows should I end up with and how many double crochets on each end? I have the three double crochets, 7 cables, and then just one double crochet on the other end. I bet it’s supposed to be even but it’s not, and I had the stitches at the right count beforehand. It would be helpful if you could include in the pattern, how many cable rows and stitches we should have total after that first row. Can you help me out? Thank you! I really want to be able to make this correctly.
Hi! You should have a total of 51 stitches and 6 cables. Make sure when you are doing the front post stitches that you are skipping the sc.
Thank you! That’s exactly what I did wrong!!
Hi…love this pattern but my straps arent in the right place. I chained across 92 and now I dont know how many stitches do across from row 52 and on.
I’m updating the pattern with ending stitch numbers right now 😀
Hi Brenn
Thank you, such a lovely jersey. You are so kind to share it for us to just copy.
People comment on things I make, but all the credit goes to you. You are amazing, thanks again.
Oh my goodness, you are too sweet. Thank you so much!!
Hi Beautifull sweater,could i make it with worsted weight yarn ?
Thanks! The pattern is written in worsted weight yarn 🙂
With the front and back panels have different amounts different rows, should I add equal rows to the back if add to the front?
Yes
I’ve been struggling to learn cables for a while. The step by step pictures of row 6 got me through!! Thank you many times over!! One change I’ve made is I’m tacking down the loose sc’s behind the cables. Loving working your pattern
Awesome! Thank you!
It’s a beautiful sweater! I love it!